Building your PC is one of the most exhilarating tasks for tech enthusiasts, and the best part is that anyone can make their PC. It doesn’t matter whether you are a gamer, a professional, or an office user. Building your PC is simple and also quite satisfying.
How difficult is it to build a PC, particularly for a newbie?
Building a PC isn’t a difficult task. It may seem unsafe, but it is generally quite logical and straightforward. The chances of accidents are low to nil if you have a general idea of what you are doing.
You do not need to be a tech expert to build a PC. After all, you are not INVENTING the PC. You are just putting the parts together like pieces of Lego – how difficult can that be?
Plus, I would advise everyone to build their PCs. It gives you first-hand knowledge of how all the parts fit together. This knowledge can help you troubleshoot various hardware-related issues in the future too. And, of course, PC building is a skill you can also capitalize on in the future.
There are essentially two parts to building your PC. Firstly, you have to buy the right parts that are compatible. Secondly, you have to put them all together.
In the following text, I will talk in detail about how difficult it is to build a PC by particularly looking at the core components and how to buy the right parts.
TABLE OF CONTENTS
So How Difficult Is It to Build a PC?
Building a PC is straightforward if you have all the right parts.
As such, the first step to building any PC is to procure the right parts.
You have to make sure that the four core components, i.e., the motherboard, CPU, RAM, and Power Supply Unit, are all compatible with each other, to begin with.
Choosing the Right Parts for Your PC Build
Step 1: Choose the CPU First
Choosing the CPU should be the first step for any PC build.
The choice of your CPU directly impacts the intention of your motherboard.
The CPU not only defines the overall performance grade of your build but also loosely defines the overall budget of your PC.
To have parity, you would then choose the correct motherboard. For instance, if you choose an entry-level CPU, you would naturally pair it with a budget motherboard.
Similarly, if you choose to go for a high-end CPU, you would pair it with a premium motherboard to avoid any bottleneck or issues caused by a low-quality motherboard.
In terms of performance, both Intel and AMD have a hierarchy.
Intel commercial CPUs rank as such in terms of performance and price:
- Intel Core i9 – Most Powerful – Most Expensive
- Intel Core i7
- Intel Core i5
- Intel Core i3
- Intel Pentium
- Intel Celeron – Least Powerful – Least Expensive
AMD commercial CPUs rank as such in terms of performance and price:
- AMD Ryzen 9 – Most Powerful – Most Expensive
- AMD Ryzen 5
- AMD Ryzen 3
- AMD Athlon – Least Powerful – Least Expensive
You must gauge your requirements to choose the right CPU for yourself.
Intel Pentium would be sufficient for you if you are an office user.
If you are a gamer on a budget, an Intel Core i3 can be the way to go. Enthusiasts, gamers, and intermediate editors/designers can choose the Intel Core i5.
Professionals, designers, gamers, and streamers may prefer to choose the likes of Core i7/Core i9 CPUs.
Also Read: Is Intel Pentium Good for Gaming?
I highly recommend using popular benchmark scores to measure or compare a specific CPU’s performance. I would recommend PassMark and Cinebench R15/R20/R23.
Also Read: How is Processor Speed Measured?
CPU Defines the Motherboard Socket
One of the essential parameters the CPU defines is the Motherboard Socket.
A motherboard’s CPU socket is essentially the physical placeholder where the CPU sits on the motherboard.
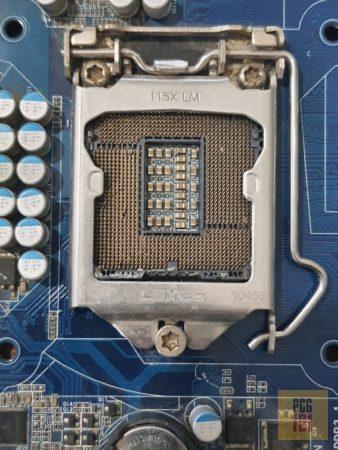
Different CPU models and generations may require a different socket.
The following table shows the newer desktop motherboard sockets and their compatible CPUs.
| Brand | Motherboard Socket | Type | CPU Supported | Pins |
|---|---|---|---|---|
| Intel | LGA1151 | LGA | – Intel 7th, 8th and 9th Gen Celeron, Pentium and Core CPUs | 1151 |
| LGA1200 | LGA | – Intel 10th and 11th Gen Celeron, Pentium and Core CPUs | 1200 | |
| LGA1700 | LGA | – Intel 12th Gen Celeron, Pentium and Core CPUs | 1700 | |
| LGA2066 | LGA | – Intel Core Extreme 7th, 8th, 9th, 10th Gen – Intel Xeon Skylake-W and Cascade Lake-W | 2066 | |
| AMD | AM4 | PGA | AMD Athlon and Ryzen 1000, 2000, 3000, 4000, 5000 | 1331 |
| sTRX4 | LGA | AMD Threadripper 3000 series | 4094 |
CPU With or Without an Integrated Graphics Card
There are two types of CPUs:
- CPUs that do come with an integrated graphics card.
- CPUs that do not come with an integrated graphics card.
This idea can have huge ramifications on your PC build.
If you choose NOT TO buy a separate dedicated graphics card for your PC, you MUST have a CPU with an integrated graphics card. Otherwise, your PC will have NO display ability.
Motherboards DO NOT have onboard graphics. As such, the video output ports located on the back I/O panel of the motherboard rely on the CPU’s integrated graphics card to output the display.
Both Intel and AMD have CPUs that do not offer integrated graphics on their CPUs.
With Intel, CPUs with an “F” suffix LACK an integrated graphics card (the rest OFFER). Examples include the Intel Core i5 11400F and Intel Core i3 10100F.
With AMD, CPUs with the “G” suffix HAVE integrated graphics (the rest DO NOT OFFER). Examples include AMD Ryzen 5 3400G and AMD Ryzen 7 5700G.
Read an in-depth article on this: Do Motherboards Have Integrated Graphics?
Step 2: Choosing the Right Motherboard
Once the CPU is decided, you can choose the right compatible motherboard.
The first and foremost vital spec to consider is the CPU socket. The motherboard socket MUST match the socket requirement of the CPU.
I talked about the motherboard sockets and the CPUs supported in the table above.
Also Read: How to Check What Motherboard Socket You Have?
The next step is to choose the right motherboard chipset.
Intel and AMD have different motherboard chipset series catering to different budgets and needs.
Intel Chipsets
| H Series, such as H510 | For budget builds |
| B Series such as B560 | They are similar to the H series but are considered for mid-range builds. |
| Z Series, such as Z590 | For premium builds. The only Intel chipset that offers to overclock support. |
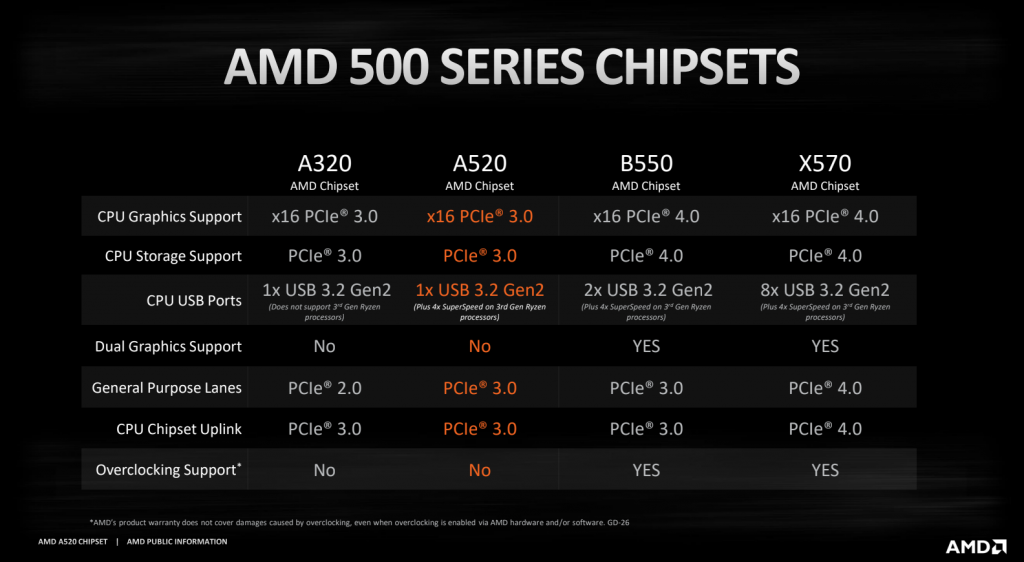
AMD Chipsets:
| A Series, such as AMD A520 | Entry-Level chipset for budget builds |
| B Series, such as B550 | Mid Range chipset, for most gamers |
| X Series, such as X570 | For Enthusiasts and high-performance PC builds |
The chipset defines various aspects of the motherboard, including:
- The supported CPU socket
- The amount of PCIe lanes it offers
- The amount of PCIe slots and M.2 slots
- The version of the PCIe protocol
- The amount and arrangement of USB slots
- The amount and version of SATA slots
- The amount, size, and quality of VRMs
- Multi GPU support
- Overclocking support
To get a better grasp of the concepts above, I recommend reading the following:
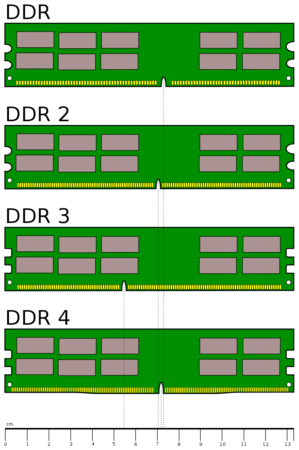
Step 3: Choosing the Right RAM
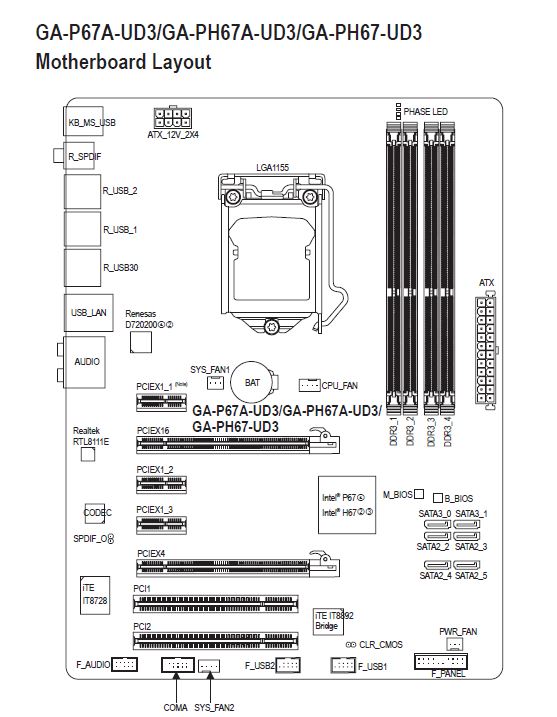
To choose the right RAM sticks, you must first figure out the RAM type supported by your motherboard.
You can determine the RAM type your motherboard supports by looking at its spec sheet.
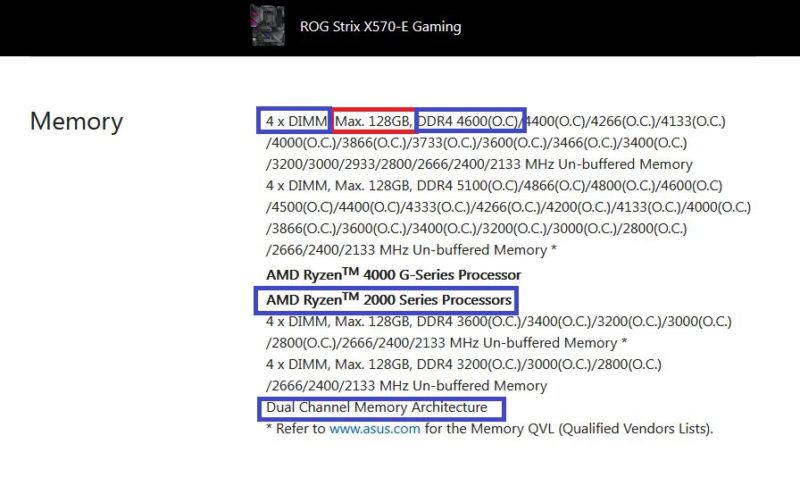
For instance, in the specification for ASUS ROG Strix X570E above, you can find a wealth of information regarding the RAM it can support.
- Marked in Red is the TOTAL RAM the motherboard can support, i.e., 128 GBs.
- It also talks about the number of slots, i.e., 4. You can use this information to deduce the amount of memory each slot can support, i.e., 128 GBs / 4 Slots = 32 GB stick per slot.
- You can also find out the maximum RAM frequency the motherboard can support. Generally, DDR 4 RAM sticks are rated at about 2666 Hz – 3200 Hz. Anything higher than this is considered expensive and professional grade.
Most of the newer motherboards support DDR4 RAM. It should be noted that the RAM type is not cross-compatible. You cannot use DDR3 RAM on a motherboard supporting DDR4 RAM.
Also Read: How to Tell if RAM Will Work With Your Motherboard?
For primary office and home-use PC builds, 8 GB DDR4 is more than enough. For gaming and intermediate levels of editing work, you can choose to go for 16 GBs DDR4. Professionals may prefer 32 GBs DDR4.
Anything higher than 16 GBs is highly specialized and beyond the average user’s need.
Step 4: Choosing a Dedicated Graphics Card (Optional)
Choosing a dedicated graphics card is optional. A dedicated graphics card is a powerful graphics processing unit that goes into the PCIe slot on your motherboard.

A dedicated graphics card is often far more potent than an integrated one. An integrated graphics card (iGPU) comes built into the CPU.
As mentioned in step 1: CPU section above, if you choose not to buy a dedicated graphics card, then you must select a CPU that does have an iGPU and a motherboard with video output ports located on the back I/O panel; otherwise, your PC will have no display capability.
Integrated Graphics vs. Dedicated Graphics Cards
The following chart shows how the different iGPUs and dedicated GPUs compare regarding their G3DMark scores.
| GPU | G3D Mark |
Notes |
| Intel UHD 630 | 1395 | Integrated; As found on 8-10th Gen Intel CPUs |
| Nvidia GeForce GT 740 (MSRP $79) |
1543 | Dedicated; GPU Basic |
| Intel UHD 750 | 1684 | Integrated; As found on 11th Gen+ Intel CPUs |
| AMD Radeon Vega 3 (2018 Version) |
1071 | Integrated; AMD 2000 Series APU |
| AMD Radeon Vega 6 (2018 Version) |
1274 | Integrated; AMD 2000 Series APU |
| AMD Radeon Vega 8 (2018 Version) |
1704 | Integrated; AMD 2000 Series APU |
| Intel UHD 770 | 1928 | Integrated; As Found on 12th Gen Intel CPUs. |
| Intel Iris Pro 580 | 2044 | Integrated; Found on premium laptops. |
| AMD Radeon Vega 11 (2018 Version) |
2139 | Integrated; AMD 2000 Series APU |
| Nvidia GeForce GT 1030 ($79) |
2613 | Dedicated; GPU Entry Level |
| AMD Ryzen 5 5600G Vega 7 Graphics |
2639 | Integrated; As found on the Ryzen 5600G |
| AMD Ryzen 7 5700G Vega 8 Graphics |
2708 | Integrated; As found on the Ryzen 5700G |
| AMD Radeon RX 550 ($79) |
2764 | Dedicated;GPU Entry Level |
| NVIDIA GeForce RTX 3080Ti |
26,677 | Dedicated, High End |
Do You Need a Dedicated Graphics Card?
Suppose your motherboard lacks video output ports, or your CPU lacks an integrated graphics card. In that case, you will need to invest in a primary dedicated GPU to enable display capability for your PC.
Otherwise, you do not need a dedicated graphics card if your PC is not for gaming or professional designing/editing work.
Read in Depth: Does Your PC Need a Graphics Card If It’s Not for Gaming?
Step 5: Choosing the Storage
There are two types of storage derives:
- Hard Disk Drives (HDD)
- Solid State Drives (SSD)
HDDs are your average spinning drives that connect to the SATA ports. They are slower but offer substantial storage capacities for cheap.
SSDs, on the other hand, are multiple times faster than an HDD but are expensive.
There are two types of SSDs: SATA SSDs and NVMe SSDs. SATA SSDs connect to the SATA slots and are much slower than the NVMe SSDs.
NVMe SSDs use the PCIe protocol and are much faster.
I would personally recommend going for the NVMe SSDs. They are expensive, but the speed gains they offer are matchless.
| Storage Type |
Typical Read Speeds |
| Hard Disk Drive | 200 MB/s |
| SATA SSD | 550 MB/s |
| Gen 3 NVMe SSD | 3500 MB/s |
| Gen 4 NVMe SSD | 5500 MB/s |
- Gen 3 NVMe SSD uses the PCIe 3.0 interface, while Gen 4 NVMe uses the PCIe 4.0 interface.
As you can see, NVMe SSDs are lightning fast as compared to HDD or SATA SSD.
NVMe SSDs require an M.2 slot to connect to. Fortunately, almost all of the newer motherboards have one or two M.2 slots for attaching the NVMe SSDs.
As for the cost, currently, the NVMe SSDs are getting ever-cheaper. They are still more expensive than HDDs but within reach of almost all PC builders.
- HDD – A Good 2 TB Seagate BarraCuda 7200 RPM drive costs about $55. (~$0.0275 per GB)
- SATA SSD – An average 500 GB SATA SSD costs $60 (~$0.12 per GB)
- Gen 3 NVMe SSD – Samsung Evo 970 1 TB costs about $110 ($0.11 per GB).
Surprisingly, the NVMe SSDs are cheaper or on par with the SATA SSDs, yet they offer far greater speeds.
NVMe SSDs are about four times as expensive as an HDD, but they are still highly recommended as your primary drive due to their speeds.
Do note that to use a Gen 3 NVMe SSD, you must have a PCIe 3.0 M.2 slot. To Use Gen 4 NVMe SSD, you must have a PCIe 4.0 M.2 slot.
Also Read:
Step 6: Choosing the Power Supply Unit
Finally, after choosing all the significant components of your PC, you would then choose a Power Supply Unit with a good rating.
The PSU has to provide enough power to the connected components. Unfortunately, determining the total power consumption of your PC components is not as simple as adding up all their TDP Watts.
There is a method for manual calculation, but I generally avoid them
Instead, I would recommend using the following free-to-use calculators to determine the right PSU for yourself:
In addition to the wattage rating of the PSU, you must also take into consideration the following specs:
Power Supply Efficiency Rating
The PSU must meet the 80Plus Standard. 80Plus certification ensures that the PSU will maintain an input-to-output efficiency of at least 80% at all times. Meaning 80% of the power taken from the Wall will be supplied to the PC even in the worst-case scenario.
There are different levels of the 80Plus certification. The more premium, the more efficient the PSU is and the more expensive.

Power Supply Unit Form Factor
There are different PSU sizes and form factors. You must choose the one that can fit into the PC case of your choice.
ATX12V is the most common form factor.
To determine the correct form factor for your PC build, consult your PC case spec sheet.
Step 7: PC Case
PC case can be as basic as a block or as crazy as a spaceship. The most important consideration is that it fits your motherboard and power supply unit.
There are different sizes of motherboards:
- ATX: 12 x 9.6 inches
- Micro ATX: 9.6 x 9.6 inches
- Mini ITX: 6.7 x 6.7 inches
As such, you cannot choose a Mini ITX PC Case if you have an ATX case.
The same applies to the Power Supply Unit.
Other than that, a PC case’s other features are optional. This includes:
- Aesthetics
- Fans
- Front-Panel connectivity ports
- Cable management
- Drive bays and mounting
- Placeholders for AIO cooler
- Dust filters
- RGB lighting
Assembling all the PC Parts
The next part of the answer to the question “how difficult is it to build a PC” is the assembly.
However, building the actual PC is as easy as pie once you have all the right parts.
Motherboard’s Manual is Your Best Friend Here
A motherboard’s manual is your primary guidebook for building your PC. Always have that with you to determine the location of various connects and ports.
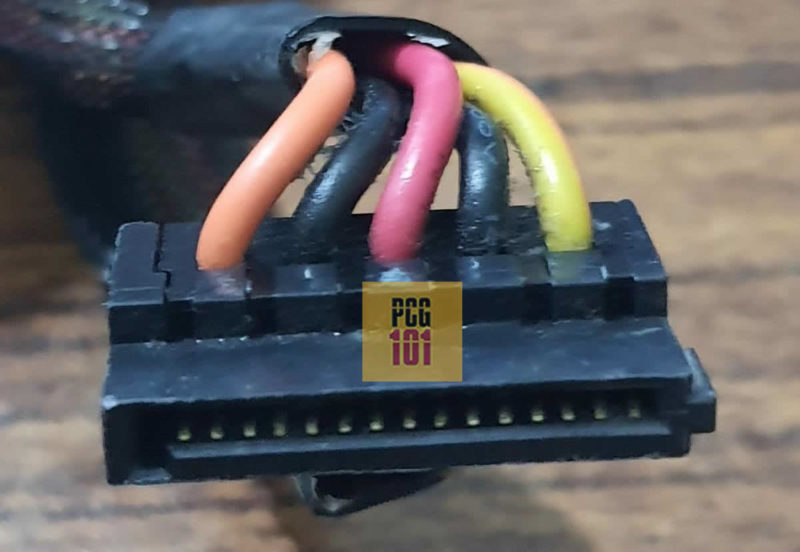
Cables and Where They Connect
One confusing and challenging aspect of PC building for newbies is where all the cables go, where to get them from, and what connects to what cables.
The table below should help in demystifying this.
| Cable |
Component it Comes With |
| SATA Data Cables |
Motherboard (Often two provided) |
| SATA Power Cables |
Power Supply Unit |
| PCIe Power Cables |
Power Supply Unit |
| Motherboard and CPU Power Cables |
Power Supply Unit |
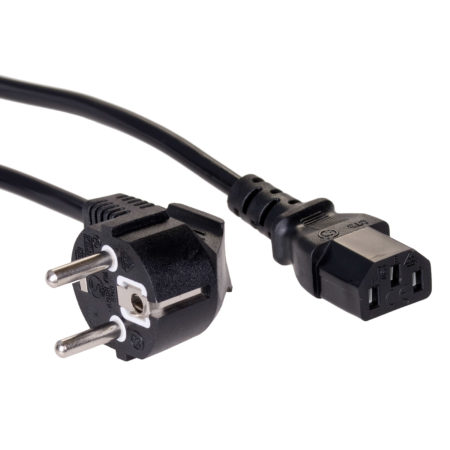
| Main Wall Socket Power Cable |
Power Supply Unit |
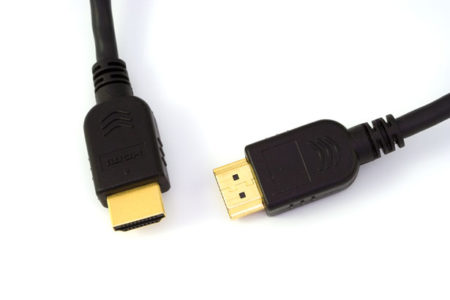
| Video Output Cables |
Monitor |
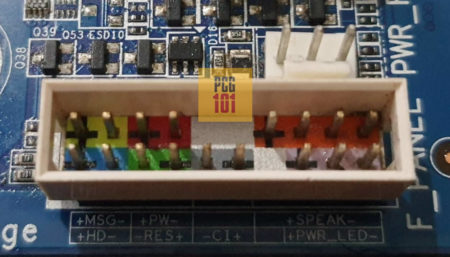
| Front Panel Cables |
PC Case |
| Cables for USB Header |
PC Case |
SATA DATA and SATA Power cables to power up the hard drives.

PCIe power cables are often needed to power up the dedicated graphics card.
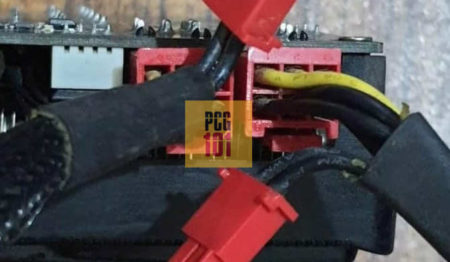
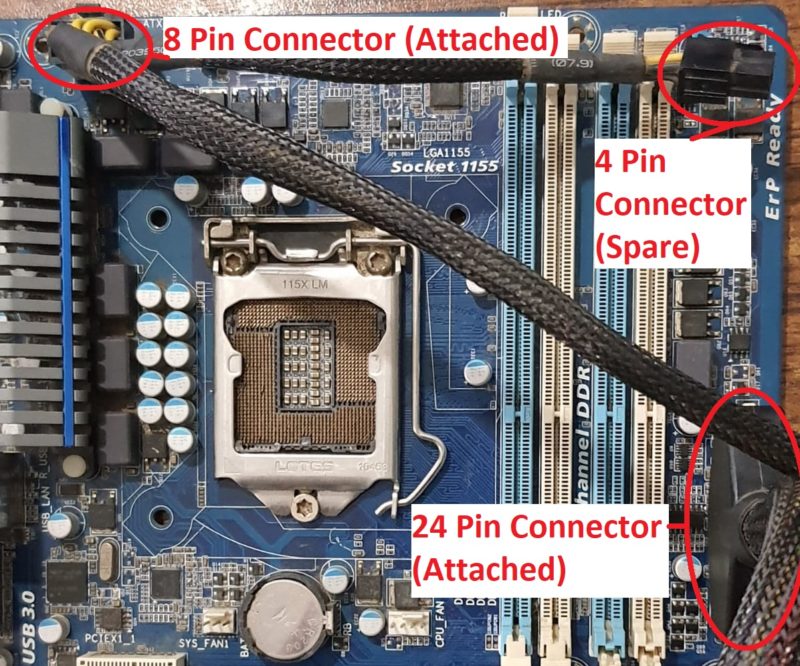
Motherboard and CPU Power cables
24 Pin Motherboard and 8 Pin CPU power cables connect to the motherboard.
Main Wall Socket Power Cable connects PSU to the Wall.
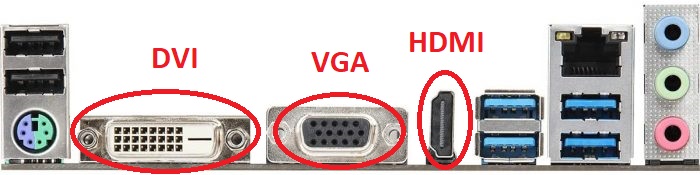
Video output cables such as HDMI, VGA, DP, and DVI cables are provided with the monitor. They connect to the motherboard back I/O port or the dedicated graphics card (if you have one installed).
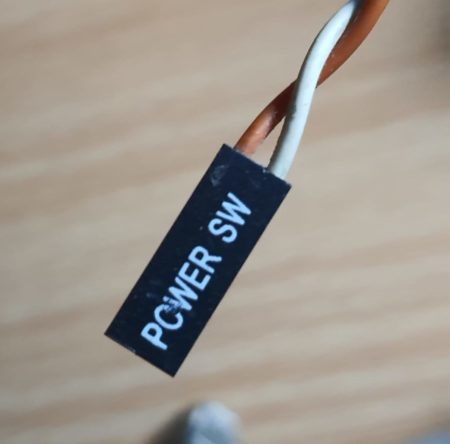
Front Panel Cables for the PC Case connect to the Front Panel Header. They come with the case and include cables for power on, resetting, LED lights, etc.
Also Read:
Cables for USB ports on your PC Case connect to the USB Headers on the motherboard. The cables for this come with the PC case.
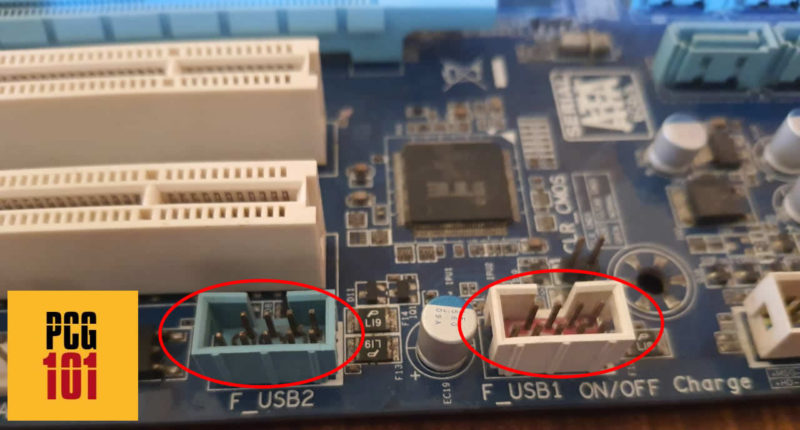
Also Read: What are USB Headers?
Putting All the Parts Together
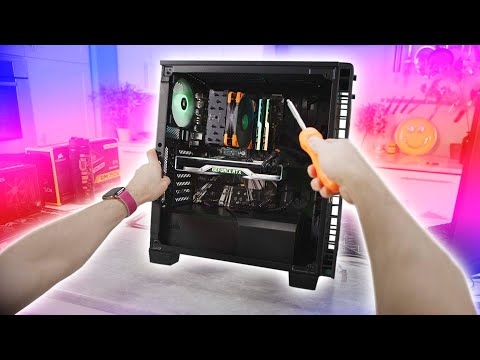
Finally, it is now time to put all the components together. Fortunately, there are resources on the internet that show you just that. Therefore, there is no point in re-inventing the wheel. The following video by Linus shows a step-by-step processor of how the parts are assembled:
Essential steps to note:
- Take the motherboard out and put it on a clean surface.
- Plug the CPU onto the motherboard socket, carefully matching the notches correctly.
- Install RAM carefully matching the notches.
- Install the SSD on the M.2 (if you have bought one), again, matching the notches correctly. Unlike RAM, SSDs will need to be screwed into place.
- Apply thermal paste BEFORE installing the Cooling Fan. This comes with the CPU cooling Fan. Apply only a tiny amount of thermal paste. You do not have to empty the entire thermal paste syringe.
- Install the CPU cooling fan. Most CPUs come with stock CPUs included in the package. High-end CPUs require you to procure separate high-performing cooling fans such as those by Cooler Master or Noctua. Make sure you read the manual or the installation guide of the respective fan you choose to buy. The CPU Cooling fan’s power cable goes into the 4-pin CPU Fan Header on the motherboard.
- Install the Case Fans. Take the Case out of its box and install the Case fans. Many PC Cases do come with fans already installed. If not, then you will need to buy one or two separately.
- Cable management is essential for a neat and clean build when dealing with the PC Case. As mentioned earlier, the Case comes with several cables, including front panel connectors, USB headers, front audio connectors, and Case fans.
- You are installing the motherboard into the PC Case. For this, you must first install the I/O shield to the Case. The I/O shield comes with the motherboard. Make sure that the location of the motherboard standoffs in the Case properly aligns with the form factor of your motherboard.
- Screw the motherboard to the motherboard standoffs in the Case and plug in the cables for the Case Fans, Front Panel Headers, USB Headers, and Front Panel Audio.
- Install the Power Supply Unit into its placeholder by screwing it. Plug the 24-pin motherboard and 8-pin CPU power cables into the motherboard.
- Mount the hard disk drives onto the drive bays (if you have one). Ensure you connect the SATA data cable from the HDD to the motherboard SATA port and the SATA power cable from the PSU to the HDD. You do not need a hard disk drive if you have an M.2 NVMe SSD.
- Install the dedicated graphics card (if you have one) to the PCIe x16 slot on your motherboard. Make sure it is provided with the right amount of PCIe cables. Always use the first PCIe x16 slot for your dedicated graphics card.
- Close the PC Case, plug PSU into the wall socket, and connect the monitor display cable to the motherboard or the dedicated graphics card (if you have one installed).
- Fire up your PC!
Also Read: What Should I Put Under My PC?
Final Words
In this article, I talked in detail about how difficult it is to build a PC with particular attention to buying the right parts.
In my opinion, the actual assembly process of the PC itself isn’t complicated at all. The assembly should not take a couple of hours, even for a complete newbie.
The tricky part is understanding and procuring the correct components while ensuring they are all compatible and cater to your needs.
For more help, you can always email or comment here.
FREQUENTLY ASKED QUESTIONS
1. How much does it cost to build a PC?
The cost of building a PC can vary depending on the components you choose, but generally, a budget PC build can cost around $500, while a high-end gaming PC build can cost upwards of $2000.
2. Can I build a PC without a case?
Technically, it is possible to build a PC without a case, but it’s not recommended as the case helps with cooling and provides protection for the components.
3. What tools do I need to build a PC?
The basic tools you will need to build a PC include a screwdriver, pliers, thermal paste, and zip ties. Some other useful tools include an anti-static wristband and cable ties.
Hi Atif…great article….im planning to build my own PC and it would be great if I got really stuck to ask you….I mean really stuck, I wouldn’t bother you for mundane things. Would it be possible to have an email, I understand you must be really busy….but it’s only as a last resort and who knows if I ever finish one I’ll post you a pic. All the Mike Jennings
Sure, the email is in the contact me page (scroll to the bottom of the website)