There are many reasons why knowing what motherboard socket you have is critical. When buying a CPU or upgrading your CPU, the socket on the CPU and the motherboard must match. So how to check the motherboard socket you have?
There are a few ways to check what motherboard socket you have. Here they are:
- you can check through the manual or the technical sheet of the motherboard itself
- you can physically check for labels on the motherboard
- you can use free and trusted third-party utilities such as CPU-Z
- if you already have a CPU installed, you can check the CPU’s technical sheet to figure out the motherboard socket
In the following text, I will cover these methods in detail. In doing so, I will also talk about the different types of sockets you can expect and briefly discuss the compatible CPUs for the latest motherboard sockets.
Also Read: Where is the CPU Located in a Computer?
TABLE OF CONTENTS
Types of Motherboard Sockets to Expect
There are essentially three types of sockets that you can expect to see:
- LGA Socket – Land Grid Array Socket
- PGA Socket – Pin Grid Array Socket
- BGA Socket – Ball Grid Array Socket
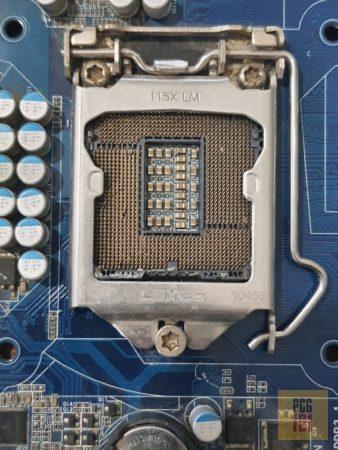
Land Grid Array sockets on the motherboard have pins sticking. The CPUs that mount on this socket type have pads. LGA socket type is generally found on Intel-based motherboards.
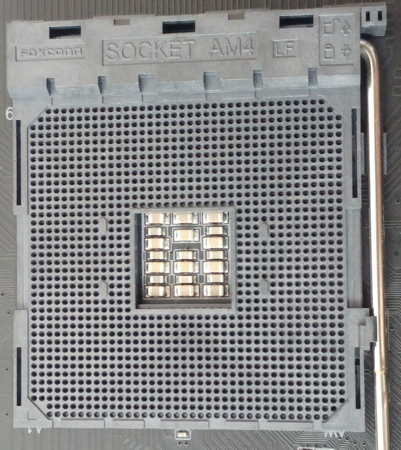
Pin Grid Array sockets on the motherboard have holes. The CPUs that mount this socket type have pins that go into the holes. PGA socket type is generally found on AMD-based motherboards.

Ball Grid Array sockets are soldered with the CPU mounted on top. The CPUs on this socket type are irreplaceable. BGA sockets are found on laptops that Intel and AMD motherboards use for mobile-based CPUs.
For more details, read:
Sockets and CPU Compatibility
The motherboard sockets can vary from model to model and generation to generation.
This means that a motherboard socket for Intel 8th Generation CPUs would NOT be compatible with an Intel 10th Generation CPU.
Therefore, when installing a new CPU or upgrading to a newer one, you must ensure that the CPU and motherboard socket match.
The following table shows the newer desktop motherboard sockets and their compatible CPUs.
| Brand | Motherboard Socket | Type | CPU Supported | Pins |
|---|---|---|---|---|
| Intel | LGA1151 | LGA | – Intel 7th, 8th and 9th Gen Celeron, Pentium and Core CPUs | 1151 |
| LGA1200 | LGA | – Intel 10th and 11th Gen Celeron, Pentium and Core CPUs | 1200 | |
| LGA1700 | LGA | – Intel 12th Gen Celeron, Pentium and Core CPUs | 1700 | |
| LGA2066 | LGA | – Intel Core Extreme 7th, 8th, 9th, 10th Gen – Intel Xeon Skylake-W and Cascade Lake-W | 2066 | |
| AMD | AM4 | PGA | AMD Athlon and Ryzen 1000, 2000, 3000, 4000, 5000 | 1331 |
| sTRX4 | LGA | AMD Threadripper 3000 series | 4094 |
It should be noted that motherboard sockets have different sizes and pin counts. The number after “LGA” identifies the pin count for Intel sockets. So an Intel LGA1151 socket has 1151 pins.
Also Read: How Many Pins Does a CPU Have?
So How to Check Motherboard Socket You Have?
Now that you have been given the primer on the socket type and the short compatibility list of the latest sockets and CPUs, you should be better able to deduce what socket you have.
There are four basic ways to figure out what motherboard socket you have:
- Using the Technical Specsheet of the Motherboard
- Manually Checking for Physical Labels on the Motherboard
- Using CPU-Z – A Free Third Party Software
- Utilizing the CPU Specsheet (If It is Already Installed)
1. Using the Technical Specsheet of the Motherboard
The easiest way to check what motherboard socket you have is to check its spec sheet. Of course, you must know what motherboard to look up to find the correct spec sheet online.
Fortunately, I have written a comprehensive article on this topic: How to Check What Motherboard You Have?
Once you have figured out the make and model of your motherboard, search it up online.
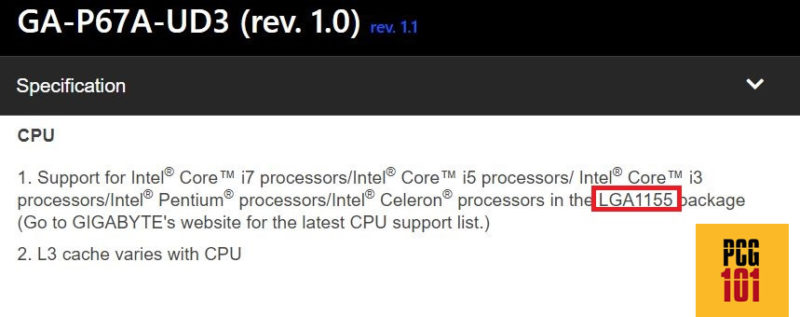
Take, for instance, the following excerpt from the Gigabyte GA-P67A-UD3 spec sheet. Under the CPU section of the spec sheet, you can identify the supported socket type of this motherboard.
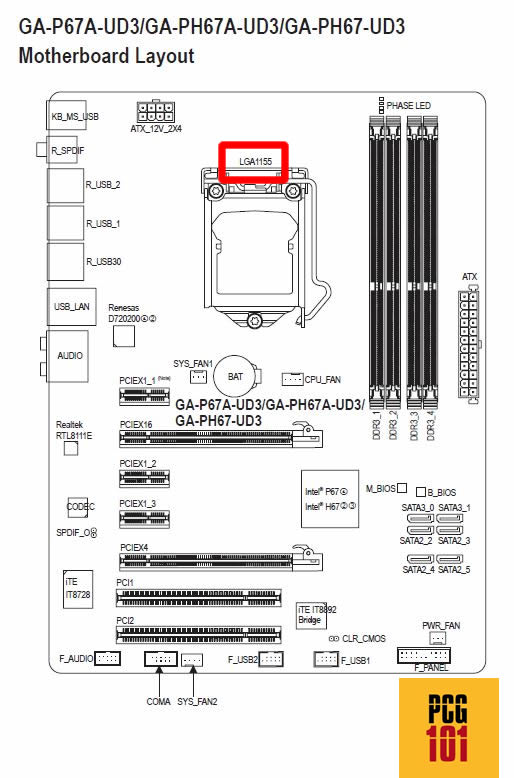
You can also figure out the socket if you have the motherboard manual. In the motherboard manual, head over to the Motherboard Layout page. It should highlight the CPU socket, model, and other components there.
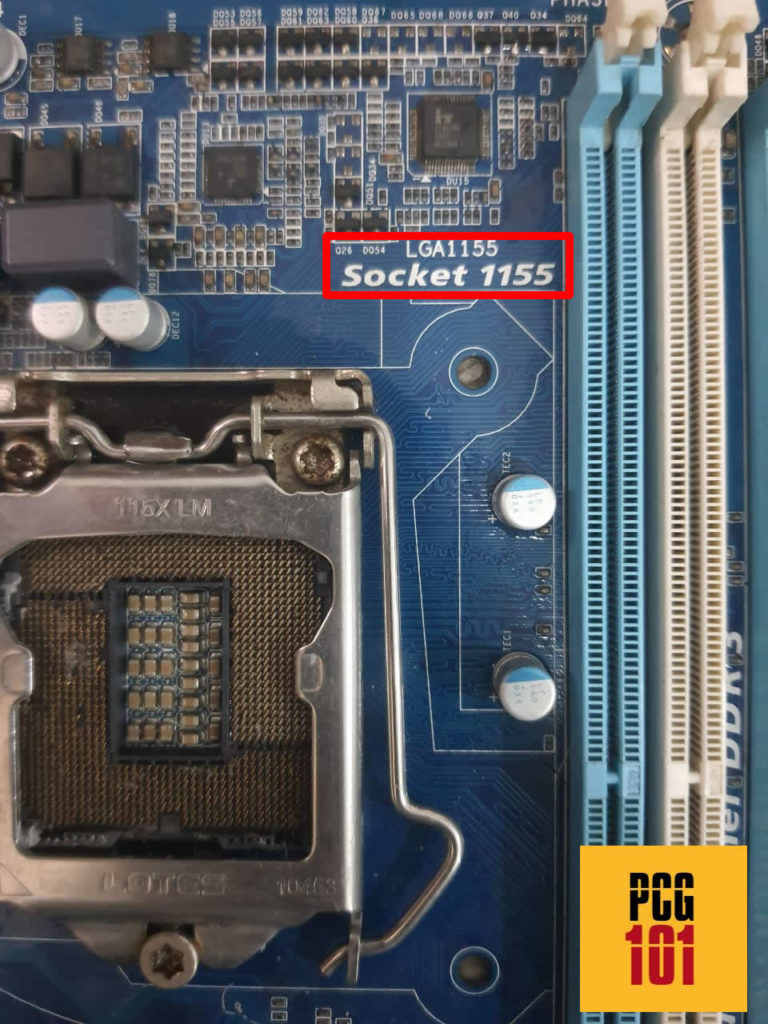
2. Manually Checking for Physical Labels on the Motherboard
Often motherboards have evident labels indicating the different parts on them. This makes finding your way around the motherboard’s other components, ports, and slots easy.
As such, you can also find the motherboard socket model clearly labeled next to it on most motherboards. Therefore, a simple physical inspection can tell you the exact motherboard socket you have.
Of course, this method involves the inconvenience of opening up your PC case.
This method is more feasible for desktops as compared to laptops. Laptops are more difficult to open up for physical inspection, and laptop motherboards are not as clearly labeled as desktop motherboards.
3. Using CPU-Z – A Free Third Party Software
This is personally my favorite method. It is simple and involves a minor inconvenience, in my opinion.
However, this method only works if you have a running system. If you are building a new PC or your PC isn’t operable, this method won’t work.
This method requires downloading and installing CPU-Z, a free but popular third-party utility for monitoring system hardware.
Once the utility is installed, run it, and in the “CPU” tab, look for the field marked as “Package.” This should tell you the exact socket type of the motherboard.
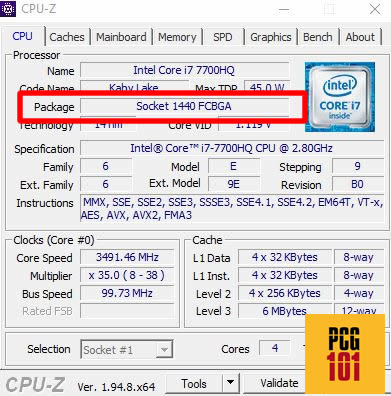
The image above shows that my laptop motherboard has the Socket 1440 FCBGA. This is an Intel-based Ball Grid Array socket with 1440 pins.
4. Using the CPU Specsheet (If It is Already Installed)
The final method to check what motherboard socket you have is to check the socket information of the CPU installed on the motherboard.
Of course, this method considers that you have a CPU already installed that works.
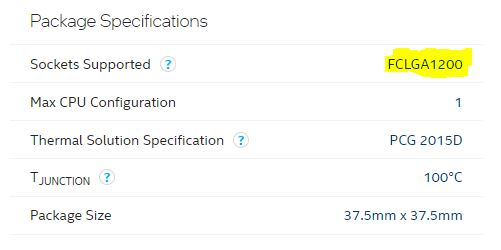
For instance, if you have an i7 10700K installed on the motherboard, its spec sheet above can help you logically deduce that the motherboard socket is also LGA1200.
For instance, you can then use this information to choose an upgrade for the PC. Upgrade to 11th Gen Intel Core i7 11700K since it also uses the LGA1200 socket.
However, you cannot upgrade to 12th Gen Intel Core i7 12700K as it uses the LGA1700 socket and would thus be incompatible with your current motherboard.
Also Read: How to Check What CPU is Compatible with My Motherboard?
Final Words
Before upgrading or buying a new CPU, you MUST learn how to check your motherboard socket.
The last thing you want to do is procure a CPU only to discover that it is incompatible with your current motherboard socket.
Also read: Why Motherboard Is Important
FREQUENTLY ASKED QUESTIONS
1. Can I upgrade my CPU if the motherboard socket is incompatible?
No, you cannot upgrade your CPU if the motherboard socket is incompatible.
CPUs have a specific socket type that is designed to fit into a corresponding socket on the motherboard. If the socket types are not compatible, the CPU will not fit properly and will not function. Upgrading your CPU requires you to ensure that the socket type of the new CPU matches the socket type of the motherboard.
2. What are the common mistakes to avoid when checking the motherboard socket?
When checking the motherboard socket, some common mistakes to avoid include misreading the socket type, not verifying compatibility with the CPU, and not ensuring that the CPU is properly seated in the socket.
Additionally, it’s important to avoid using excessive force when installing or removing the CPU, as this can damage both the CPU and the socket.
3. What are the consequences of using an incompatible CPU with the motherboard socket?
Using an incompatible CPU with the motherboard socket can result in a range of issues, including system instability, crashes, and even permanent damage to the CPU and motherboard.
Incompatible CPUs may not fit properly into the socket or may have different power requirements than the motherboard can provide, leading to poor performance or system failure.
To avoid these issues, it’s important to ensure that the CPU is compatible with the motherboard socket before attempting to install or upgrade the CPU.
Also Read: How Difficult is it to Build a PC?