Minecraft is all about building stuff, so why not start at the beginning by building a suitable PC for the game first?
It does not matter whether you are a beginner or an expert. Minecraft is a game that has deliberately been made so that everyone can enjoy it.
Now Minecraft is generally considered a very light game. After all, it is a game designed to also appeal to kids with nothing more than a primary home-use computer.
The gameplay mechanism essentially mimics Lego. Hence many refer to this game as Lego on PC. This attribute allows the game to be loved by all, young and old.
One of the primary reasons for this being a popular game is thanks to the amount of flexibility you have in the game’s graphics settings, which allows it to run on even a potato PC.
However, once you ramp up the settings to high with many objects to load, things start to change, and the game begins to eat up your CPU and GPU.
So depending upon how deep your pockets are, the type of graphics settings you aspire for, and the complexity of the stuff you build in the game, you could go for an entry-level, mid-range, or advanced PC build for Minecraft.
In this guide, we explore the game’s requirements, talk in detail about the hardware you need to run Minecraft efficiently, and also talk about the PC builds for Minecraft games from different price ranges.

TABLE OF CONTENTS
What is Minecraft?
Minecraft is a sandbox open-world game where you build and craft stuff. Of course, this definition of the game is an oversimplification. Minecraft isn’t a traditional PC game. It is essentially an experience.
Any PC gamer worth their salt would have encountered this popular gaming title at one point. It is a game with a culture behind it, and with 200+ million copies sold, it has established itself as one of the best-selling video games of all time.
What is the Purpose of a Minecraft Player?
The primary purpose of a Minecraft player is to explore a procedural-generated infinite map. Your aim is to discover raw materials, extract them, build tools out of them, and then eventually build very large and majestic structures.
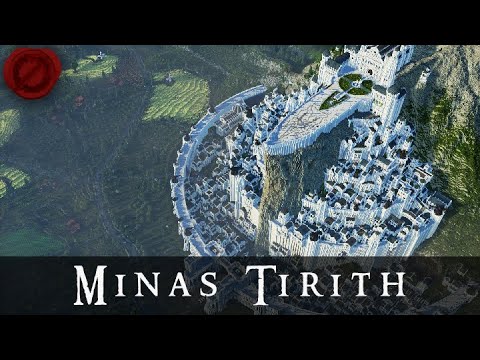
Some Minecraft players actually made an actual replica of Minas Tirith in Minecraft. There is a huge repository of player-generated structures such as this.
There are two popular modes in the game:
- Survival Mode
- Creative Mode
Spare a Sec for a Brief Poll
The following survey will help improve the article and will only take about half a sec for you to complete : )…
Minecraft Survival Mode vs. Creative Mode
In the survival mode, as the name suggests, you have to survive against the forces of nature. You must care for your hunger and health, collect and harvest resources, and build weapons, structures, and simple fortifications to fend off “MOBS.”
The creative mode, on the other hand, is aimed more toward casual builders. You have all the resources available and do not have to worry about health, hunger, or enemies.
Minecraft JAVA Edition vs. Minecraft Windows Edition
There are essentially two versions of the game.
- Minecraft JAVA Edition
- Minecraft Windows 10 Edition (Bedrock)
As far as the content and the gameplay goes, they both are literally the same. They both have similar game modes, updates, command blocks, gameplay mechanics, etc.
The primary difference is in the way that they are coded. As the name suggests, the JAVA edition is coded in the JAVA language, whereas the Windows 10 edition is coded in C++.
Minecraft JAVA edition is the original release. In contrast, the Minecraft Windows Edition is based on the Bedrock Engine. The Windows 10 Edition is referred to as just “Minecraft” by the publisher, but popularly, it is referred to as “Minecraft Bedrock Edition” – due to the engine it uses.
Both editions have their pros and cons. Minecraft JAVA edition is older and has richer content, mods, and graphics.
Minecraft Windows 10, aka Bedrock edition, has crossplay and controller support.
If you are a traditional PC gamer, you may still be interested only in the JAVA edition. However, the Bedrock edition may interest you if you have friends on different platforms.
Minecraft Bedrock Edition and Crossplay
One of the biggest advantages of Minecraft Windows 10 (Bedrock Edition) is that it can be played not just on Windows 10 but also on Xbox, PS, Android, iOS, Nintendo Switch, and even on VR platforms.
This is the edition that brings literally everyone together and is, thus, its biggest selling point.
What is Minecraft Pocket Edition?
Before Minecraft was brought under one umbrella with the Bedrock engine, there were different game versions for different platforms.
Consoles had their version, PC had their version, and mobile devices had theirs.
The version on mobile devices was called the Minecraft Pocket Edition.
It has long been replaced now by the Minecraft Bedrock Edition, which again is known simply as “Minecraft” by the publisher.
Operating Systems Supported By Minecraft
Different versions of Minecraft Support different operating systems:
- Minecraft JAVA Edition: works on Windows, Linux, and Mac OS
- Minecraft (Bedrock Edition): Windows 10, Xbox, PS, Android, iOS, Nintendo Switch, VR Platforms
Unfortunately, the Bedrock Edition is not supported on MacOS and Linux Operating Systems.
Minecraft Hardware Requirements
The official system requirements for a PC for Minecraft are as follows:
Note that the system requirements below are for the JAVA Edition, which is considered more resource intensive than the Minecraft Windows 10 Edition and the Minecraft Pocket Edition.
The JAVA Edition can work on Windows operating systems, macOS, and Linux operating systems.
Minimum Requirements
The following are the minimum system requirements as stipulated officially:
| CPU | Intel Core i3-3210 / AMD A8-7600 APU |
| GPU | Intel HD 4000 / AMD Radeon R5 |
| RAM | 4 GB |
| Hard Drive | 1 GB |
Recommended Requirements
The following are the recommended system requirements as stipulated officially:
| CPU | Intel Core i5-4690 / AMD A10-7800 APU |
| GPU | GeForce 700 Series / AMD Radeon RX 200 |
| RAM | 8 GB |
| Hard Drive | 4 GB (SSD Recommended) |
So at first glance, you can already tell that the minimum and the recommended system requirements for a Minecraft gaming PC are quite old. For instance, the Intel Core i5-4690 mentioned here was released in 2014 and discontinued in 2017.
Hence, to understand the CURRENT HARDWARE REQUIREMENTS, we will need to dissect every hardware specification and benchmark them separately.
In other words, we will use the officially recommended hardware as the reference point for choosing the current-gen hardware.
I. CPU Requirements for Minecraft
So the recommended CPU for this game is the Intel Core i5-4690. As mentioned earlier, this fairly old CPU has long been discontinued.
It has the following specs and benchmarks:
Intel Core i5-4690 – The Official Intel Recommended CPU
| CPU | Specs | Cinebench R15 Score | Passmark Score |
| Intel Core i5-4690 | 3.5-3.9 GHz 4 Cores 4 Threads 22 nm | Single-Core: 152 Multi-Core: 534 | 5579 |
Similarly, the recommended AMD CPU has the following benchmarks.
AMD A10-7800 APU – The Official AMD Recommended CPU
| CPU | Specs | Cinebench R15 Score | Passmark Score |
| AMD A10-7800 | 3.5-3.9 GHz 4 Cores 4 Threads 28 nm | Single-Core: 61 Multi-Core: 239 | 3126 |
We will use these scores as a reference point.
Again, it should be noted that judging by this, the recommended CPU requirement for Minecraft games is minimal. This is mainly because even the entry-level CPUs today are far more efficient than the mid-range CPUs of 2014.
In any case, let us look at the specs and benchmark scores of some of the potential CPUs you can get today for your PC build for Minecraft.
| Product | Level ($RCP) | Clock Speed | Cores/ Threads | Integrated GPU |
|---|---|---|---|---|
| AMD Athlon 3000G | Entry ($50) | 3.5 GHz 14nm | 2/2 | Vega 3 |
| AMD Ryzen 3 3100 | Low ($99) | 3.6 – 3.9 GHz 7nm | 4/8 | NA |
| AMD Ryzen 3 3200G | Low ($99) | 3.6- 4.0 GHz 12nm | 4/8 | Vega 8 |
| Intel Core i3 10100 | Low ($122) | 3.6 – 4.3 GHz 14nm | 4/8 | UHD 630 |
| AMD Ryzen 3 3300x | Low-Mid ($120) | 3.8 – 4.3 GHz 7nm | 4/8 | NA |
| AMD Ryzen 5 34 00G | Low-Mid ($150) | 3.7- 4.2 GHz 12nm | 4/8 | Vega 11 |
| Intel Core i5-10400 | Mid ($182) | 2.9 – 4.3 GHz 14nm | 6/12 | UHD 630 |
| AMD Ryzen 5 3600 | Mid ($199) | 3.6 – 4.2 GHz 7nm | 6/12 | NA |
| Intel Core i5-11600K | High-Mid ($262) | 3.9- 4.9 GHz 14nm | 6/12 | UHD 750 |
| AMD Ryzen 5 5600X | High-Mid ($299) | 3.7- 4.6 GHz 7nm | 6/12 | NA |
A few points to note here
- CPUs that do not have an integrated GPU will not be able to run the video output ports on the motherboard, and thus you will require a discrete graphics card for video connectivity.
- The price mentioned is the Recommended Customer Price, or the Launch Price, and does not reflect the current listing price. The listing price could be lower or higher depending on the market situation.
Comparing Official CPUs to Newer Gen Models
The following are the benchmark scores of the recommended CPUs. They show how the newer CPUs fare against the official recommended CPUs.
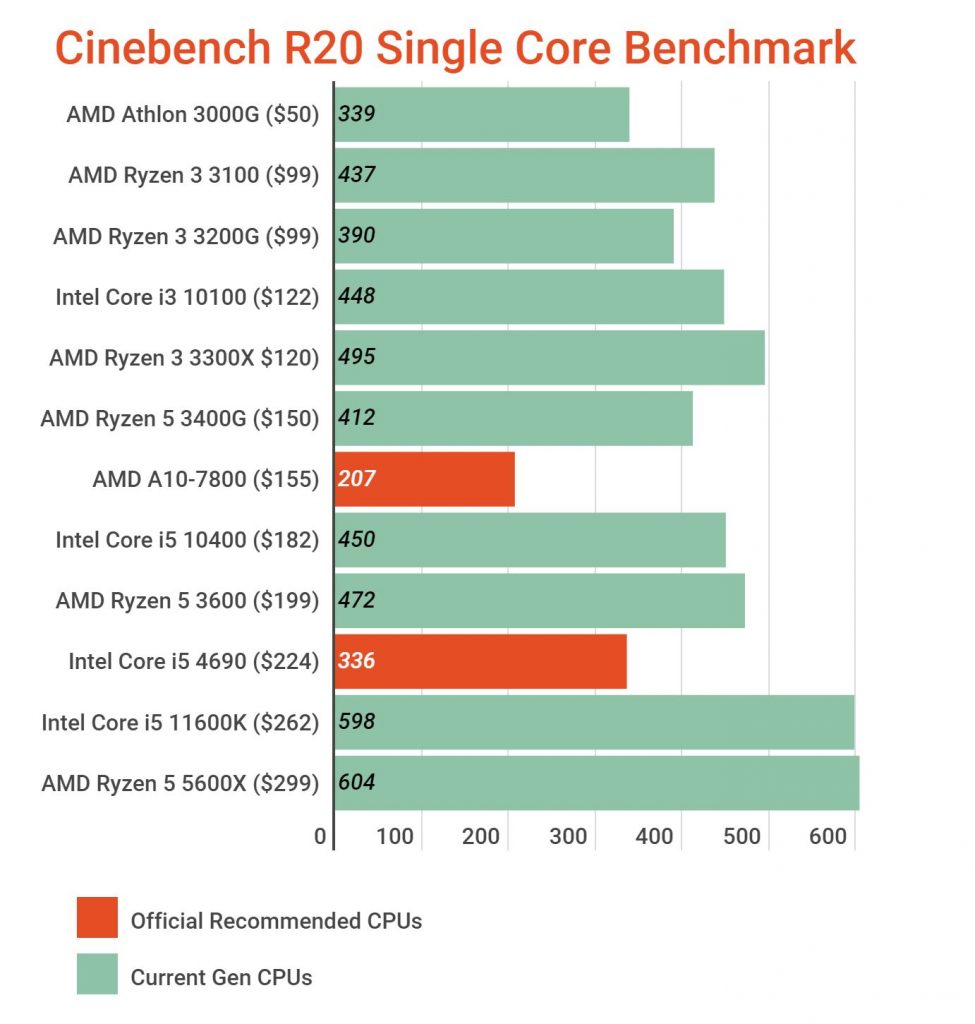
Image: Cinebench R20 Single Core Benchmark Scores. Source: CPUMonkey.com
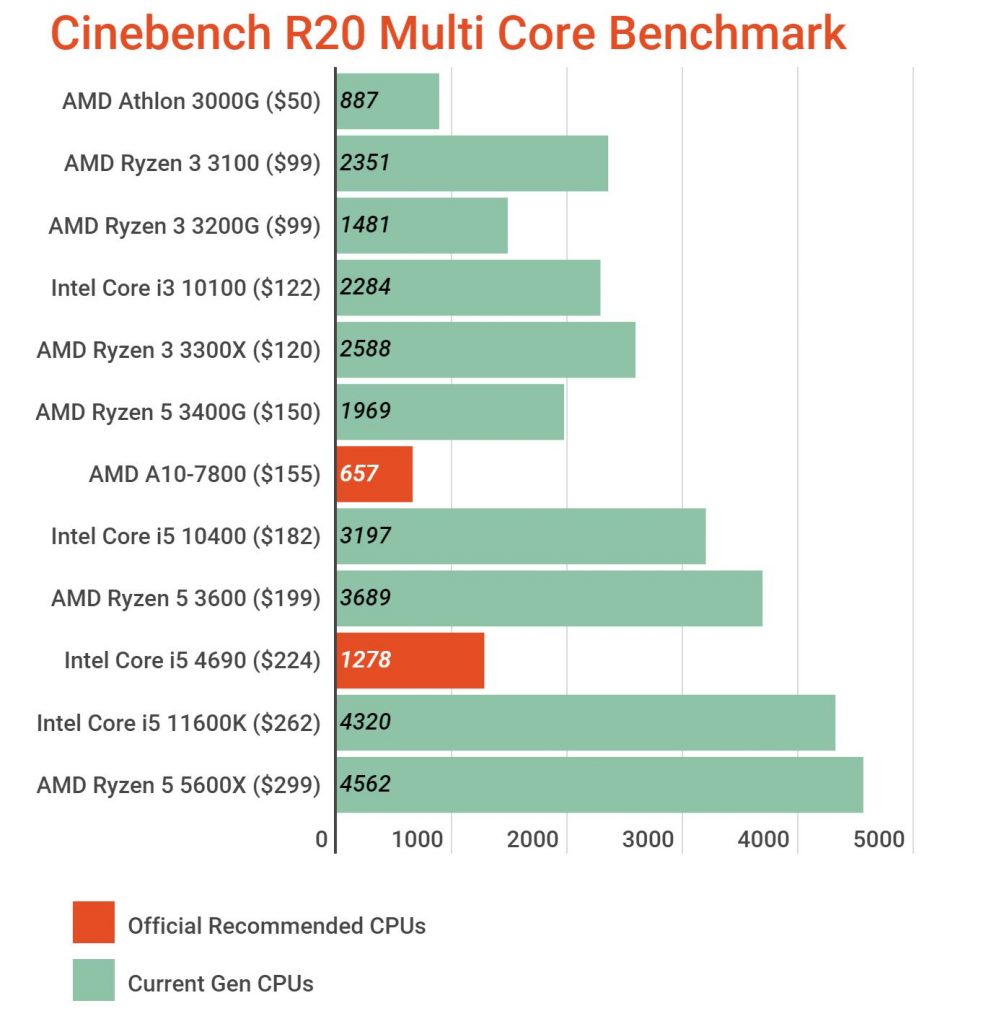
Image: Cinebench R20 Multi-Core Benchmark Scores. Source: CPUMonkey.com
Comparing the official recommended CPUs with the current-gen CPUs, you can see a drastic difference in performance. Even the cheapest AMD Athlon 3000G CPU seems feasible here.
This goes in line with the fact that Minecraft does not require a top of the line hardware.
However, depending on your crafting complexities and graphics settings, you may require a better processor.
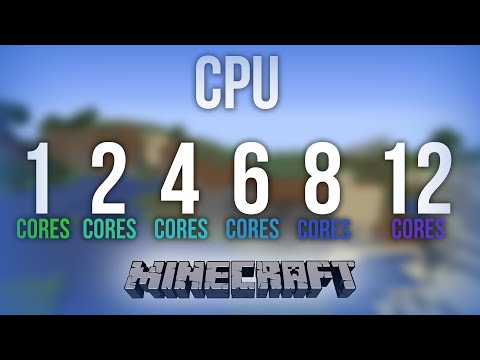
Does Minecraft Benefit from a Higher Core Count?
While you will often hear that Minecraft utilizes no more than two cores at a time, in reality, Minecraft JAVA Edition can distribute the workload for certain tasks IF you have mods like Sodium or Optifine installed.
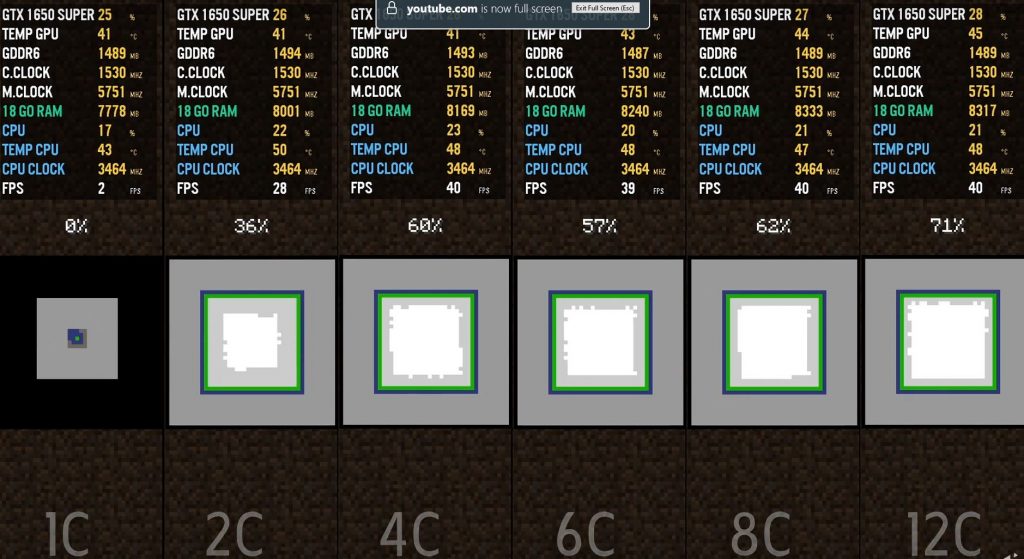
Image: Map Loading Time with 1, 2, 4, 6,8, and 12 Cores. Source: Seaiter YT Channel
The image above shows an example of a task directly benefiting from a higher core count. The Map Loading task shows the 12 Core processor clearly winning the race with 71% of the Minecraft world loaded while a Single Core processor still hasn’t even started loading the map yet at 0%.
This is just one example of a task that requires a high core count. The actual in-game graphics generation and settings, such as the Biome Blend and Render Distance, are hugely impacted by the cores you have.
The following video, albeit in French, shows how having more cores affect the in-game performance. In short, the more cores you have, the quicker the high-quality and complex assets can be loaded.
In light of this, I recommend the following CPUs for different budget ranges.
CPU Recommendations
CPU is THE critical component for a Minecraft gaming PC. Minecraft is a CPU-hungry game, so you should focus on a CPU with the best single-core performance your budget can allow.
1. CPU For ULTRA-BUDGET PC Builds for Minecraft
- AMD Athlon 3000G
If you plan to keep the graphics settings to a bare minimum and if you are perhaps building a PC for Minecraft for your kids, then this should suffice.
It has integrated Vega 3 graphics that should be able to support the game at bare minimum graphics – something I hope your kid will not be annoyed by.
2. CPU For BUDGET Minecraft Builds
- AMD Ryzen 3 3100
- AMD Ryzen 3 3200G
- Intel Core i3 10100
- AMD Ryzen 5 3400G
AMD Ryzen 3 3100 has the best CPU performance of the four mentioned here but does not feature an integrated graphics card. A dedicated GPU will be a must for a build with this CPU.
However, thanks to the better multi-core and single-core performance, this would give you better FPS on settings with a higher Render Distance and Biome Blend.
AMD Ryzen 3 3200G, on the other hand, offers relatively decent Vega 8 integrated graphics, so you may not need to purchase a dedicated GPU here for your budget PC build for Minecraft.
The Intel Core i3 10100 is a bridge between the two CPUs. This CPU has a decent performance, not as good as the Ryzen 3 3100, but it has an integrated GPU, the Intel UHD 630.
The Intel UHD 630 is weaker than the Vega 8 found on the Ryzen 3 3200G but should be able to handle the game at lower graphics.
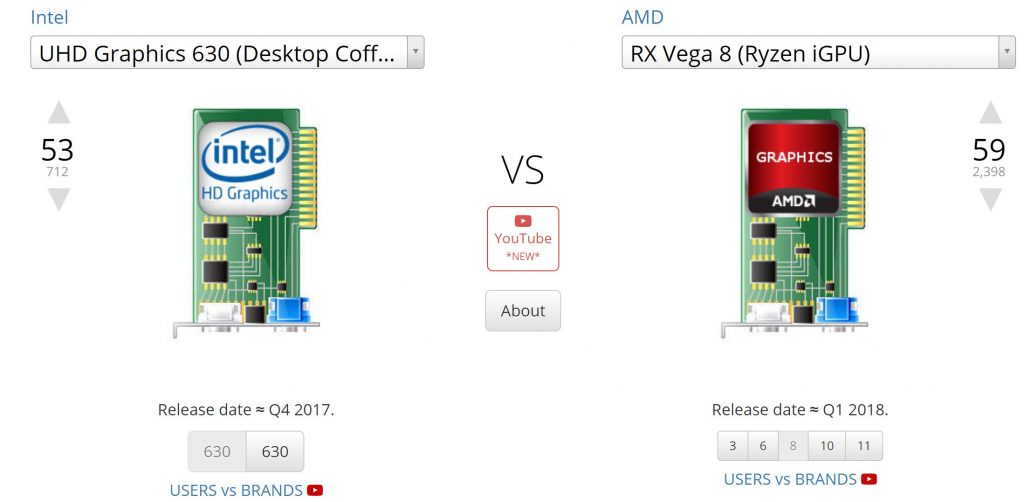
Intel UHD 630 vs AMD Vega 8. Source: gpu.userbenchmark.com
Finally, the AMD Ryzen 5 3400G, in my opinion, would be an excellent choice for a budget build because it has one of the most powerful integrated graphics cards, i.e., the RX Vega 11.
It is basically a step up from the AMD Ryzen 3 3200G with better graphics, single-core and multi-core performance.
3. CPU for PERFORMANCE Minecraft Gaming PC Build
- AMD Ryzen 3 3300X
- Intel Core i5 10400
- AMD Ryzen 5 3600
Now a CPU for a PERFORMANCE PC built for Minecraft, in my opinion, is the CPU that has excellent single-core performance and a decent amount of cores for excellent multi-core performance.
With that said, the AMD Ryzen 3 3300X, in my opinion, is excellent if you want to maximize the performance per dollar value at a rather affordable price tag.
In fact, in the lower midrange, 3300X has one of the best single-core performances beating even the more expensive AMD Ryzen 5 3600.
AMD Ryzen 5 3600, on the other hand, is a mid-range CPU with far better multi-core processing than the AMD Ryzen 3300X. I have already established above that Minecraft JAVA Edition does benefit from a higher core count, especially if you set the graphics settings to high.
However, the game DOES NOT always use multiple cores. In reality, once the graphical assets have been loaded, the game heavily relies on a maximum of two to three cores to run the game. Hence, in this instance, a CPU with excellent single-core performance, like the Ryzen 3 3300X, would more than suffice.
On the other hand, AMD Ryzen 5 3600 is more expensive than the 3300X, but with much better multi-core performance, this is a stepping stone into the PERFORMANCE gaming pc build for Minecraft.
With higher multi-core performance, you can have complex animations like thousands of TNT blowing up at a time and have large Render Distance load up quickly.
Finally, we have the Intel Core i5-10400. This is sort of a compromise between the AMD Ryzen 3 3300X and the AMD Ryzen 5 3600, both in terms of price and performance.
It does feature integrated Intel UHD 630 graphics, though. While a PERFORMANCE PC build for Minecraft will almost certainly have a dedicated graphics card, an integrated GPU is still a convenient component to have.
4. CPU for High PERFORMANCE Build PC Build for Minecraft
- Intel Core i5 11600K
- AMD Ryzen 5 5600X
Finally, we have the CPUs for a High-Performance Minecraft build or even for establishing decent Minecraft Servers. Both of these processors have comparable performance/dollar value.
They both offer 6 Cores and 12 threads. The AMD Ryzen 5 5600X has a better 7nm transistor architecture. However, the release price of this CPU is also higher.
While these processors are overkill for the single-player game, you could also use them for a Minecraft server or a Minecraft streaming setup on platforms like Twitch or YouTube.
II. Graphics Card Requirements for Minecraft
The minimum requirements stipulate that Minecraft be played on the basic Intel HD graphics found on relatively older CPUs. Again, indicating that the overall requirements are weak.
However, in this build, we are more interested in creating a gaming computer that can easily meet the recommended system requirements.
The recommended graphics cards for Minecraft are the GeForce 700 Series / AMD Radeon RX 200.
This is pretty vague because the requirements point to the series, not the actual model.
So, for instance, the RX 200 series has several cards, such as the entry-level R5 235, mid-range, R7 260, and high-end R9 270.
Similarly, the Nvidia 700 series also has several video card models, such as the entry-level GT 720, Mid-Range GTX 760, and High-End GTX 780.
For comparison, we will choose an entry-level, mid-range, and high-end GPU from the NVIDIA GeForce 700 and AMD Radeon RX 200 series for reference point benchmarking.
NVIDIA GeForce 700 Series – The Official NVIDIA Recommended GPU
| GPU | PassMark Score |
| NVIDIA GeForce GT 720 | 597 |
| NVIDIA GeForce GTX 760 | 4780 |
| NVIDIA GeForce GTX 780 | 8013 |
AMD RX 200 Series – The Official AMD Recommended GPU
| GPU | PassMark Score |
| AMD R5 230 | 242 |
| AMD R7 260X | 2892 |
| AMD R9 280 | 5608 |
Source of the Benchmark Scores
Comparing Official Graphics Cards to Newer Gen Models
The following graph shows how the NVIDIA 700 and AMD RX 200 series video card models compare with the popular contemporary integrated and dedicated GPUs.

Here you can see that the entry-level GPUs from the NVIDIA 700 and the AMD RX 200 series, i.e., the AMD R5 230 and the NVIDIA GT 720, stand no chance of competing for a dedicated GPU.
Integrated GPUs are far more advanced these days. In fact, AMD Vega 11 iGPU, as found on the AMD Ryzen 5 3400G, is almost as powerful as the mid-range AMD R7 260X.
If you want to stay as close as possible to the recommended series’s high-end spectrum, I suggest you go for the AMD RX 5500.
Anything higher than that, in my opinion, is overkill for a game like Minecraft, even with decent modding.
Read in Detail: Do You Need a Graphics Card for Minecraft?
Integrated vs. Dedicated Graphics Card for Minecraft Gaming PC
If you choose to go for a budget build, then I recommend looking into the integrated GPUs.
We have already established that the iGPU, like the Vega 11 found on the Ryzen 5 3400G, is far more advanced than intuition would have you believe. In fact, this CPU is almost as powerful as the AMD R7 260X.
People have even played the game on much weaker iGPU, such as the Intel UHD 610.
Case Study: Intel UHD 610
This user, for instance, tested the game on Intel Pentium Gold G5400 with Intel UHD 610 (One of the weakest contemporary iGPU) at “Fast” Graphics Settings and a Render Distance of 8 Chunks.
He achieved over 60 FPS even in intensive scenarios (such as when raining).
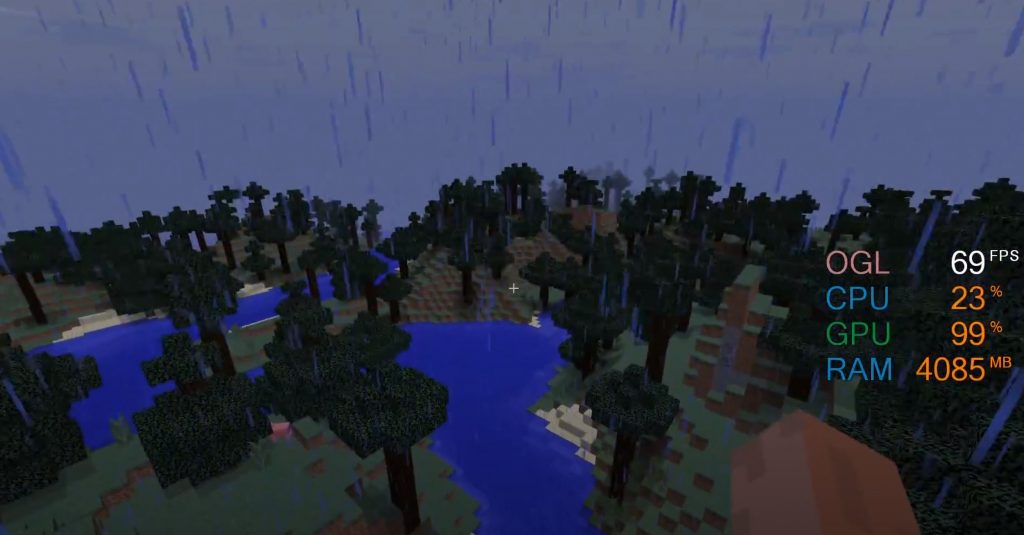
Image Source: Benchmarks YT Channel on an integrated Intel HD Graphics.
Therefore, it is evident from here that you can certainly play the game on integrated graphics cards.
Case Study: AMD R9 270
RandomGaminginHD had tested a build using the older high-end AMD R9 270 graphics card from the series recommended in the official requirements.
The graphical settings were set to Fancy with Maximum Lighting and a resolution of 1920×1080.
The user noted that the game consistently runs at greater than 200 FPS.
There can be lags at 32 Chunk draw distance while the game loads the newer generated assets. However, once you bring that value to a reasonable 18 Chunks draw distance, you could potentially enjoy the game at 300 FPS or higher!
You will need a monitor that supports 240Hz refresh to enjoy the frame rates you get with this dedicated graphics card.
But of course, here we are ONLY TALKING ABOUT THE VANILLA GAME!
Once you start modding, depending on the mods you install, you may need a better graphics card.
Case Study: NVIDIA GeForce RTX 3090
When it comes to modding, even the best of the best GPUs could feel underpowered in running this straightforward game.
DMIIITRIEV is a user who tested the game at extreme texture resolution, PTGI 12 Shaders, Stratum, and Ray Tracing on an ultimate gaming PC.
The results were astonishing, to say the least.
The game looks absolutely fantastic, but the user could barely stay near the 60 FPS range, with dips in the frame rate occurring quite often. DIPS BELOW 60 FPS ON A GeForce RTX 3090! And we are talking about a game that can run on an Intel UHD 610!
Unbelievable.
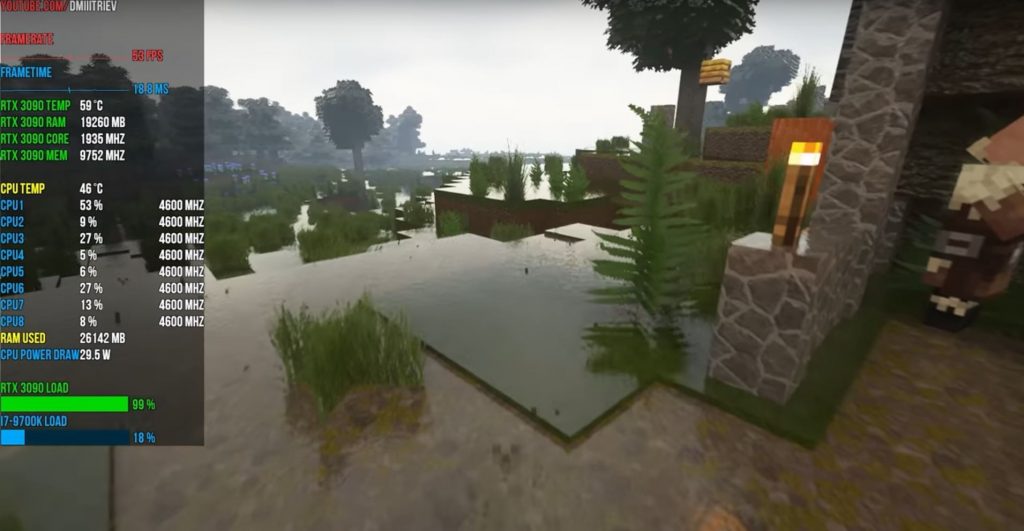
Image: NVIDIA GeForce RTX 3090 Heavily Modded Minecraft Test Run. Source: DMIIITRIEV
So the lesson to take home from these case studies is that Minecraft could require a Potato Graphics card, such as the Intel UHD 610, all the way to GeForce RTX 3090. And it all depends upon you.
Does Minecraft Support Ray Tracing; Do You Need a GeForce RTX Card for Minecraft?
Yes, Minecraft does support ray tracing if you have version 1.16.200 or higher. The Render Dragon Engine enables support for ray tracing and realistic lighting.
You must update the game if you cannot see the ray-tracing option.
Ray Tracing can only be supported if you have the right hardware for NVIDIA, that is, GeForce RTX 2000 and GeForce RTX 3000 series GPUs.
For AMD, Ray Tracing is supported by the Radeon RX 6000 series GPUs.
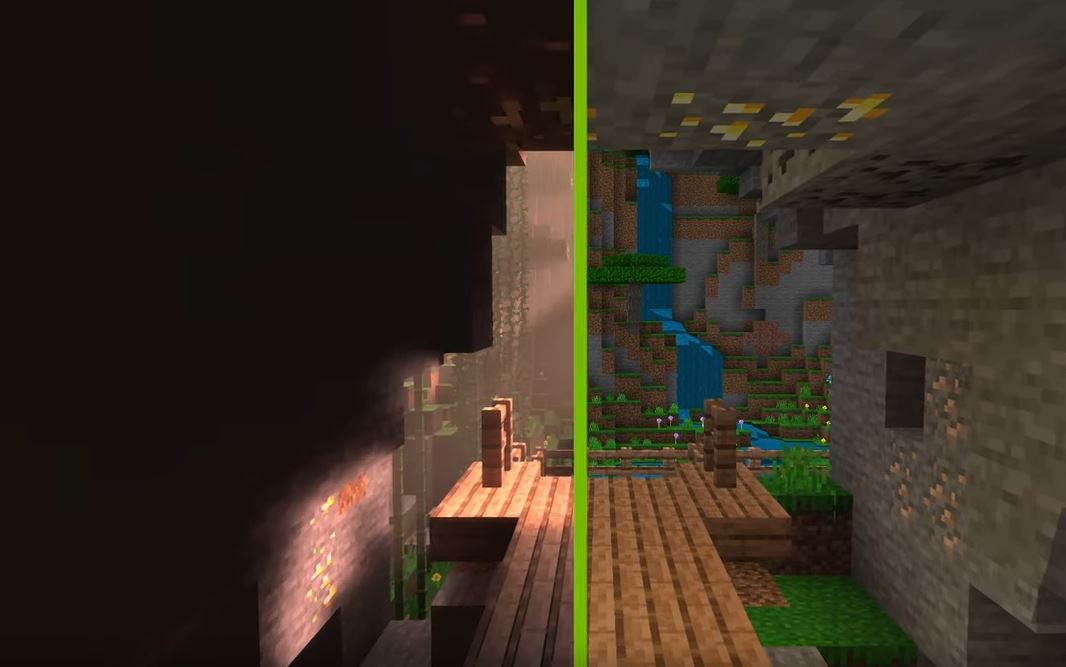
Image: Ray Tracing enabled vs. No Ray Tracing Source: NVIDIA
III. RAM Requirements for Minecraft PC Build
According to the official requirements, the recommended RAM amount for a good Minecraft PC Build is 8 GB DDR4.
And honestly, 8GB of DDR4 RAM is overkill for running the vanilla game for a Minecraft gaming PC.
In fact, for vanilla games, even 4 GB of DDR 4 RAM for your PC should more than suffice, especially if you have a dedicated graphics card (Given that 2 GB are allocated to the game and 2 GB DDR4 are left for the system).
While I certainly do not recommend anything lower than 4GB of RAM for your PC, 8 GB DDR4 RAM is more than sufficient to play the game solo or with a decent amount of players in the Minecraft server.
More RAM would be needed depending on the Modpacks you have installed, your graphics settings, and the textures’ size.
So if you have hundreds of mods installed or mods with high-quality texture, that may require more RAM.
However, needing more than 8 GB DDR4 RAM for your gaming PC is reserved only for enthusiasts.
More RAM may also be needed if you are running plenty of background software, such as screen recording software, or if you are hosting a server with a lot of players.
Does Adding More RAM Improve Minecraft Performance?
Yes, having more RAM does affect the performance. However, its impact isn’t as large as the impact of a CPU or a GPU would have on the game.
If you are running either the vanilla Minecraft or a game with some shader and texture mods, then the game should run quite fine with 2-4 GB RAM.
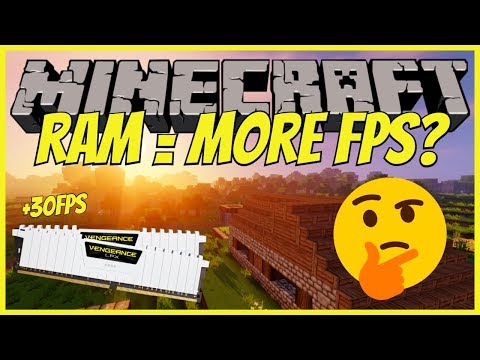
In any case, the following video shows how the RAM affects the game’s performance.
You will notice here that the game runs butter smooth even with just 2 GB allocated RAM, even with shaders on.
Increasing the Amount of RAM in Minecraft
If you are experiencing lags with your game, particularly if you set the graphics settings to very high with texture and shader mods installed, then you may need to allocate more RAM to the game.
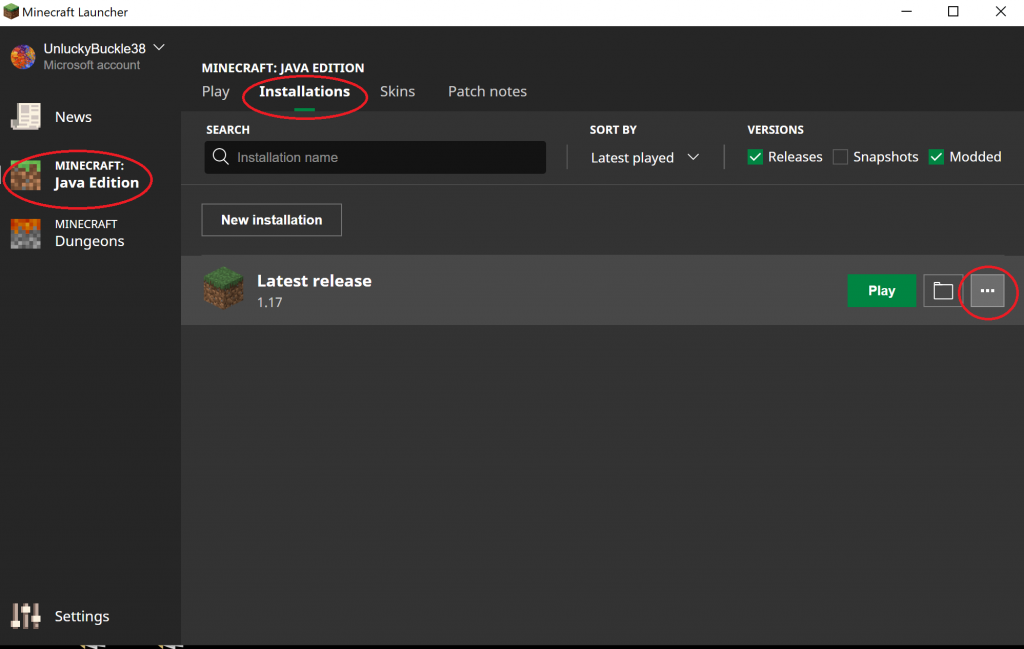
To allocate more RAM to Minecraft, you need to follow these steps:
- Open the Minecraft Launcher.
- Select the game on the left-hand menu of the Minecraft launcher.
- Select the “Installations” tab
- Press the three-dot button “…”
- Select the “Edit” option
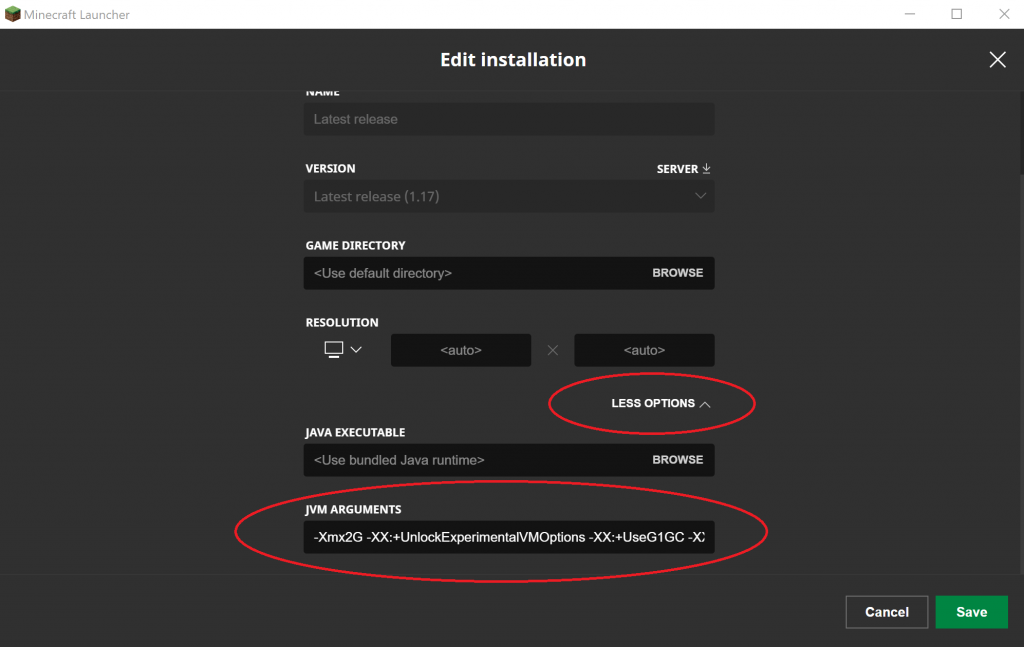
In the Edit Installation settings window, perform the following steps:
- Press “More Options“
- In the JVM Arguments field, pay attention to the “-Xmx2G” value.
- The number in this string indicates the amount of RAM allocated to the game. So, for instance, at the moment, 2 GB RAM is allocated. To allocate more RAM, change the number to the desired amount of RAM you wish to allocate. So to allocate 4 GB RAM, replace 2 with 4; “-Xmx4G”
Do not go beyond the amount of RAM you have in your PC!
In fact, if you have 8 GB DDR4 RAM, do not allocate more than 5-6 GB of RAM to the game. The remaining 2-3 GB of RAM should be reserved for the system and background apps.
IV. Hard Drive Requirements for Minecraft Build
For budget Minecraft builds, normal spinning Hard Disk Drives should more than suffice. However, Minecraft recommends installing an SSD over an HDD. Again, they haven’t specified which type of SSD.
There are basically two types of SSDs, i.e., SATA and NVMe SSDs. They are also differentiated by the generation they belong to.
So, for instance, SATA SSDs are the slowest; they rely on the SATA 3 protocol and have read speeds of about 550 MB/s. NVMe SSDs, on the other hand, utilize the PCIe interface.
3rd Gen NVMe SSDs have read speeds of about 3500 MB/s. 4th Gen NVMe SSDs can reach read speeds of up to 7000 MB/s (average of 5500 MB/s).
The following table should give you an idea of how the transfer speeds differ across different hard drives.
| Storage Type | Read Speeds |
| Hard Disk Drive | 200 MB/s |
| SATA SSD | 550 MB/s |
| Gen 3 NVMe SSD | 3500 MB/s |
| Gen 4 NVMe SSD | 7000 MB/s |
It should be pointed out that the normal hard disks use the SATA protocol like the SATA SSDs.
Furthermore, Gen 3 NVMe SSDs require a PC conforming to at least PCIe v3.0. For Gen 4 NVMe SSDs, you require a PC that supports PCIe v4.0.
Also Read:
V. Motherboard for Minecraft Gaming Computer Build
You do not need a high-end motherboard for the game. Essentially the first thing you must ensure is that the motherboard has the same socket as the CPU.
Here is the socket information:
- For AMD Ryzen 3000 and 5000 Series: AM4
- For Intel 10th and 11th Gen: LGA1200
After the socket, the next important aspect to look at is its chipset. Chipsets are generally divided between cheap, mid-range, and high-end.
The following are the different chipsets you can find for AMD and Intel motherboards:
The difference between the chipset lies in how many PCIe lanes they have, the ports they offer, the expansion slots they have, whether they can overclock or not, the version of PCIe they offer, whether they can support multiple GPU and VRMs they offer, among other things.
AMD Motherboard Chipsets:
- A Series: i.e., A520, this is the chipset series for entry-level motherboards.
- B Series: i.e., B550, for mid-range and most staple gaming pc builds.
- X Series: i.e., X570, for high-end builds
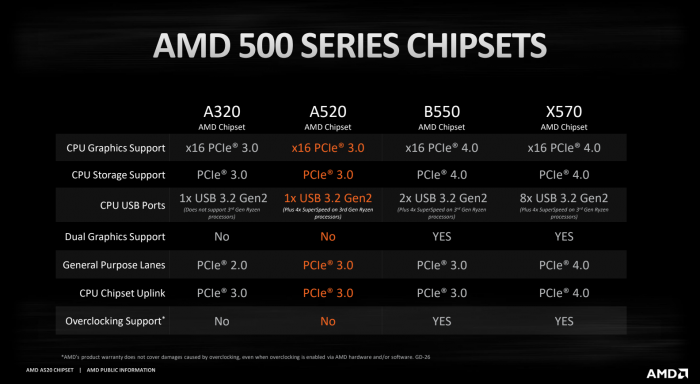
Intel Motherboard Chipsets:
- B Series: i.e., B560, for entry-level builds
- H Series: i.e., H510 for mid-range builds
- Z Series: i.e., Z590, for high-end builds
For a Minecraft gaming PC build, I recommend that you either stick with an entry-level motherboard, or at most, with a motherboard with a mid-range chipset.
Motherboard Form Factor
The motherboard size may also be something that you may want to look into.
There are three common sizes:
- ATX: 12 x 9.6 inches
- Micro ATX: 9.6 x 9.6 inches
- Mini ITX: 6.7 x 6.7 inches
The form factor plays a role in determining how many expansion slots it would have. For instance, a Mini ITX form factor, being the smallest, has only a single PCIe x16 slot.
If you want a motherboard for a compact gaming PC build, then a mini ITX form factor is recommended. However, if you want to have more expansion slots, then Micro ATX and ATX are recommended.
Micro ATX motherboards are the cheapest, and hence for a budget Minecraft gaming build, this is the form factor that we will recommend.
Some motherboards come with aesthetic components such as beautiful heatsinks and RGB lighting. Often aesthetics can add to the cost. Therefore, you can let go of this for budget builds.
Also Read: Does Motherboard Matter for Gaming?
VI. Power Supply Unit for Minecraft PC Build
The choice of the power supply unit depends upon the components you have for your Minecraft build. You basically have to determine the wattage rating of the PSU depending on the power consumption of your installed components.
Manually calculating the power consumption of your components can be a bit difficult since it is not as simple as just adding all the TDPs together.
Instead, to find the right power supply unit, I recommend you use the calculators:
Other than the wattage rating of the PSU, the other two important factors are:
- Form Factor (size): ATX12V is the most common form factor. However, consult the specification of your PC Case to find out the dimensions of the PSU it can support.
- Power Supply Efficiency: Make sure the power supply unit has 80Plus certification. 80Plus certifications ensure that PSU will at least maintain an efficiency of 80% at all times.
Cheaper PC builds for Minecraft would require a smaller PSU than more expensive ones. For instance, if your build does not include a dedicated graphics card, then your power requirements will be much lower.
At the same time, investing in a PSU with a somewhat higher wattage rating is better than what is required for future expansions.
Important Minecraft Graphics Settings and Their Impact
Let us look into the different graphical settings of the game and their impact on the hardware.
The following are basically the primary settings available for the vanilla version.
Graphics Settings
The options you have here are Fast, Fancy, and Fabulous.
People rarely see any difference in graphics with this turned on or off.
But essentially, this setting affects particles, glass and semi-transparent surfaces, clouds, leaves, and a handful of other assets.
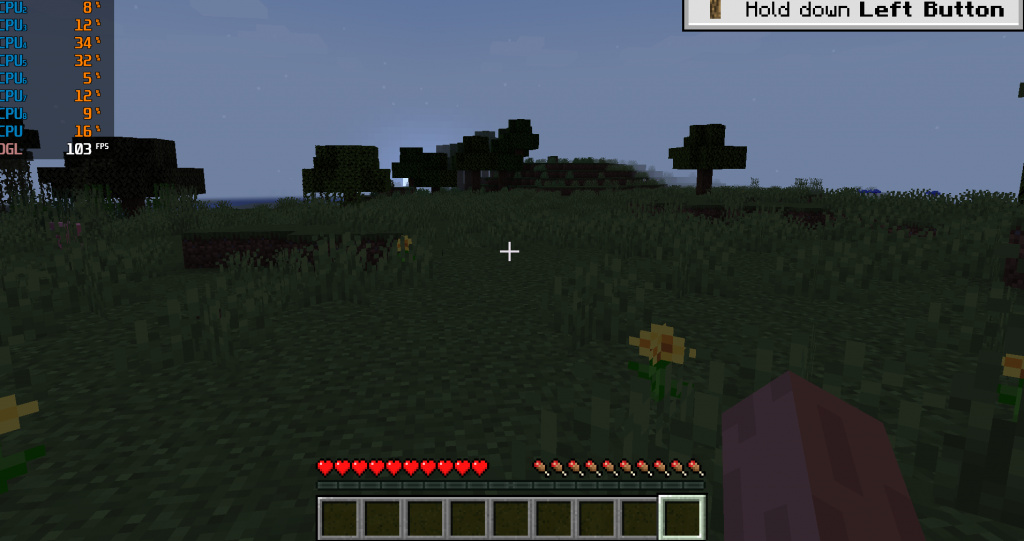
Image: On Fast Settings. Note the leaves on the trees are opaque.
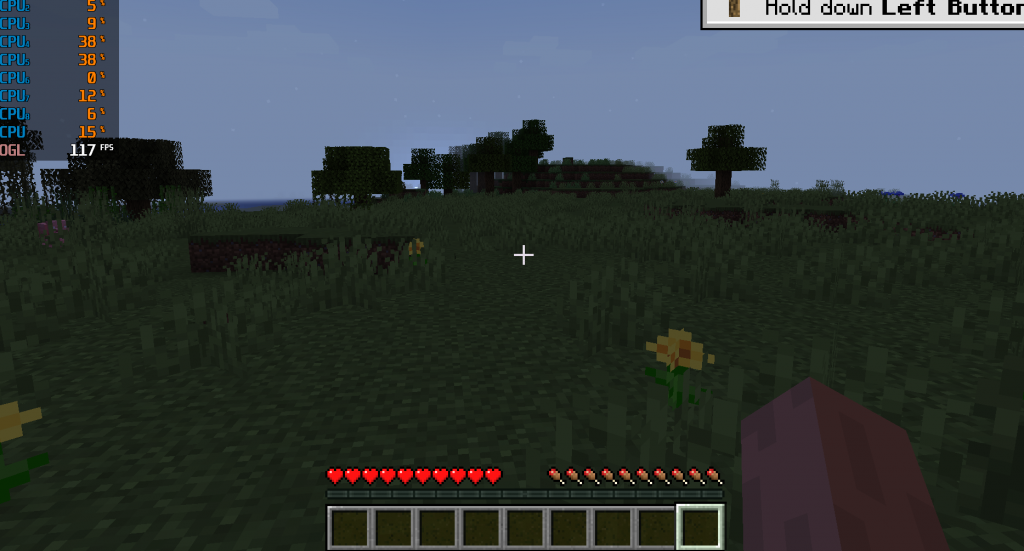
Image: On Fabulous Settings. Note the leaves on the trees are transparent.
Biome Blend
This setting allows you to tweak how complex the environments are generated. The lower the setting, the simpler the environments will load.
For instance, on a higher Biome Blend settings, you don’t get a sharp difference between one Biome and another. The transition is rather smoother.
This setting greatly impacts the Frame rate, especially when the Minecraft world has to load as you move around.
Render Distance
A setting that perhaps has one of the greatest effects on the performance.
The render distance settings range from 2 Chunks all the way to 32.
The lower the render distance settings, the smoother your game will run. Therefore, if you have a potato PC, set your render distance to as low as possible.
This setting has perhaps the most visible impact on the gameplay.
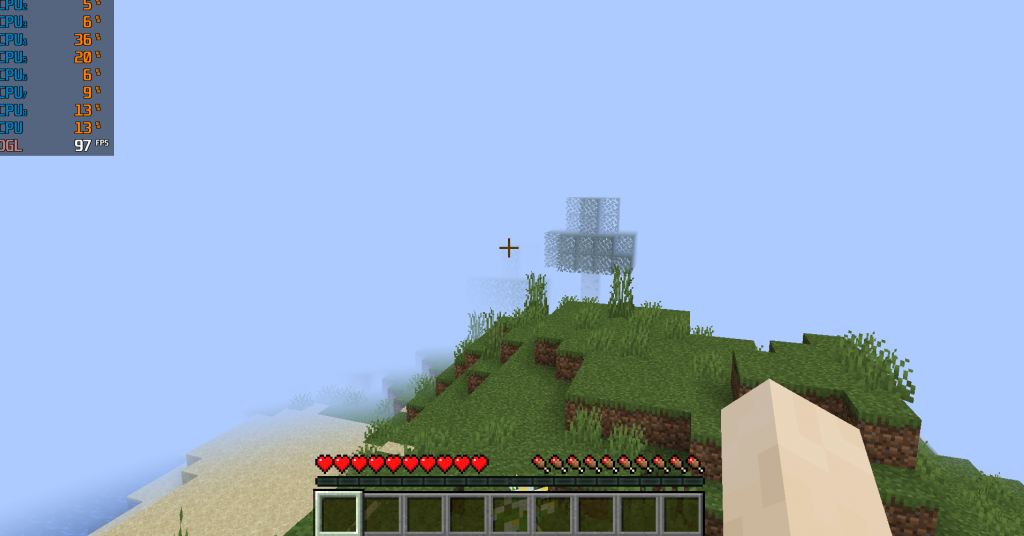
Image: Render Distance 2 Chunks – 97 FPS
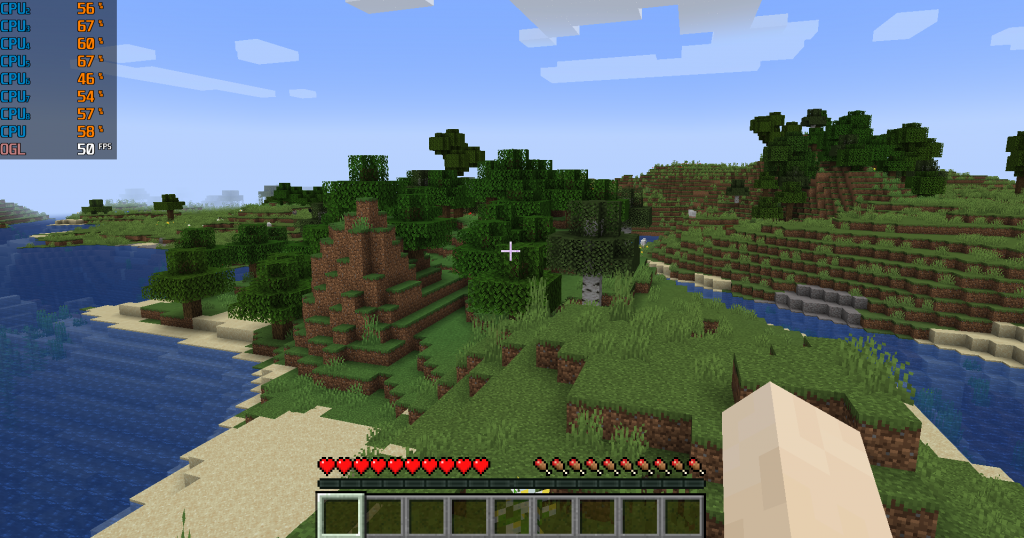
Image: Render Distance 16 Chunks – 50 FPS
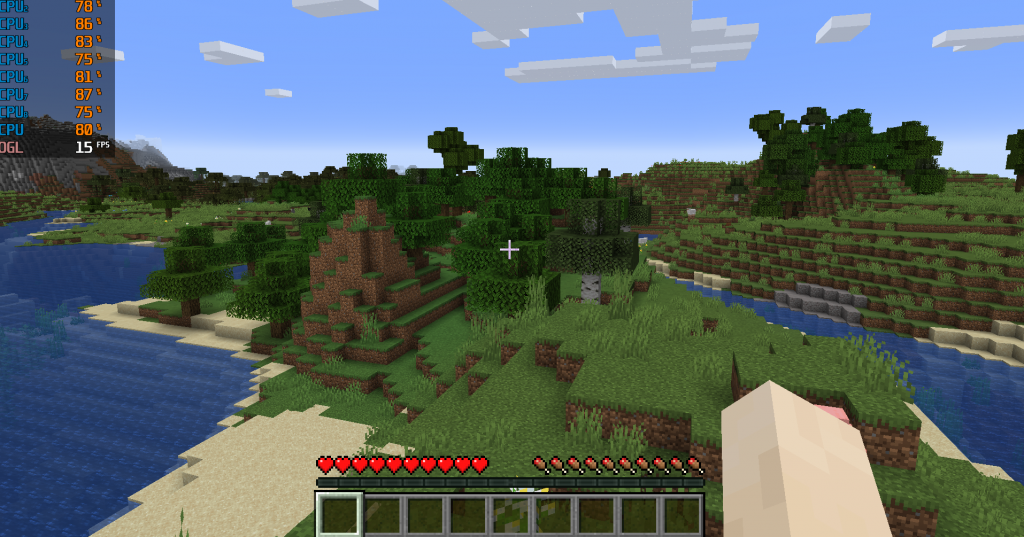
Image: Render Distance 32 Chunks – 15 FPS
This was tested on Intel Core i7-7700HQ 4 Core / 8 Threads and NVIDIA GTX 1050Ti. So an overall mid-range build.
It should also be noted that the rest of the settings, including Biome Blend Settings, was set to max.
The point to note is that setting a high render distance, especially if you have set the graphics setting to high, can get quite taxing, even for a mid-range gaming PC.
I was standing stationary, yet the frame rate dropped to 15 FPS while the Minecraft world was loading. When moving, the FPS dropped even more.
And this is WITHOUT any form of mods, texture packs, and shader installed.
Clouds
You can set the clouds to Off, Fast, or Fancy.
On Fast, the Clouds are 2D. On Fancy settings, they are 3D.
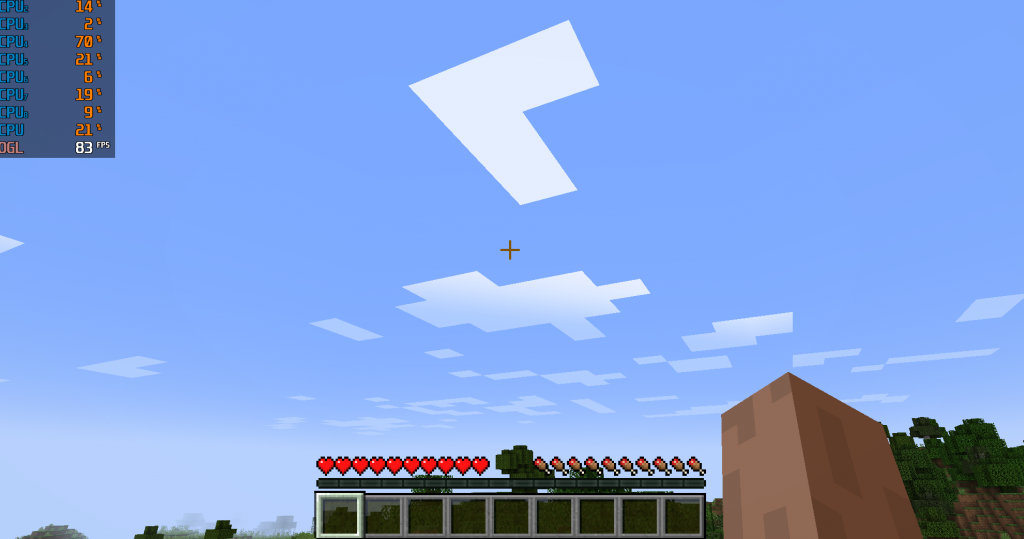
Image: Cloud Setting on Fast
Image: Cloud Settings on Fancy
How to Improve Performance (FPS) on a Weak PC?
If you want to build a budget gaming PC, perhaps with an iGPU and no dedicated graphics card, then there are several tweaks that you can perform.
Change the Resolution (High Impact)
Lowering the resolution can have a great impact on FPS.
Unfortunately, changing the resolution on this game is a bit unintuitive as it cannot be done through in-game Video Settings.
Instead, you have to follow these steps:
- Open the Minecraft Launcher
- Select the Game from the Left Hand Menu
- Select the three dots button “…” and a drop-down menu will pop up.
- Select Edit from the drop-down menu.
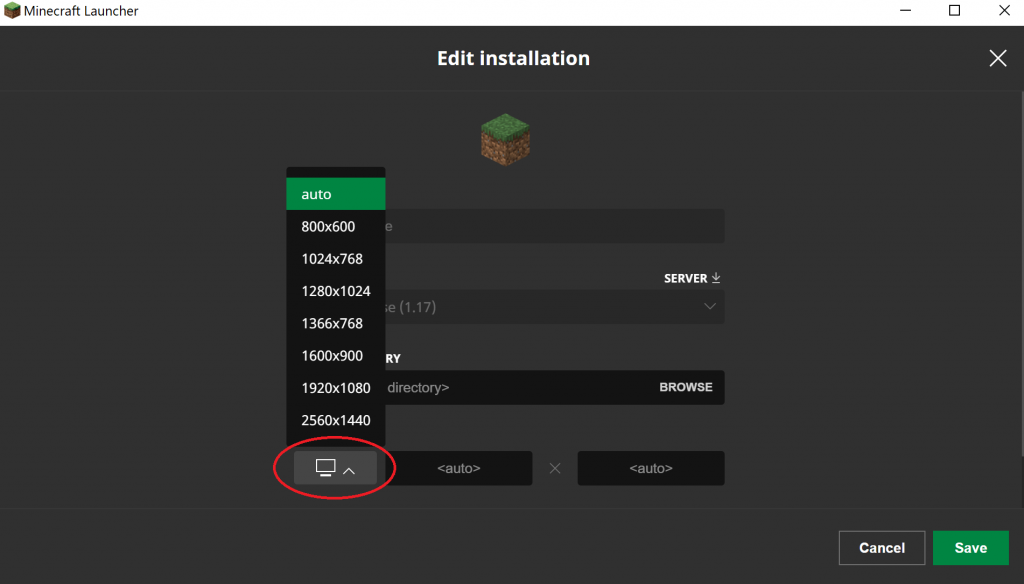
This will open up the Edit Installation Window.
- Select the Display Icon from there and then select the desired resolution.
- Hit save.
Note when Setting the Resolution:
The game, by default, runs at the native resolution of your monitor screen. However, if you feel that it lags on the native resolution, then set it to a lower resolution from this options window.
So, for instance, if your native screen resolution is set to 1920×1080 and you find that your game lags, then set it to a lower resolution, like 1600×900, to improve frame rates.
Tweaking the Render Distance Settings (High Impact)
This should be the first thing you should look into. Try tweaking the Render Distance to a moderate amount, i.e., from 14-16, and see if that helps.
If you have a fragile system, such as a system with AMD Ryzen 3 3200G and Vega 3 graphics, you could try setting the Render Distance to very low, i.e., 2-6.
Biome Blend is Another Culprit (High Impact)
Another setting that goes hand-in-hand with render distance is the Biome Blend. If you have a high render distance with a high Biome Blend, then that could tax your system heavily.
This is a high-impact setting IF you also have a high Render Distance.
If you want to keep a high render distance, try to keep Biome Blend low.
Set Graphics Settings to Fast
Changing the graphics settings to fast on a weak system can greatly help.
It does not greatly impact how the game looks and can help improve the FPS when set to low.
Tweak the Mipmap levels
The mipmap affects how smooth the texture looks. You can set the value from 1-4. If you are having performance issues, we suggest keeping this value to a minimum.
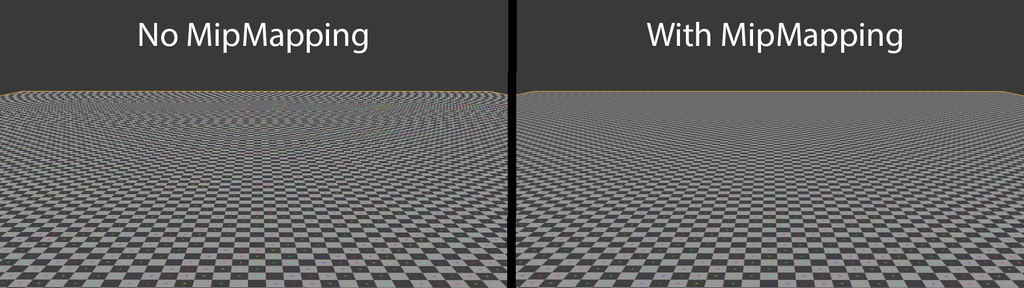
Image Source: Wikipedia
Other Settings to Consider
If all else fails, you can try keeping the following settings to a minimum too:
- Clouds: affects whether they are rendered in 3D (Fancy), 2D (Fast), or not at all.
- Particles: affects how many particles you can see (i.e., bubbles emerging from the water).
- Entity Shadow: as the name suggests, enables or disables the shadows on assets.
More Gaming Build Guides
- PC For Fortnite
- PC for Rocket League
- PC for Roblox
- PC for League of Legends
- PC for World of Warcraft
- Gaming PC Without Dedicated Graphics Card
More Work Build Guide
Frequently Asked Questions
1. What components should I prioritize when building a PC for Minecraft?
When building a PC for Minecraft, the components that should be prioritized include the CPU, RAM, and graphics card. A fast CPU can handle the game’s complex calculations, while a dedicated graphics card can improve the game’s visuals and provide smoother gameplay. Additionally, having enough RAM can prevent performance issues and allow for smoother gameplay.
2. Can I use a laptop for playing Minecraft?
While it is possible to play Minecraft on a laptop, it is important to note that the performance may not be as good as on a desktop PC with similar specs. Laptops have limitations in terms of cooling and battery life, which can affect the performance of the CPU and graphics card. It is recommended to choose a laptop with a dedicated graphics card and a powerful CPU for the best possible gaming experience.
3. Is it worth building a PC for playing Minecraft 2026 or should I just use a gaming console?
Whether it’s worth building a PC for playing Minecraft or using a gaming console ultimately depends on your personal preferences and budget.
While building a PC can be more expensive upfront, it allows for more customization and future upgrades.
Gaming consoles, on the other hand, have a lower upfront cost but can be limited in terms of upgrades and customization.
If you prefer a more versatile and customizable gaming experience, building a PC may be the way to go.