Connecting the case power button to the motherboard is a relatively simple procedure. You will undoubtedly need your motherboard’s manual for this, though.
To connect the power button to the motherboard, you need to locate the correct pair of pins (aka terminals) on the motherboard that is intended for the power switch.
These pins are often located on the “Front Panel Header” block. The front panel header has the pins for the Power Switch and Reset, Power LED, Motherboard Speaker, etc.
If all this sounds too confusing, do not fret; we will discuss how to connect the power button to the motherboard in detail.
TABLE OF CONTENTS
Learning Some Preliminary Jargon
I recommend you keep the definition of the following two terms in mind for this article.
1. Electrical Pins
A typical motherboard has several pins for different purposes. For instance, you may find plugs for USB ports, motherboard fans, etc. We are interested in the SW_PW or Power Switch pins for the power button.
2. Header
The header is another name for connectors for motherboards with several male pins. Often, different pins on a header serve another purpose.
The Power Switch pins are located on the Front Panel Header.
Also Read: What are Motherboard Standoffs?
How to Connect Power Button to Motherboard
Connecting the power button involves the following few simple steps
1. Locate the Front Panel Header
As mentioned earlier, the pins for the power switch can be found on the motherboard Front Panel Header.
You can locate the Front Panel Header by:
- Using the motherboard’s manual
- Physically inspecting the motherboard
Using the Motherboard Manual
The following shows the location of the Front Panel Header according to my motherboard’s manual.
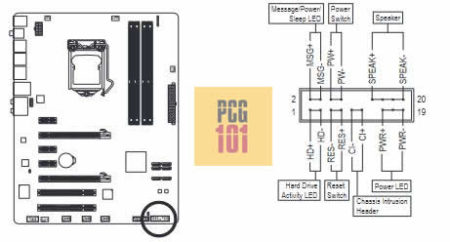
According to this, the Front Panel Header is located on the bottom right of the motherboard.
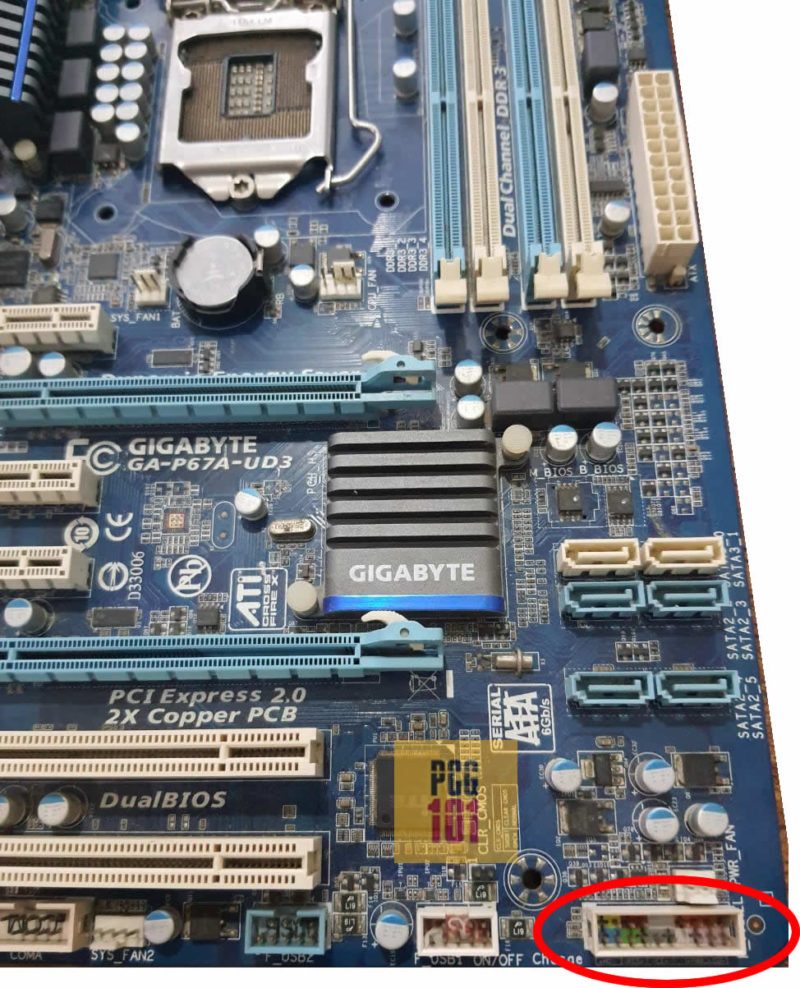
Physically Inspecting Motherboard
You can also find the location of the front panel header by physical inspection. Most of the headers have labels for their intended purpose.
The label for the Front Panel Header on a motherboard is often F_Panel
Also Read: How to Connect Extra Fans to Motherboard?
2. Determine the PINs Intended for the Power On Switch
There are many pins on a Front Panel Header for different purposes, such as:
- Power On Switch
- Reset Switch
- Power LED
- Hard Disk LED
- Beep Core Speaker
Therefore, once you have located the Front Panel Header, you want to determine the pins corresponding to the Power On switch.
The Power Switch pins are always in pairs, i.e., 2 pins.
The easiest way to figure out the correct pins is through the labels next to the Front Panel Header on the motherboard itself.
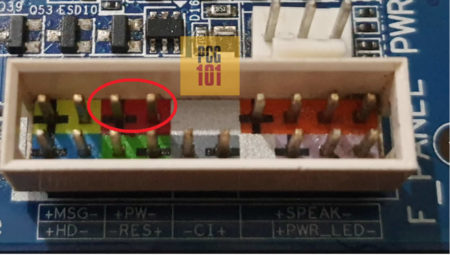
In the following image, I have highlighted the label corresponding to the Power On pins.
The third and fourth pins from the left in the first row correspond to the power switch.
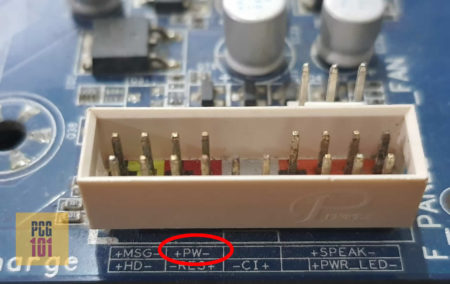
The following image shows the Power Switch pin’s location for my motherboard.
3. Connect the Jumper to The Pins
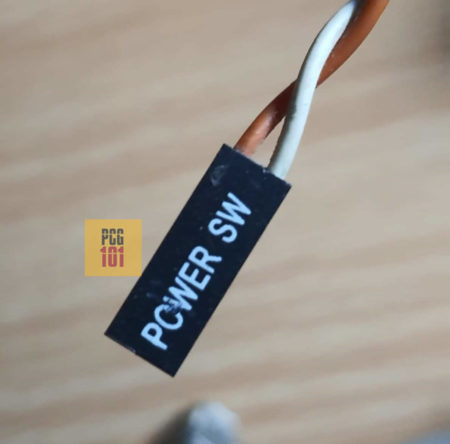
Finally, connect the Power Switch jumper to the Power Switch pins on the Front Panel Header.
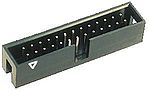
The Power Switch jumper cable comes with the PC case, and it originates from the case’s front panel along with the myriad of other jumpers for different purposes.
Does the Polarity (+/-) Matter Here
While the labels on the motherboard read as +PW- indicating that the 3rd pin in the first row is positive and the 4th pin is negative, for a switch, the polarity does not matter here.
You can connect the jumper either way, i.e., on any terminal, as long as it completes the circuit.
For LED lights for Hard Disk and Power, the polarity does matter, whereby you have to make sure that you connect the negative jumper in the negative pin and the positive jumper in the positive pin.
Also Read: Do Motherboards Come with Cables?
Other Ways to Turn On a Motherboard
There are also a couple of other methods to turn on your motherboard. These methods may come in handy, particularly where your PC case’s power button or the jumper cable is damaged:
Using the Standalone Power Switch Cables
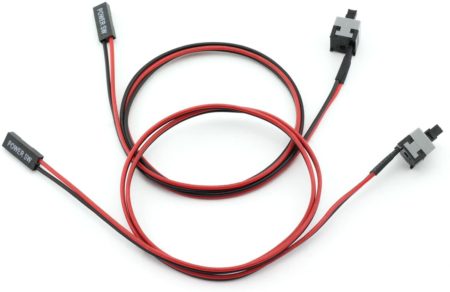
These are pretty straightforward to use.
On one end, you connect the jumpers to the Power Switch pins on the Front Header Panel just as you usually do. On the other end, you have a push button that works like the PC case’s button.
This can be useful, mainly if you are bench testing your motherboard, i.e., testing the motherboard outside the case.
Manually Jump Starting Your Motherboard
Suppose you do not have a Power On switch at all. You can jump-start your motherboard with a simple precision screwdriver.
You take the screwdriver, which touches the 2 Power Switch pins on the Front Panel Header.
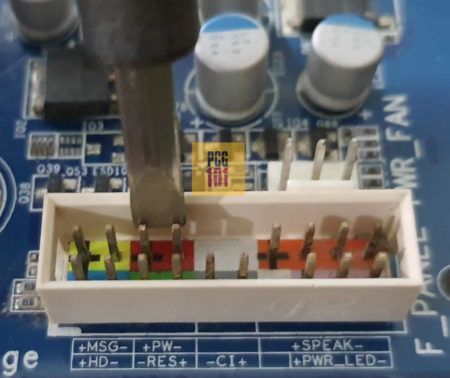
It would be wise to ensure the screwdriver does not touch other pins. Hence it is advisable to use precision or a small, flat screwdriver.
Also Read:
Also Read: How to Use Motherboard HDMI with Graphics Card?
Final Words
Connecting the power button to the motherboard is pretty straightforward once you understand the Front Panel Header on your motherboard and its pin configuration.
You must identify the pins corresponding to the Power On Switch on the Front Panel Header and then plug the Power Switch Jumper cable from your PC case into them.
Also Read: How to Connect Motherboard Internal Speaker? (Beep Code Speaker)
FREQUENTLY ASKED QUESTIONS
1. How Can I Turn On My Motherboard Without the Power Button?
You can use a precision screwdriver to jumpstart your motherboard. Close the circuit on the two power pins in the Front Header Panel with the screwdriver, and voila, you’ve turned your motherboard on.
2. Is There a Power Button On a Motherboard?
No, most motherboards don’t come with a power button. Instead, they come with Power Switch pins. It is worth noting that some premium motherboards come with a dedicated push button for powering on.
3. PC Does Not Turn On After Connecting the Jumper Cable
Here’s what you need to do if your PC doesn’t turn on after connecting the jumper cables to the correct pins:
-Ensure the 24-pin ATX connector from the power supply unit is connected to the motherboard.
-Make sure the 8-pin CPU connector is connected to the motherboard from the PSU.
-Check to see if the button on the PC was damaged or not.
Inspect the Power Switch Jumper cable to see if it is damaged or not.
-Check to see if the Power Switch pin on the Front Header Panel is damaged or not.
4. What should I do if I’m having trouble locating or identifying the correct pins or connectors on the motherboard?
If you’re having trouble locating or identifying the correct pins or connectors on your motherboard for connecting the power button, you may want to consult the documentation or user manual that came with your motherboard or computer.
You can also try searching online for guides or tutorials specific to your motherboard or computer model.
Additionally, some motherboards may have labels or markings near the connectors that indicate their function or purpose.
5. What are some alternative options or solutions if I’m unable to connect the power button to the motherboard on my own?
If you’re unable to connect the power button to the motherboard on your own, you may want to consider seeking assistance from a professional computer technician or repair service.
They can help you identify the correct pins or connectors, as well as ensure that the connection is made properly and safely.
Alternatively, you may be able to find a replacement power button or cable that is compatible with your motherboard, although this may require some additional research and troubleshooting.