You would want to test your motherboard without the CPU attached for many reasons. Essentially, this test would allow you to troubleshoot your motherboard and pinpoint where a specific fault lies.
Testing a motherboard without a CPU is quite simple. You must ensure it is connected to the power supply unit and placed on a safe material. You can attach the rest of the peripherals and components, such as RAM and hard disk if you wish, but you don’t have to.
You may also have to learn how to jump-start your motherboard without a Power ON switch.
Ultimately, you should expect to hear beeping or LED flashes from your motherboard.
Below we will talk in detail about how to test motherboards without CPU and also get in touch on how to troubleshoot the issues.
TABLE OF CONTENTS
Why and Should You Test Your Motherboard without CPU?
There is nothing wrong with testing your motherboard without the CPU. The only thing you have to keep in mind is that your PC will NOT pass the POST ( Power-On-Self-Test).
You will see nothing displayed on your screen because the motherboard does not have an onboard graphics processing unit. If you have a dedicated GPU installed in the PCIe slot, that won’t work without the CPU.
You may only observe beeping sounds if your motherboard has a beep code speaker and LED flashes.
Testing if the Motherboard is Dead or Alive
Testing whether the motherboard is dead or alive often becomes necessary.
Imagine you are building your computer and have just purchased a new motherboard. If there’s a fault in it and it comes to DOA (dead on arrival), it may become more problematic to identify the root cause AFTER you build your computer.
Hence, many desktop PC builders and gamers prefer to test their new motherboards BEFORE installing the CPU. This is often called the Pre-build bench test.
This is because motherboards are sensitive components of the computer. They are prone to damage, mainly due to mishandling from shipping. There also can be a factory error in providing a non-functional motherboard.
This test may also become necessary if your PC has suddenly stopped working. You may want to perform this test to check if your motherboard works appropriately.
Also Read:
How to Test Motherboard without CPU?
Here is how you can test the motherboard without a CPU.
1. Unbox For Bench Testing
Bench test is when you test the PC components outside of the case.
First, unbox your motherboard. Next, remove it and set it on an anti-static foam or material inside the packaging or a large piece of cardboard. You can even place the motherboard on the box that it came with.
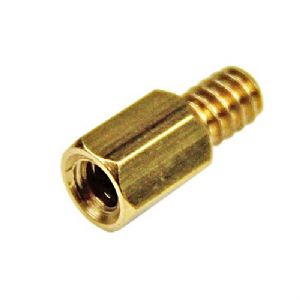
Do NOT place the motherboard on a bare metallic or conductive surface! Motherboards have a lot of solder points on the bottom. You do not want these points to come in contact with a metallic exterior when turned on.
This is the reason why motherboards inside the case sit on standoffs. These lift the motherboard off from the CPU case so that it does not come in contact with the conductive material.
2. Plug in the Power Connectors
You will need to attach two power connectors
- 8 Pin for the CPU power connector on the motherboard
- 24 Pin for the motherboard power connector
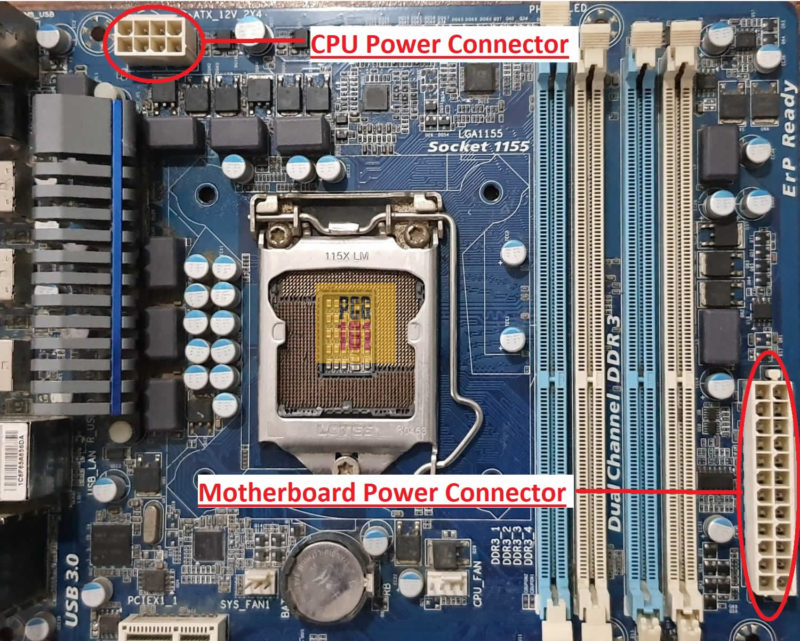
The layout of your motherboard may differ, but this generally is where you can find the motherboard and the CPU power connectors.
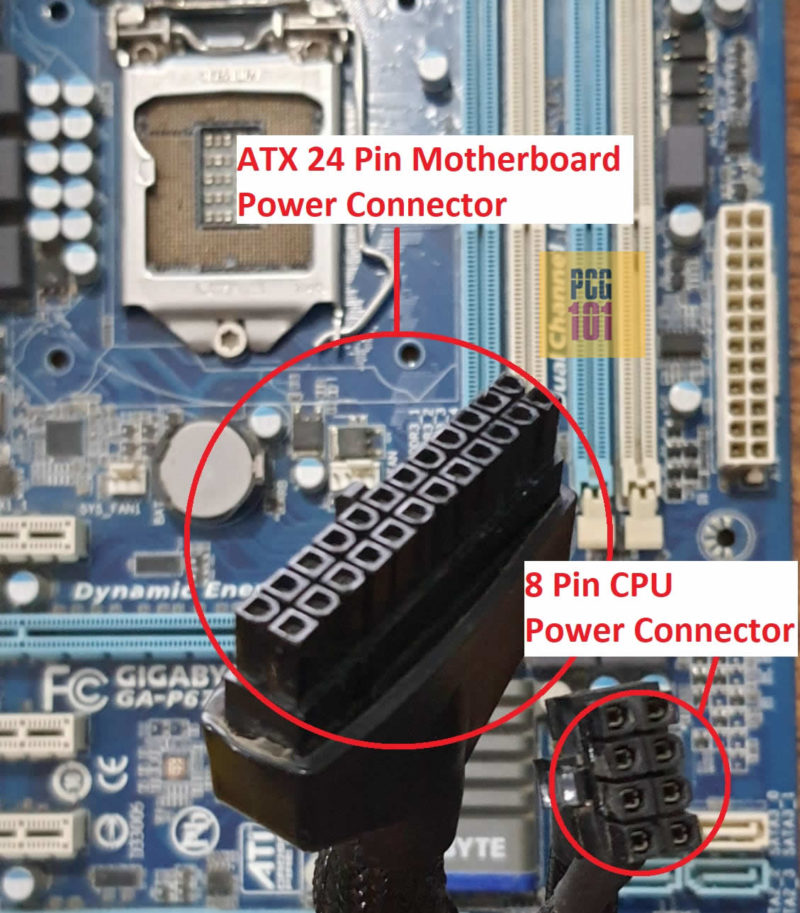
Both the 24 Pin and the 8 Pin cables are provided with the Power Supply Unit.

My Power Supply Unit also had a spare 4-pin CPU connector for older motherboards and systems.
These days almost all motherboards come with an 8-pin CPU power connector. The 8-pin provides about 280 watts of power to the CPU, while the 4-pin connector only delivers half as much at about 140 watts.
In the rare instance that you have an ancient system, you would use the 4-pin connector for CPU power.
3. Installing Other Components (Optional)
You can have the rest of the components, such as RAM, hard disks, and the graphics card, installed if you wish. However, they won’t be of much use here without the CPU.
So whether you have them on or not would not make a difference. However, I recommend at least having the hard disks unattached to save you from losing data due to any mishap.
4. Connect PSU to the Wall Socket
Go ahead and connect the Power Supply Unit to the wall socket. Make sure the power supply unit is also placed on a non-conductive surface and you are grounded.
It would also be best to wear plastic slippers/shoes and non-conductive electric gloves.
5. Turn the Motherboard On
If Motherboard is INSIDE the Case:
If your motherboard is inside the case, then turning on your motherboard is relatively easy.
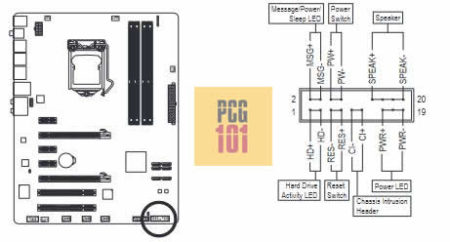
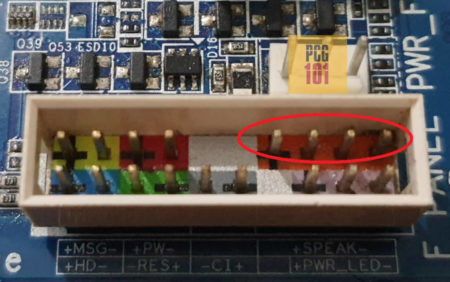
It would be best to find the Power Switch Pins on your motherboard. These are often located on the Front Panel Header.
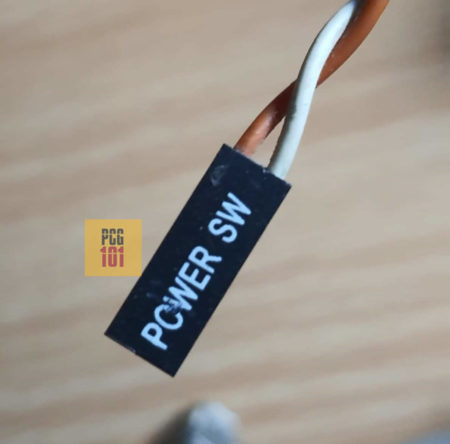
Once the Power Switch Pin is identified, you can connect the Power Switch Cable from your Case to these Pins.
You may have to refer to your motherboard’s manual to find the exact location of the Power On Switch pins.
The following shows the Power On Switch pins’ location for my motherboard:
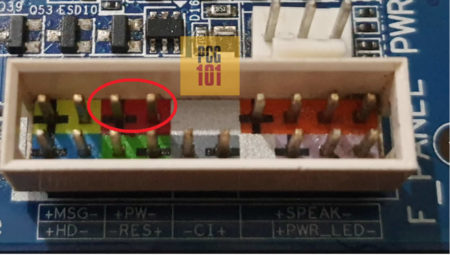
Once everything is connected, press the ON button on the Case, and you should be good to go.
Also Read:
If Motherboard is OUTSIDE the Case:
Many newer and higher-end motherboards have a manual turn-on power button. However, if you have an older or a budget motherboard, you must manually turn the motherboard on.
There are two ways you can go about this:
- Using the case’s Power On switch cables
- Manually jump-starting the motherboard
Utilizing the Case Power On Switch Cables
This is similar to the process I highlighted above.
It would be best to keep your CPU Case close to the motherboard so that the POWER ON SWITCH CABLES from the Case can reach the pins on its front panel header. Then you can press the turn-on button on the case like usual.
Manually Jump Starting the Motherboard
The second option is to jump-start the motherboard manual.
You will need a screwdriver for this.
You take the screwdriver and, with it, touch the 2 Power Switch pins on the Front Panel Header.
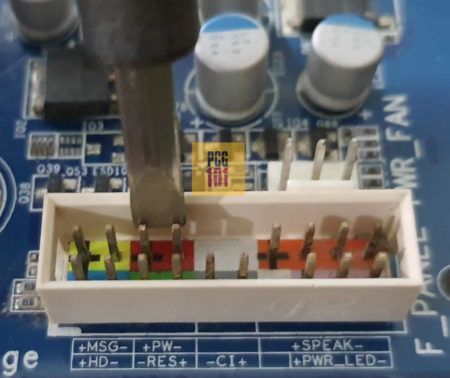
It would be wise to ensure the screwdriver does not touch other pins. Hence, precision or a small, flat screwdriver is advisable here.
Also Read:
What To Expect? – Beeping Sounds and Flashing LEDs
If you test a motherboard without a CPU, then the first outcome to expect is that NOTHING will be displayed on your screen.
The other outcome to expect is that your motherboard will perhaps flash LEDs, make beeping sounds, or both, or even nothing at all.
LED flashes and beeping sounds are essentially codes indicating where the problem lies.
Beeping Sound Codes
If your motherboard does have a speaker, it will make beeping sound codes to indicate the issue.
The number of beeps it makes would tell where the problem lies.
For instance:
- 1 Beep – issues with the memory
- 2 Beeps – issues with the motherboard
- 5 Beeps – issues with the CPU
There is a whole list of beep sound codes. You can learn more about them here. For instance, if you start the motherboard without a CPU but with RAM and other components installed, you may hear a 5-beep sound code.
If your motherboard DOES not have a built-in beep code speaker, you can invest in a very cheap one and install it yourself.
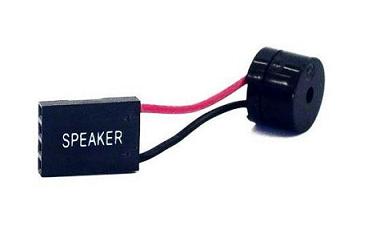
Also Read: How to Connect Motherboard Internal Speaker? (Beep Code Speaker)
LED Flashes
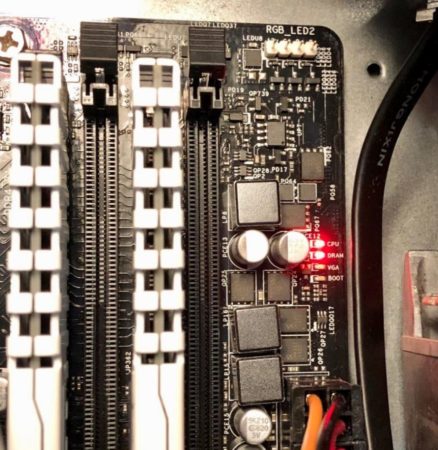
You may also see specific LEDs on your motherboard flash, indicating where the problem lies. To understand what these LED flashes mean, you may have to refer to your motherboard’s manual.
Also Read: How to Reset Motherboard?
No Beep Sounds & No LED Light Flash
The outcome that you may see is nothing.
If you hear no beep sounds and no LED flashlights, then do not fret. This still does not indicate that your motherboard is damaged.
Motherboards Without LED or Speaker
Some motherboards do not come with either, i.e., a beep sound code speaker and LED lights indicating where the problem lies.
In this situation, I would advise testing the motherboard through fans.
There are two ways you can go about this:
- Connect the Cooler Fan to the CPU_FAN header.
- OR connect the Case Fans to the 3 Pin FAN headers on the motherboard, often labeled SYS_FAN (Note: not all motherboards have FAN headers).
Also Read: How to Connect Fans To Your PC?
In the second method, you power the Case Fans through the motherboard instead of the Power Supply Unit. You will need a Case FAN that has the three Pin connectors.
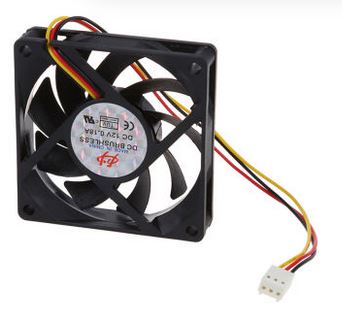
If the CPU or System Fans turn on, you can be sure that the motherboard receives the power. This can POTENTIALLY indicate that the motherboard is okay unless an essential IC or controller is damaged. In that case, the motherboard will still receive the power but may not start.
In the end, if you have ensured that the motherboard is receiving the power, the last thing to do is attach the CPU and test your system.
Also Read:
- How To Tell if CPU is Bad or Dead?
- How To Tell if PCIe Slot is Bad?
- Can I Upgrade My Laptop Processor from i5 to i7?
Conclusion
In this article, I discussed testing motherboards without a CPU in depth. This is essential for many PC builders who want to try the components before installing them into the case.
This test would highlight if and where the problem lies. Testing the motherboard without a CPU is an excellent way of checking if it is alive or dead, particularly when it’s brand new and you want to check if it came to you as DOA (dead on arrival).
While I reiterate that the procedure is pretty safe, I would advise that you exercise caution, especially if you are a PC builder or seeking to be one. Any mishandling or error on your side can also damage the motherboard.
Also, when in doubt, it is best to refer to an expert technician instead of fiddling with the delicate components yourself.
Gaming Build Guides
- PC for League of Legends
- PC for Rocket League
- PC for Roblox
- PC for Minecraft
- Gaming PC Without Dedicated Graphics Card
Work Build Guide
FREQUENTLY ASKED QUESTIONS
1. How do I know if my motherboard is faulty and needs to be tested?
If you are experiencing issues with your computer, such as random crashes or a failure to start up, you may want to test your motherboard to determine if it is the source of the problem. However, it’s important to note that testing a motherboard without a CPU installed will only reveal some issues, not all of them.
2. Can I damage my motherboard if I test it without a CPU?
No, you cannot damage your motherboard by testing it without a CPU installed. In fact, it is a common practice in the computer repair industry to test motherboards without CPUs to diagnose issues.
3. What are some common issues that can be detected by testing a motherboard without a CPU?
Testing a motherboard without a CPU can help you detect issues such as defective RAM slots, faulty power regulation circuits, or malfunctioning input/output ports. However, it’s important to note that testing without a CPU installed won’t reveal issues related to the CPU itself.
4. How do I interpret the results of my motherboard test without a CPU?
To interpret the results of your motherboard test without a CPU, you should consult the motherboard manual or contact the manufacturer for guidance. The results will depend on the specific motherboard and the testing method used.
5. Can testing a motherboard without a CPU help me determine if my CPU is faulty?
The main risk involved in testing a motherboard without a CPU is that you may miss certain issues or get inaccurate results.
To mitigate this risk, it’s important to use reliable diagnostic tools, follow the manufacturer’s instructions, and consult with a professional if you’re unsure of what to do.
Additionally, make sure to handle the motherboard with care and take necessary precautions to avoid static electricity damage.
Thank you Atif! This was a great guide. I was able to troubleshoot my PC without a CPU in it.
Glad this helped
What about older motherboards without BIOS FlashBack feature? I heard it won’t even turn on fans without CPU.
Msi b450 tomahawk motherboard showing red light cpu, does that mean cpu is dead,
Not necessarily. It could indicate a potential issue with a certain hardware or BIOS setting.
My motherboard won’t start with or without the cpu, unless I disconnect the 4 pin ATX12V lead, then it will start with or without the cpu
Hy Atif.
Interesting read! Thank you for all this stuff.
In my case I put only RAM, GPU and two case fan on mobo (Maximus VIII Ranger) and plug the PSU (TUF GAMING 750w). But only a red led line and the START button on the bord became power and are highlighted. When I press the START button (on MOBO or CASE), nothing happens. No fan are spinning, even not on the PSU. But when I JUMP the 2 pins (GRD and PSUon) with a papper clip on the 28 pins connector when it is pluged on the mobo, then all the fans are spinning (Case and GPU) an the MOBO indicate Q-Code 00 which refer to “Not used” in the description of the mobo. Is it possible that in this case, it is the power supply that is DOA? Or the Mobo needs to have a CPU installed to start properly!
Regard, Phil
On some PSUs, the fan only turns on when it reaches a certain load. Have you tried jumping the motherboard from its front panel header with the PSU cable connected?
How are you jumping the pins if the cable should be plugged into the motherboard? Also, as far as I can read from the spec sheet, the PSU does not have 28 pins connector. Perhaps if you can give more detail.
Just in case, check the orientation of the pins when plugging the 24-pin connector into the motherboard.
Hy Atif, thank you for replying.
No, I didn’t try to bridge directly the pins on the motherboard since I had already connected the case button wires, but I will give it a try.
My mistake concerning the number of pins. Of course there are 24 and not 28.
I bridged with a paperclip. You can easily do that from the top of the plug even though it is connected on the MoBo.
The plug have a foolproof, it is almost impossible to be wrong when connecting. When I connected it, I didn’t feel any resistance that would make me think I had inserted it wrong.
In a short time I will have a processor and I will come back here to inform about the result.
Personally I think I had the bad luck to have received a new faulty PSU.
We will see…
Hy
OK, I’ve finally install a CPU to my mobo and you know what? Everything is working fine 🙂 !!
No faulty PSU!
By the way, I have tested if I get POST screen when I disconnect everything else, RAM, GPU, only with the CPU in place, an that works.
So I can say that not all mobo can be tested without CPU in place.
I hope this can help…
how to fix this issue , no qled flashing while im testing it. i don’t know what is going on in my new motherboard. the motherboard is dead or the cpu? before this issue. my system unit was peeing by my cat while running the pc, then i go to the technician they said replace a new motherboard. then i buy a new motherboard and i test it. and this is what happened check the viddeo
sorry for my bad english.
https://drive.google.com/file/d/1R80_e34W1bqR5vFA3tvC35atWzafjJsD/view?usp=sharing
then i see this post i try it ,nothings happened no flashing leds.
My motherboard shows dram error. I’ve started the oc without ram it beeps once and shows dram error. My cpu doesn’t heat when turned on. Is the cpu dead or motherboard?
Note : When i turn it on. My cpu fan works along with other fans connected to motherboard.