RAM is perhaps one component that we have all thought about upgrading as the first line in boosting the performance of our PC. As such, new people often wonder what to do after upgrading RAM. Do you have to install drivers, update your PC, etc.?
Fortunately, once you have installed a new RAM module into your PC, there is generally nothing more you need to do.
RAM sticks are plug-and-play components. So long as you have the RAM module type compatible with your motherboard, you do not need to worry about anything else.
You do not need to install drivers or update your operating system to detect or run the RAM modules.
However, you can make a few checks for optimal performance, and I will talk in detail about those below.
So What to Do After Upgrading RAM?
Again, RAM modules are plug and play; you generally do not need to worry about installing them.
However, I recommend performing the following checks to make sure the newly installed RAM is working optimally:
- Check if RAM is detected in the first place
- Enable XMP (If supported by the motherboard and RAM)
- Check if RAM is working in Dual Channel mode
- Check the Frequency of Upgraded RAM
- Benchmark Your RAM
1. Check if RAM is Detected
So this is the most apparent check you must perform after upgrading RAM.
You have to make sure that your PC has detected upgraded RAM.
Check Using About This PC
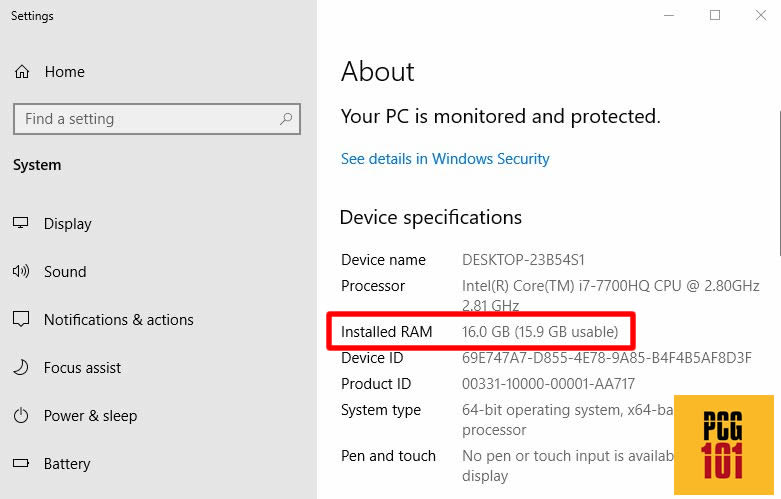
A straightforward way is to go to the “Properties” or the “About This PC” utility in Windows.
- On Windows 10, Right Click on “This PC”
- Select Properties
- This should open a new Window
- Look for the field labeled “Installed RAM.”
- Check if the upgraded RAM has been added to the total
Alternatively, type “About This PC” in the Windows Search bar.
Check Using Command Prompt
Another neat way to check not just the total amount of RAM in your PC but also the amount of RAM installed in EACH slot is using Command Prompt.
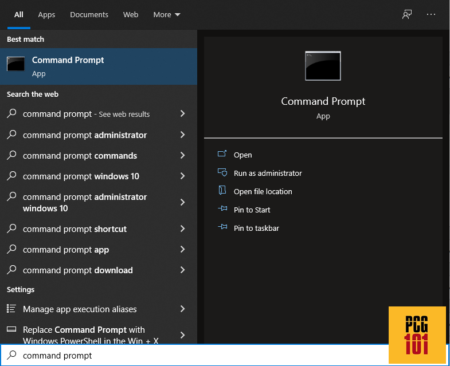
- Head over to the Windows Search function.
- Type Command Prompt
- Open the application
With the Command Prompt open, type in the following code
wmic MemoryChip get DeviceLocator, Manufacturer, PartNumber, capacity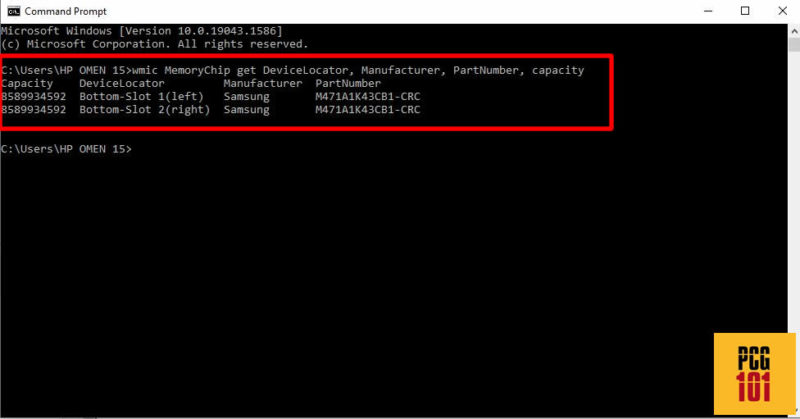
Note that the capacity is written in BITS. So 8589934592 equals 8 GB of RAM.
As such, when upgrading your RAM, it can be worthwhile to check if it has been detected in its respective slot.
Also Read: Where is RAM in Device Manager?
2. Enable XMP (if Supported)
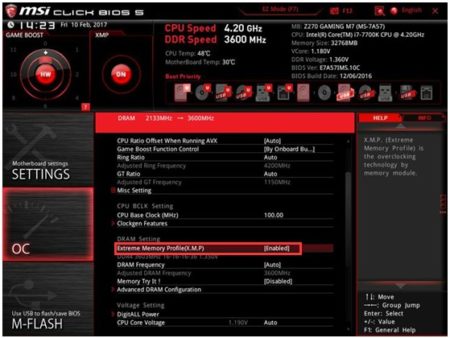
If your motherboard and your RAM modules support the Intel XMP or Intel Extreme Memory Profiles, then make sure you enable them through the BIOS.
XMP profiles are settings that boost the performance of the RAM modules. The manufacturers install these onto a small chip on the RAM sticks.
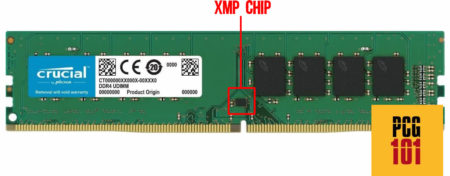
These profiles are added onto RAM sticks if RAM sticks are intended to be operated at higher than their base frequency.
By default, the motherboard and the RAM modules DO NOT have the XMP mode enabled.
You have to enable the XMP profile mode manually through BIOS.
It is not necessary for all RAM modules to have the XMP profile or for all the motherboards to support XMP. Therefore, you must check your RAM and motherboard’s specs to check if XMP is supported.
Also Read: How to Check RAM Model and Brand?
3. Check if RAM is in Dual Channel Mode
Another essential aspect of ensuring you have two or more RAM modules is that it works in Dual Channel mode.
Dual Channel is a technology that doubles the number of buses that the CPU can use to access the RAM. Doing so allows for faster data transfer between the CPU and the memory.
For Dual Channel to work, you need to:
- Have TWO RAM sticks
- Place the RAM sticks in the correct slots.
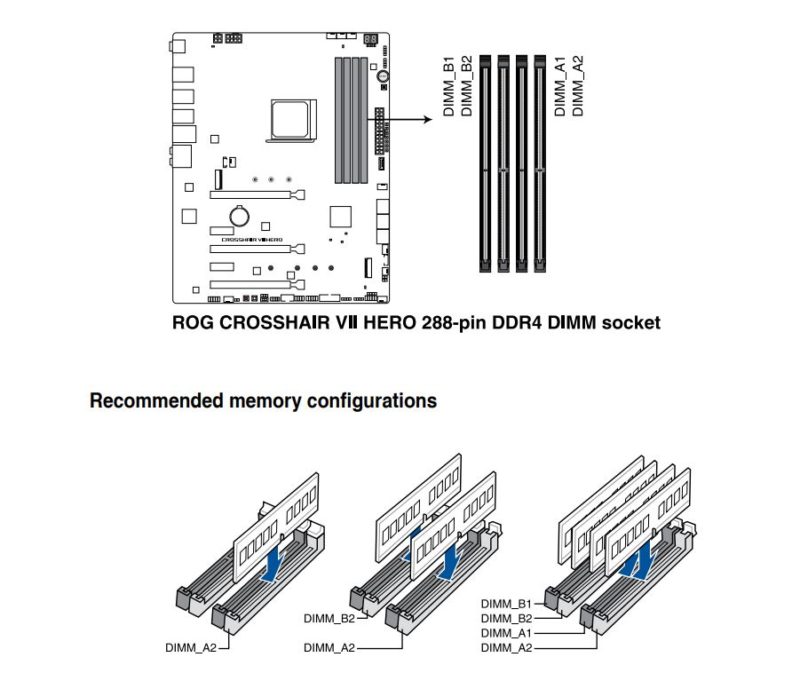
If you have four memory slots on your motherboard and two RAM sticks, you generally have to put the RAM stick in the second and the fourth slot to enable the dual channels.
Read in Detail Here: Which RAM Slot to Use?
Checking if Dual Channel Mode is Enabled in CPU-Z
So to check if your memory is working in dual channels, you can use a simple and free third-party utility called CPU-Z.
- Download and Install CPU-Z
- Run the Utility
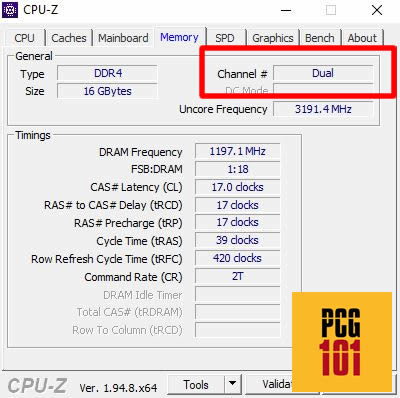
- Head over to the Memory tab
- Look for the field labeled as Channel #
Again, you will not see dual channel mode if you only have a single RAM stick.
However, it is worth leveraging the Dual Channel technology if you have added a RAM stick.
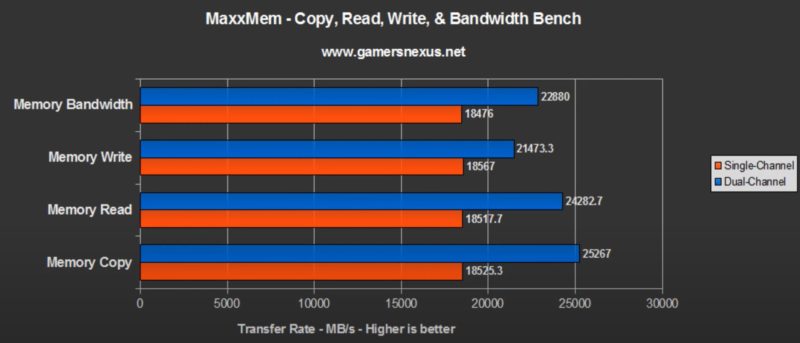
According to GamersNexus.net, leveraging Dual Channel can give you a sweet performance boost of up to 30%.
Also Read: How to Check if RAM is Dual Chanel?
4. Check the Frequency of the RAM
Another critical parameter to check is whether your upgraded RAM works at the rated frequency.
Besides the rated frequency, if you enabled XMP, ensuring that the RAM works at your desired XMP frequency is also essential.
To check the frequency, you can again use CPU-Z.
- Download and Install CPU-Z
- Run the Utility
- Head over to the Memory Tab
- Look for the field DRAM frequency
- If your RAM operates in dual channels, the actual frequency is double what it shows in the DRAM frequency field.
For instance, I have two 8 GB DDR-2400 sticks installed on my PC. Here is what it shows in CPU-Z:
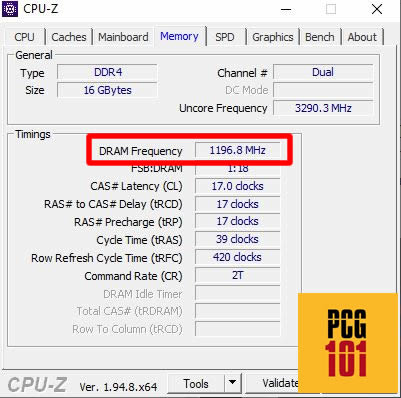
Here you can see that it reads 1196.8 MHz. Since the RAM is in Dual Channel mode, if I double it, I get 2393.6 MHz, which is close to 2400 MHz and within the margin of error.
Hence, for me, the RAM frequency checks out.
Often when you install new RAM modules, there can be a frequency mismatch.
For instance, if you have a DDR4-2400 MHz stick initially installed in your PC, and then you upgrade your total RAM with an additional DDR4-3000 MHz RAM module, then you have created a frequency mismatch.
This is not an issue, and your PC will work just fine. However, the DDR4-3000 MHz RAM will be clocked to 2400 MHz frequency to match the previously installed weaker RAM. As such, the full potential of the more expensive DDR4-3000 MHz stick would go to waste.
5. Benchmark Your RAM
Benchmarking your installed RAM is a bit more advanced for average users, but this can give you vivid details regarding how well your RAM performs.
There are various RAM benchmarking utilities out there. I recommend using the Maxxmem2 for its simplicity or the UserBenhcmark.
Maxxmem2 is pretty simple to use.
- Download the benchmark
- Run utility
- Press the “Start Bench” button
- Wait for the benchmark test to complete
- Check out the results
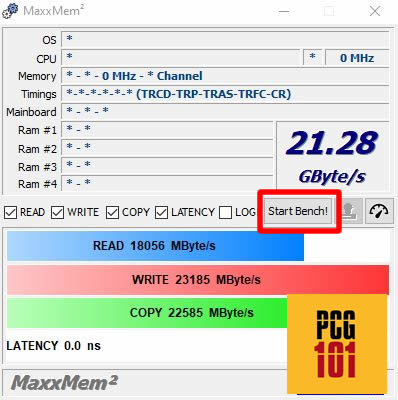
These tools test the RAM read, write, and latency of your RAM.
Benchmarking is particularly great for enthusiasts and overclockers who wish to tweak the settings of their RAM modules.
Benchmarking can tell you the following:
- The before and after performance results with XMP disabled and enabled.
- How do your RAM modules compare to the rest of the RAM modules with similar specs out there?
- Help you detect issues with performance.
Other popular benchmarks for testing RAM performance include AIDA64 and Geekbench.
Final Words
Here I talked comprehensively about what to do after upgrading RAM. However, you generally do not have to worry much.
If you have made sure that the RAM is compatible with your system and you have upgraded the RAM with the correct specs, then you should face no issues.
However, you can perform the above-mentioned checks to verify and ensure the RAM works correctly.
FREQUENTLY ASKED QUESTIONS
1. Do I need to reinstall my operating system after upgrading RAM?
No, you do not need to reinstall your operating system after upgrading RAM. Upgrading RAM only affects your computer’s memory, and does not impact the software or data stored on your computer.
2. What are some common issues that can occur after upgrading RAM?
Some common issues that can occur after upgrading RAM include compatibility issues with the new RAM, overheating due to inadequate cooling, and incorrect installation of the new RAM.
It’s important to follow the manufacturer’s instructions carefully and ensure that the new RAM is compatible with your computer.
3. How much RAM do I need for optimal performance?
The amount of RAM you need for optimal performance depends on the specific tasks you plan to perform on your computer.
As a general rule of thumb, most users will benefit from at least 8GB of RAM, while users who perform more demanding tasks such as video editing or gaming may require 16GB or more.
4. How do I know if I need to upgrade my RAM?
You may need to upgrade your RAM if you experience frequent slowdowns or crashes when running multiple applications, or if you are unable to run certain programs due to low memory.
You can also check your computer’s memory usage in the Task Manager (Windows) or Activity Monitor (Mac) to see if you are consistently using close to 100% of your available memory.
5. How often should I upgrade my RAM?
The frequency at which you should upgrade your RAM depends on how you use your computer and how demanding your applications are.
As a general rule of thumb, it’s a good idea to consider upgrading your RAM every 2-3 years to ensure optimal performance.
However, if you notice significant slowdowns or other performance issues, you may need to upgrade your RAM sooner.