Unlike most devices, the motherboard cannot be found intuitively in the Device Manager. Instead, it is bundled with many other critical components under the “System Devices” tab.
In this article, we will look further into exactly where the motherboard is in Device Manager, which tabs to open, and which elements to look at to figure out what kind of motherboard you have.
While the Device Manager would not highlight your motherboard’s EXACT make and model, it can certainly tell you the following essential Information regarding your motherboard:
- What chipset is the motherboard based on
- What systems and interfaces it has
- Whether the motherboard systems and interfaces are operating optimally
- What drivers does each of the system and interface have, and what are their versions
TABLE OF CONTENTS
Where is Motherboard in Device Manager – How to Access It
There are several ways through which a user can access the motherboard drivers from within their OS environment. This can be quickly done for a Windows user through the Device Manager.
It is important to note that Device Manager can be accessed in many ways
Step 1: Open File Explorer
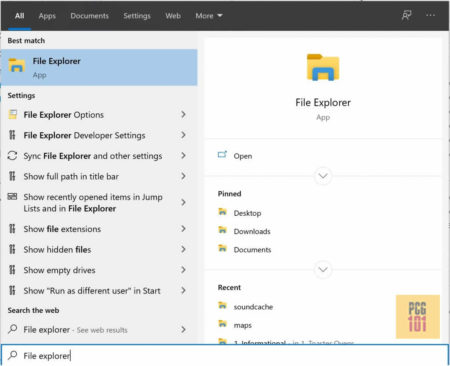
It would be best if you open File Explorer. This is the default Windows program used to navigate files on your computer.
You can easily access it by typing “File Explorer” in the search bar.
Step 2: Right Click This PC -> Hit Properties
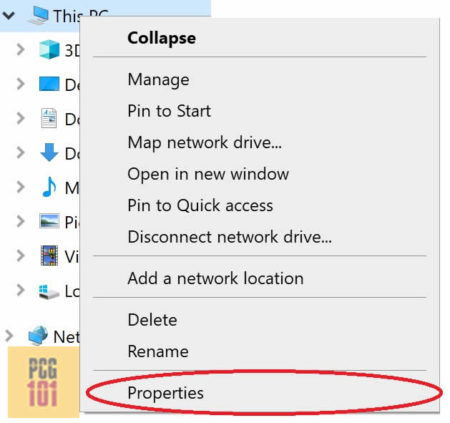
In the new file explorer window, find the icon “This PC” on Windows 10.
In some versions of windows, you may need to find the “My Computer” icon.
Right-click on either and then find and click the “Properties” tab in the popup window that appears. This will open the properties window.
Alternatively, you can click the “Manage” option instead of “Properties” to go directly to the Device Manager. However, this option may not be available on all operating system versions.
Step 3: Find the Device Manager
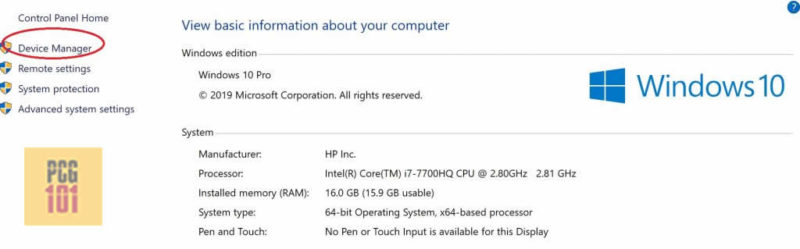
Find the tab labeled “Device Manager” from the properties window on the Left.
You can also find the same under the “Hardware” tab in some older versions of Windows.
Once you have accessed the Device Manager window, you will find a list of all devices connected to your machine. They will be grouped systematically.
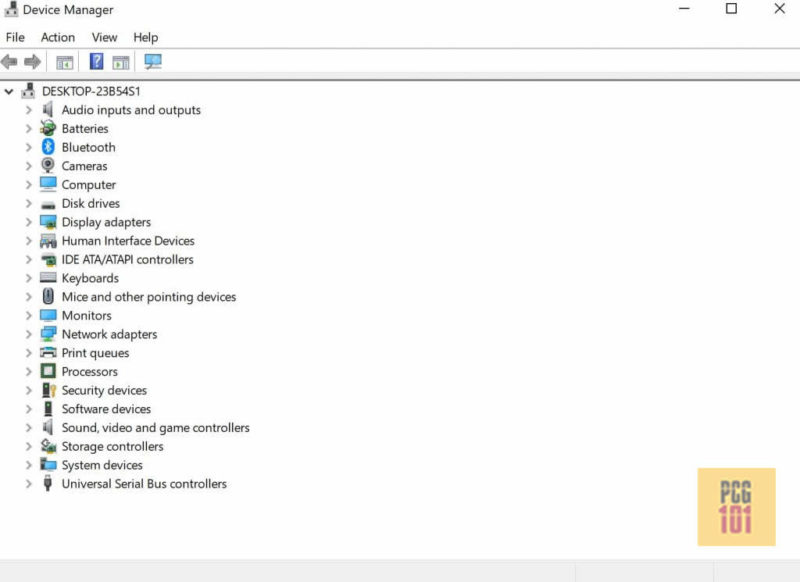
Step 4: Expand System Devices
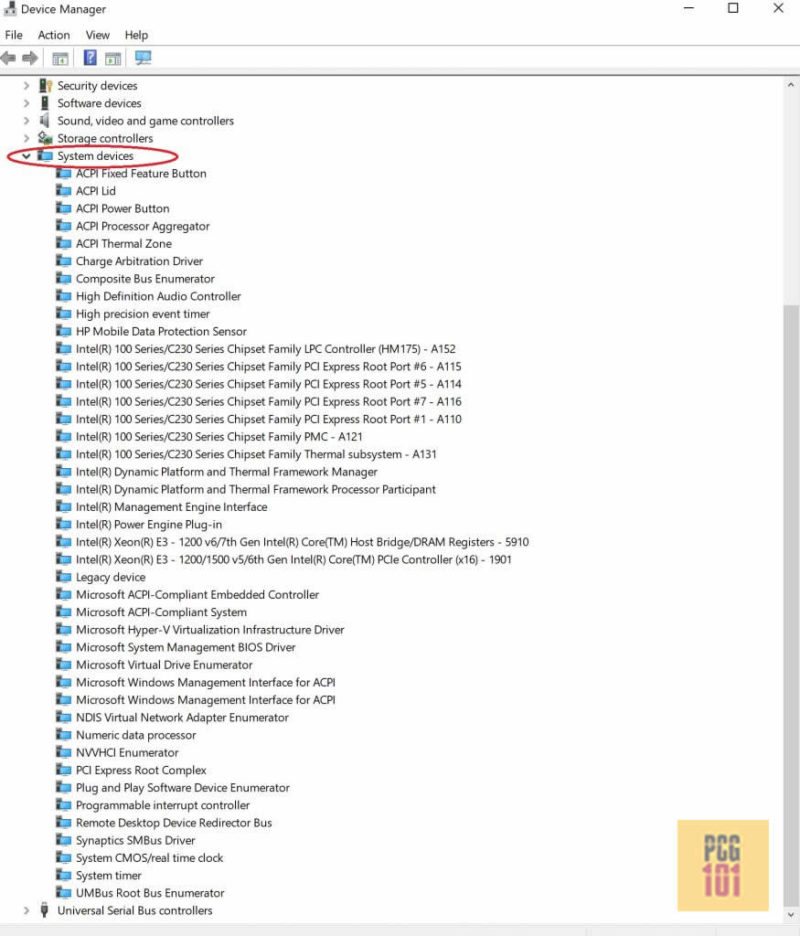
You need to find the “System Devices” tab and expand it.
You can get some essential bits of Information regarding your motherboard from here. For instance, I can tell from here that my system’s motherboard has the Intel C230 chipset.
With this chipset information, I can find out the generation it belongs to, the CPUs it supports, the RAM channels it has, and a plethora of other Information from Intel’s website.
Sifting Through Each Component
You can access the properties of each of these systems. They will open in a popup window, and you will see different tabs for various Information regarding the procedure.
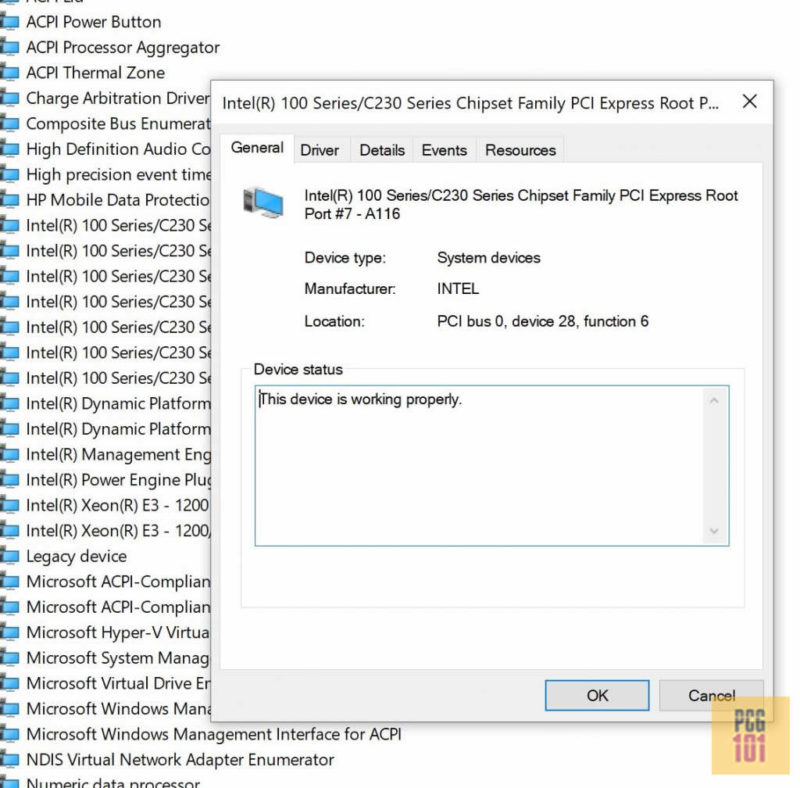
Each of the components will have the following tabs of Information:
1. General Information
This will be presented under a tab titled “General.” Here you can expect to find basic Information about the device you’re looking at, such as its type and manufacturer. You can also get device status information.
2. Driver
Under the “Driver” tab, you get Information about the installed drivers for your system and their version.
You can access the Driver details and perform administrative tasks like disabling the device or updating the drivers where necessary.
Also Read: How to Install Motherboard Drivers Without CD Drive?
3. Details
The “Details” tab lets you get more specific Information about the motherboard.
This is for advanced users who want to dive deep into the specifics of the system component in question.
4. Events
This provides a log of system changes regarding using the motherboard, such as when it was configured.
The logs are timestamped, and you can get extra Information by clicking the “View All Events” button at the bottom.
5. Resources
Sometimes installing and updating devices can cause conflict with another system, making it inoperable.
This tab allows you to check for conflicts with the selected system component.
Also Read: Do Motherboards Come with Cables?
Possible Issues
It can be hidden if you can’t find your “Motherboard Resources” selection under System devices in your Device Manager.
To solve this issue, still in your Device Manager window, find the “View” tab at the top. Click it, and in the drop-down menu that appears, see the “Show Hidden Devices” options and ensure it is checked. If not, click it.
Also Read: What CPU is Compatible with My Motherboard?
Reasons for Accessing Motherboard Settings
Accessing motherboard settings can also be accompanied by reasons such as
1. Making Sure a Certain Component is Accessible or Available
Device Manager ensures whether a particular component or driver for a member is working correctly on your PC.
If there is an issue, the device manager will either not show the device or how a yellow caution sign signals a problem with the drivers.
So, for example, if your audio is not working for some reason, it would be worth checking the “High Definition Audio Controller” status under the “System Devices.”
2. Accessing Motherboard Information
Sometimes accessing the Device Manager is needed to figure out the make and model of your motherboard.
UNFORTUNATELY, the make and model of the motherboard cannot be figured out through the Device Manager.
However, you CAN figure out the chipset and driver information regarding the various systems and interfaces on the motherboard.
To find out the make and model of your motherboard, you can have better luck with the “System Information” tool (Type “System Information” in the Windows search bar).
3. Make Changes
Sometimes, the reason for trying to find motherboard settings is so that you can do some maintenance on the system and even upgrade it.
You can uninstall, install or update the drivers for the motherboard systems through the device manager. You can enable or disable them.
Also Read: How to Reset Motherboard?
Exercise Caution Here
When fiddling around in the Device Manager, exercise caution. You do not want to tamper unless you are sure, especially with the drivers.
Final Words
Device Manager can give you access to a load of Information regarding the components on your PC.
Unfortunately, finding the motherboard in Device Manager is not as straightforward as the other components. Therefore, there is no simple answer to “where is the motherboard in the device manager?”
Instead of having a single entry for the motherboard itself, the motherboard information in Device Manager is divided into several sub-systems and interfaces, each with its dedicated entrance.
They can all be bundled under the “System Devices” drop-down menu in the Device Manager.
Also Read- Where is RAM in Device Manager?
FREQUENTLY ASKED QUESTIONS
1. Is it necessary to check my motherboard in Device Manager?
While it is not necessary to check your motherboard in Device Manager, doing so can provide useful information about your system’s hardware and help diagnose any potential issues.
Viewing your motherboard in Device Manager can give you insight into the specific model of motherboard you are using, as well as any associated drivers and hardware components.
2. How do I know if the motherboard is working properly in Device Manager?
To know if your motherboard is working properly in Device Manager, you should check for any warning or error messages associated with the motherboard.
If your motherboard is functioning correctly, you should not see any issues or errors in Device Manager.
However, if you notice any warnings or errors related to your motherboard, it may indicate that there is a problem that needs to be addressed.
3. Can I update or reinstall my motherboard drivers from Device Manager?
Yes, you can update or reinstall your motherboard drivers from Device Manager.
To do so, right-click on your motherboard in Device Manager and select “Update Driver” or “Uninstall Device,” depending on the action you want to take.
You can then follow the on-screen prompts to complete the driver update or removal process.
4. Can I disable my motherboard in Device Manager if I don’t need it?
It is not recommended to disable your motherboard in Device Manager, as it is a critical component that is required for your system to function properly.
Disabling your motherboard could cause your system to stop working altogether.
It’s best to leave your motherboard enabled and focus on disabling unnecessary hardware components if you need to free up system resources.