Most modern-day gaming PCs are made of a combination of components that are purchased separately and then put together. Graphics cards are the most expensive part of any system.
Something like the brand of the GPU only matters a little as long as the manufacturer is well known. However, what matters is the compatibility of the GPU with the system (modern GPUs are not compatible with an ancient technique with AGP slots, for instance).
Several reasons may contribute to the computer needing to start after installing a new graphics card. These include faulty/dirty PCIe slots, bad power cables, outdated BIOS, wrong video settings in the BIOS, etc.
If the graphics card and the motherboard are both in working condition and there is no compatibility issue, you will get everything working by the end of this article.
So How to Fix The Computer Not Starting After Installing A New Graphics Card Issue
Almost all issues (except physical damage or death on arrival) are solvable. The problem can range from the motherboard’s BIOS issues to the graphics card not being appropriately inserted or the 6-pin or the 8-pin PCIe cables not connected in place (if required by the card).
The issue is most probably being caused by one of many issues, but it’s better if you follow along,
1. Dirty/Faulty PCIe Slot:
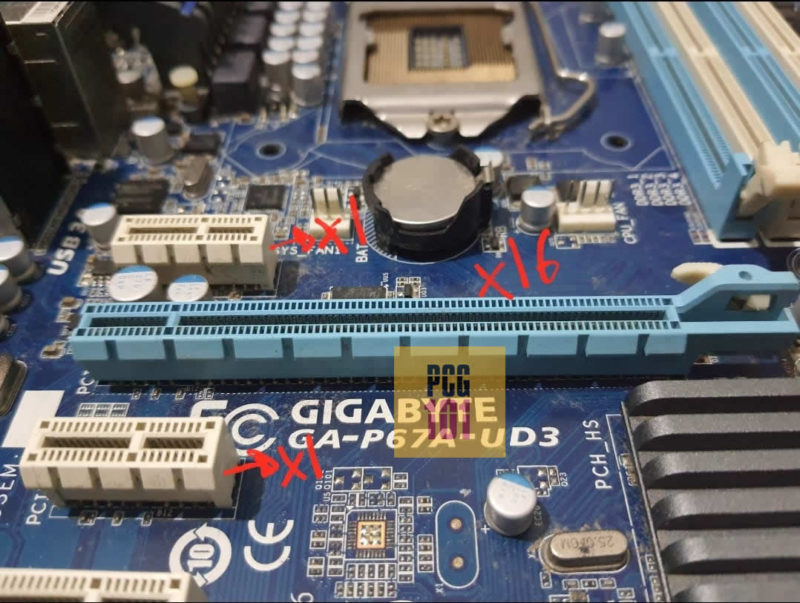
If your PC has been running on integrated graphics for a while, it may have accumulated dirt in the PCIe slot. The primary x16 PCIe slot is where the card is supposed to be inserted and is usually just under the CPU, perpendicular to the RAM slots.
To clean the x16 slot, follow these steps:
- Turn off the PC & remove all power cables.
- Clean the PCIe slot with compressed air or a blower. (Blow into the PCIe slot with your mouth if you do not have an air compressor or a blower.)
- Take a soft brush and a bottle of Isopropyl Alcohol (IPA).
- Wet the brush with the IPA (not too much).
- Now rub the brush inside the PCIe slot properly.
- Let the PCIe slot dry for a few seconds.
- Plug the card back into the slot.
If you don’t have IPA, please don’t use water or any other cleaning liquid; a regular dry brush should be enough. But to be thorough, you should consider buying any form of IPA.
Also, compressed air is not a must; it’s only used to clear out the slot of residues like dust, silicon, or carbon flakes.
If you see any damage to the PCIe slot, i.e., it is bent, the pins are coming out, the slot has detached from the motherboard, or there is hard carbon on the pins, you should contact your motherboard manufacturer and not attempt to repair it yourself.
You can use the following method if the cleaning processor doesn’t work.
2. Make Sure the Graphics Card is Plugged Into the Right PCIe Slot
Not all PCIe x16 slots are the same. Some PCIe slots have a physical size of an x16 slot but can be hardwired to only 4 PCIe lanes.
Most graphics cards require at least 8 PCIe lanes to work.
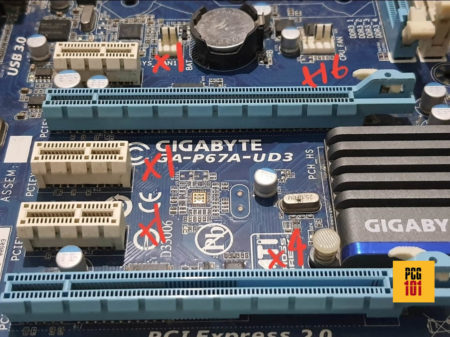
If you have a motherboard similar to the above configuration, plugging the graphics card in the bottom x16 slot (which only has four lanes) will render it inoperable.
As such, you will get no display from the graphics card. Your PC will work, but there will be no display.
3. Insert the Card in the PCIe Slot Properly
You may not have inserted the graphics card correctly in the PCIe slot, which, if true, means that the card is not connected to the motherboard.
Please carefully remove the GPU from its slot and insert it back in. While inserting, ensure the graphics card is aligned with the slot. You will see a small cut in the gold strip of the card and a small bump in the slot. You can use this for alignment before applying pressure.
When you know the alignment, gently press the card until you hear a clicking sound. This click means that the card is now correctly inserted into the slot.
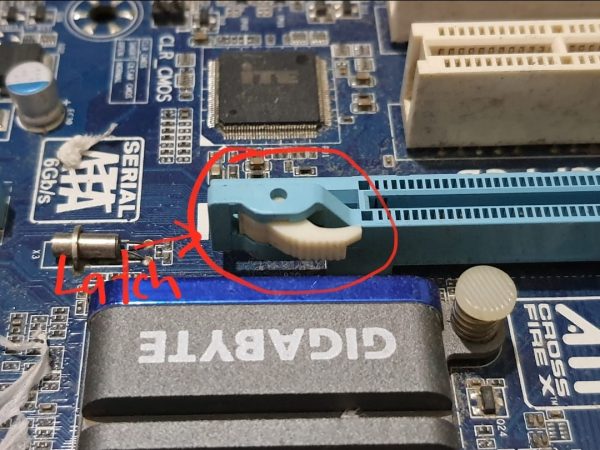
After this, you will have to place screws on the back I/O panel of the case to hold the card correctly. The screws are essential as leaving the card hanging in the PCIe slot (tower cases) can potentially damage the slot as well as the connectors of the card. Make sure you have suitable screws in place.
You can move on to the next step when you are sure that the card is in the right and secure.
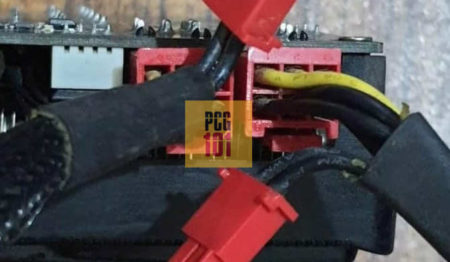
4. Make Sure All Power Connectors are Connected
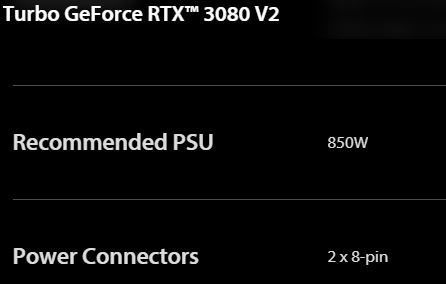
Most GPUs nowadays have high power requirements (more than 100 Watts). These cards require direct power input from the PSU; without the power cables, the card will not run.
If you want to check whether your graphics card requires additional power, please check for the six or 8-pin connectors on the top side of the GPU. The connector should look like this:
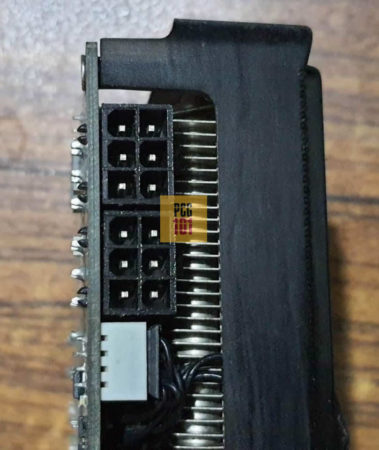
Please ensure that ALL the power connectors are connected to the PCIe cables from the PSU.
If your graphics card has these slots and you have not connected any wires, here are the steps you should follow:
- Take off the back panel of the casing.
- Among the PSU cables, look for a wire with a six or 8-pin head (sometimes with PCI-E written on them).
- Insert these heads into the connectors on the GPU (there is a 6-pin head and an additional 2-pin head with it. If the GPU has an 8-pin connector, insert the 6-pin head and the 2-pin head such that they make an 8-pin head).
Note: If the GPU has two separate connectors, look for two leads coming from the PSU and insert both. - Once you have inserted the pins, close the back panel.
- Now, connect the power cable to the PSU and turn on the PC.
The issue should now be solved. However, if the problem continues or your graphics card does not require additional power, please move on to the next step.
5. Weak PSU
One of the biggest mistakes that beginners make is that they need to calculate the GPU and CPU wattage requirements beforehand. Gaming PCs generally require high and stable power for every component to function.
To see if your PSU is enough for your system, you can check the total output of the PSU. Typically, this information is written on the PSU’s body in Watts. After this step, search online for the TDP of your graphics card. Most websites will also tell you what PSU best suits the job.
If your PSU is outputting less wattage than the GPU and CPU’s combined requirement, you need to upgrade your PSU to a higher output one.
Please go to the next step if this doesn’t solve the issue or if your PSU’s output balances the system’s requirement.
6. Faulty Wires and Monitor Settings
Many types of ports and wires are used nowadays. These include HDMI, DP, DVI, VGA, etc.
Now, these wires come with the monitor and connect the monitor to the graphics card’s display output. It would be best to ensure the wire was working and not faulty. The only way to do that is to use another wire for the connection.
Some monitors do not have an automatic detection feature. If there is still no display with the new wire, please ensure the monitor is in the correct mode. For example, the monitor should be on HDMI mode if you use an HDMI port for connection.
Also, please ensure the wire is connected to the graphics card’s port and not the port on the motherboard. The port on the motherboard is used for integrated graphics cards and not external GPUs.
Also Read: Computer Turns On But No Display – 27 Fixes and Causes
If the issue still exists, go to the next step.
7. You May Require a BIOS Update
The stock BIOS of the motherboard may need to be updated, which may cause the motherboard not to recognize the new graphics card.
The remedy for this is simple but should be performed by an experienced individual (you can brick the motherboard if you don’t know what you are doing).
Motherboard manufacturers provide BIOS update utilities, but if there are not available, a BIOS flash is the only method to update.
Note: Proceed with caution. If this is your first time doing this, it is better to consult an expert. A bad BIOS update can brick your motherboard.
Follow these steps to update the BIOS:
- Remove the new graphics card from the system.
- Find out your motherboard’s number and model (this is important).
- Go to your motherboard manufacturer’s website on another system or laptop.
- Search for your specific motherboard in the downloads section.
- Download the latest BIOS from the website.
- Extract the ZIP file and copy the BIOS folder onto a USB drive.
- Now, boot up your system and enter your BIOS.
- Navigate to the flash option. (Different for all motherboards. Get help from the internet if you have trouble finding this)
- When asked about the drive that contains the new BIOS, select the USB.
- Select the BIOS file that you copied.
- The system will automatically start updating the BIOS.
NOTE: DO NOT TURN OFF YOUR SYSTEM WHILE THE UPDATE HAPPENS.
Once the update is done, the system will reboot. Shut down the system and install the graphics card correctly.
If the system doesn’t boot up, you can move to the next step.
8. Check the Graphics Card; Perhaps it DOA
If any of the steps above do not solve the problem, you should check your graphics card for issues.
If it is a new graphics card, it may have come Dead on Arrival (DOA).
So, to verify if an issue happens with your graphics card, please insert the card into another PC (One with different specifications). If it works, the problem is not with the graphics card but with your system.
Also Read: How to Check if Motherboard is Dead?
If the graphics card does not work in another system, it would be best to contact your manufacturer for assistance if there is no display on that system.
Note: Do not perform any repairs on a card, as this may void the card’s warranty.
Also Read: Why Does My PC Randomly Turn Off?
Final Words
Suppose you are suffering from the computer not starting after installing a new graphics card. In that case, there can be many reasons ranging from issues as simple as the card needing to be installed correctly to the card coming dead on arrival.
If your computer is not turning on AT ALL after installing the graphics card, the issue could be power related, mainly if your PC works without the graphics card installed.
If the GPU draws too much power, it will render the entire PC inoperable.
Frequently asked questions
1. What should I do if my computer is not displaying anything after a power outage?
After a power outage, unplug your computer from the power source and wait for a few minutes. Then, plug it back in and try turning it on. If it still doesn’t display anything, try using a different power outlet or power cable. If the issue persists, there may be a hardware problem that needs to be addressed.
2. Can a faulty graphics card cause a computer to turn on but not display anything?
Yes, a faulty graphics card can cause a computer to turn on but not display anything. The graphics card is responsible for generating and displaying images on the monitor. If it’s not functioning properly, it can cause display issues. You can try removing the graphics card and using the onboard graphics to see if that resolves the issue.
3. How do I know if my computer’s display is the issue or if it’s another component causing the problem?
If your computer is turning on but not displaying anything, you can try connecting it to an external monitor or TV using a VGA, HDMI, or DVI cable. If the external display works, then it’s likely an issue with your computer’s internal display or graphics card. If the external display doesn’t work, then there may be a problem with another component such as the motherboard or power supply.
4. What are some DIY fixes for a computer that’s turning on but not displaying anything?
There are several DIY fixes that you can try if your computer is turning on but not displaying anything. These include checking the cables and connections, reseating the RAM and graphics card, resetting the CMOS battery, and updating the BIOS.
You can also try using a different power outlet or power cable. If none of these solutions work, it may be necessary to seek professional help or replace hardware components.