There are many methods to switch your PC to integrated graphics instead of dedicated graphics cards.
You can, for instance, remove the dedicated GPU when it comes to desktops. You can also disable the dedicated GPU from the device manager or use the dedicated GPUs control panel to set which apps use the integrated or reliable graphics card.
In this article, I will comprehensively discuss switching to integrated graphics. Generally, the solution is pretty simple; however, there are certain caveats to note with each method.
So without further ado, let us get started.
TABLE OF CONTENTS
How to Switch to Integrated Graphics?
There are four simple and easy switches to integrated graphics on a PC:
- Remove the Dedicated GPU (works on desktops)
- Disable the Dedicated GPU in the Device Manager
- Use the Dedicated GPU’s Control Panel to Set Preferred Graphics Card
- Use the BIOS to Enable the Integrated Graphics
1. Remove the Dedicated GPU (On the Desktop)
If your dedicated graphics card is malfunctioning or damaged, you must switch to the integrated graphics card for the display to work.
The easiest way to switch to an integrated graphics card on a desktop would be to remove the dedicated graphics card from the PCIe slot on the motherboard.
Here are the steps on how to remove GPU and switch to iGPU
Remove the GPU from the Motherboard
You must open your desktop case, find the graphics card installed in one of the PCIe slots and remove it.
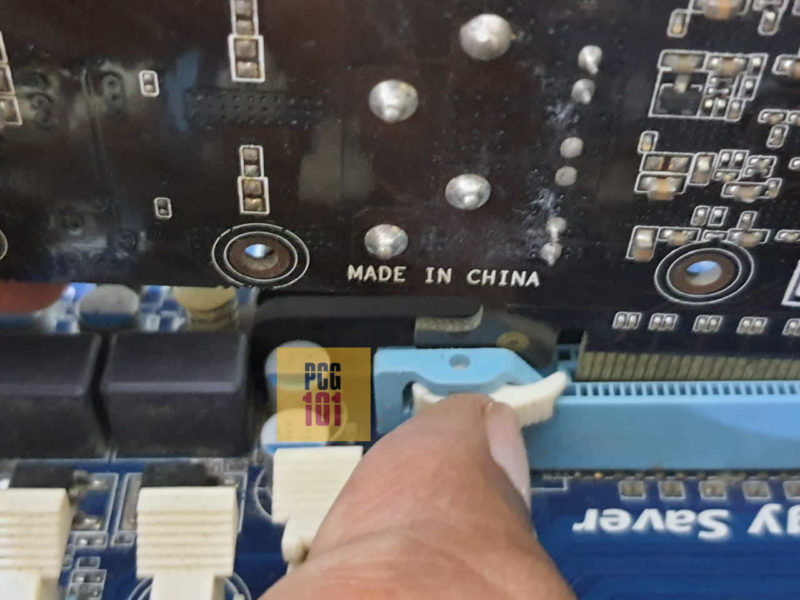
Press the latch/ slot clip to unlock your dedicated graphics card from the PCIe slot.
Also Read: How to Unlock PCIe Slot Clip/Lock?
Plug Your Monitor Cable Into the Motherboard’s Video Output Port
Next, plug your monitor into the motherboard’s video output ports.
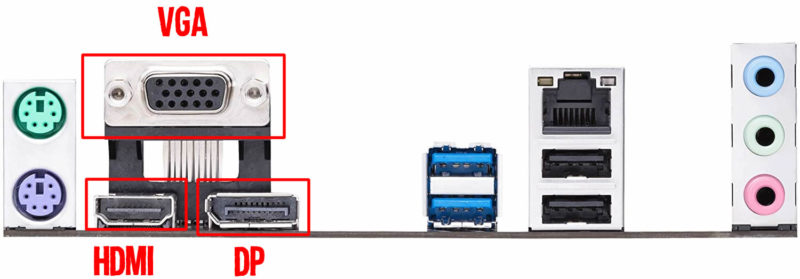
Most newer motherboards often have multiple video output ports, including VGA, HDMI, and DP.
Caveat 1: You Need To Have a CPU with an Integrated Graphics Card
One of the most crucial points to take note of in this method is that you need to have a CPU with an integrated graphics card in the first place to power up the video output ports on your motherboard.
Intel “F” series CPUs, such as the Intel Core i7 12700KF, DO NOT feature integrated graphics. Similarly, with AMD, only the “G'” series CPUs, such as the AMD Ryzen 5 3400G, feature integrated graphics. The rest do not.
Hence, if your CPU lacks an iGPU, the video output ports on your motherboard will NOT work.
Caveat 2: You Need to Have a Motherboard with Video Output Ports
First, it would be best to have video output ports on your motherboard to use your CPU’s integrated graphics.
A motherboard with no video output port means no switching to integrated graphics.
Additionally, if your motherboard lacks the right compatible port on your monitor, you must invest in an adapter such as HDMI to VGA or DVI to VGA, etc.
Caveat 3: Sometimes a BIOS Reset may be Required
In most cases, removing the dedicated graphics card from the motherboard will automatically switch your PC to iGPU (granted, you have plugged your monitor into the motherboard’s video output port).
If your monitor does not display anything, try resetting the BIOS.
To reset BIOS, unplug the PC from the wall socket. Wait a few seconds, and then remove the CMOS battery from the motherboard. Wait again for a few seconds, and then plug the CMOS battery back into its place.
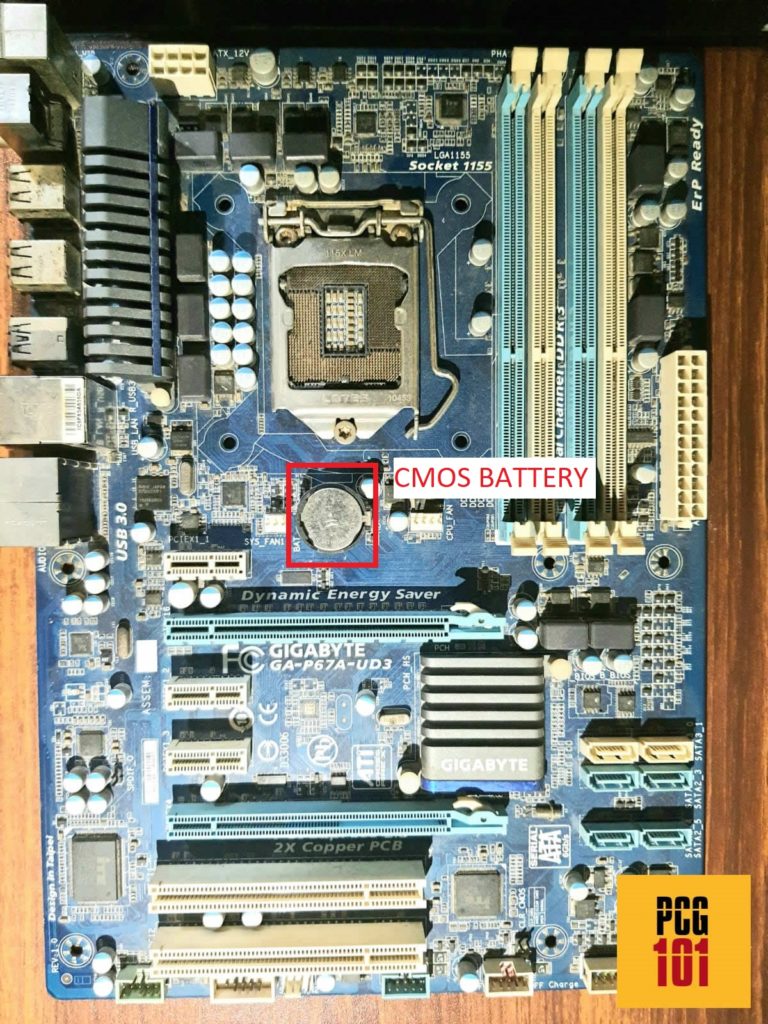
This will reset your BIOS and can work as a fix for no display issues with integrated graphics.
Also Read: How to Reset BIOS?
2. Disable Dedicated GPU in Device Manager
Another relatively simple way to switch to an integrated graphics card is to disable the dedicated graphics card from the Device Manager.
You can access Device Manager by Right-Clicking “This PC” -> “Manage” and then selecting Device Manager from the left-hand menu.
In the Device Manager, open the “Display Adapters” section.
Here locate the dedicated graphics card. In this case, the dedicated graphics card is the NVIDIA RTX 3070.
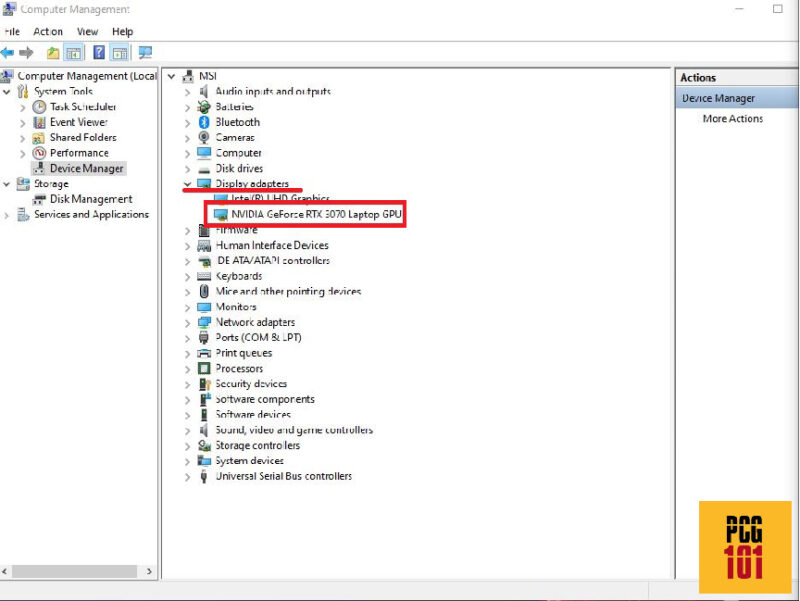
Select it, then press the “Disable Device” button from the top menu.
You will then be prompted with a confirmation message. Press “Yes.”
This should disable the dedicated GPU; running all applications would use the integrated graphics.
You can always reenable the dedicated graphics card using the same procedure.
3. Use the GPU Control Panel to Set Preferred GPU for Apps
You can also use the dedicated graphics card control panel to manage the preferred graphics card for a selected app.
For NVIDIA, head to its control panel and select “Manage 3D Settings” from the Left-Hand menu.

Here, select the “Program Settings” Tab.
From the Program Settings Tab, select the Application you wish to set a preferred graphics card for.
Here, for instance, I have “Rocket League” selected.
Finally, from the “Select the Preferred Graphics Processor for the Program” drop-down menu, select “Integrated Graphics.”
Press “Apply.” Henceforth, running Rocket League on my PC will always utilize integrated graphics.
Also Read: Is a 2GB Graphics Card Good for Gaming?
4. Enable On Board Graphics Through BIOS
The final, and also the most reliable method, is to use BIOS.
It should be noted that navigating through BIOS is a bit tricky, and incorrect settings can harm your PC.
Therefore, be careful when making changes, and if not sure, always consult with an expert.
You should also note that BIOS is different from manufacturer to manufacturer. Laptop BIOS offers limited control, whereas Desktop BIOS is more robust.
So basically, in your BIOS, you need to look for settings related to enabling or disabling “Onboard Graphics.”
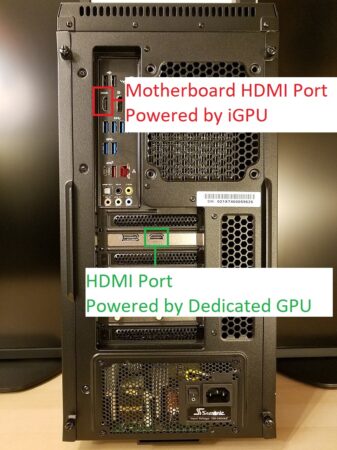
Unlike on laptops and desktops, the integrated graphics are often disabled when a dedicated GPU is plugged in.
Specific BIOS versions can be changed by enabling the “onboard graphics.”
This enables the integrated graphics for you and allows you to use the video output ports on the motherboard simultaneously with the dedicated GPU’s video output ports.
Read in Detail: How to Use Motherboard HDMI with Graphics Card?
Final Words
I covered several ways to switch to integrated graphics if your dedicated graphics card malfunctions. Let me know in the comments below if you know more ways to switch to integrated graphics.
FREQUENTLY ASKED QUESTIONS
1. Why would someone want to switch to integrated graphics?
Someone might want to switch to integrated graphics if they need to conserve battery life on a laptop or if they don’t need the high performance of a dedicated graphics card. Integrated graphics are also often more affordable and can be sufficient for everyday computing tasks such as web browsing, word processing, and video streaming.
2. Can I switch back to dedicated graphics after switching to integrated graphics?
Yes, it’s usually possible to switch back to dedicated graphics after switching to integrated graphics. The exact process may vary depending on your computer and graphics card, but it typically involves going into the computer’s BIOS settings or the graphics card control panel and selecting the dedicated graphics option.
3. How do I optimize my computer for better performance when using integrated graphics?
To optimize your computer for better performance when using integrated graphics, you can try adjusting the graphics settings of the applications you’re using, closing unnecessary background programs, and making sure your computer is running the latest drivers and updates.
You can also try overclocking your integrated graphics, although this can be risky and may cause stability issues.
4. What types of applications are best suited for integrated graphics?
Integrated graphics are best suited for applications that don’t require high levels of graphics performance, such as web browsing, word processing, video streaming, and basic photo editing.
They may also be suitable for some casual gaming, but not for more demanding games or tasks such as video editing or 3D modeling.