Several methods exist to check which graphics card is used for a particular game, application, or process. Knowing which GPU is used for what process can be helpful if you have multiple GPUs, i.e., integrated and dedicated graphics.
One of the simplest ways to know which graphics card is used for a particular task is through the Task Manager. Another method is free third-party software such as MSI Afterburner, particularly useful for gamers.
In addition, GPU-Z is another excellent free and light utility that can monitor what GPU is being used at a given time.
Let’s discuss the methods of figuring out graphics card usage and why you should know how to check.
TABLE OF CONTENTS
How to Check Which Graphics Card is Being Used?
While there are plenty of ways to know which graphics card is being used for a specific process or application, I am going to talk about four easy ways:
- Check Using the Task Manager in Windows
- Check Using MSI Afterburner
- Check Using GPU-Z
- Physically Checking
Video Tutorial
Video tutorial to check what GPU is being used. You can skip the video if you want to read it in detail.

1. Check THE CPU Being Used Using the Task Manager
The first and easiest way to check what GPU is being used is through the Task Manager. This method does not require you to install any third-party applications.
To determine what GPU is used for a particular processor, check the GPU Engine column in Processes Tab.
- Open Task Manager.
- In the Processes Tab, look for the GPU engine column.
- In the GPU engine column, you’ll see what GPU is used for a particular process.
Note that their name will NOT address them if you have an integrated and dedicated graphics card. Instead, they will either have “GPU 0” or “GPU 1” designation.
- GPU 0 – typically refers to the Integrated GPU. In my case, it is the Intel HD 630.
- GPU 1 – typically refers to the dedicated GPU. In my case, it is the NVIDIA GTX 1050Ti.
Here is a case study.
I am running a game called “Expeditions: Rome” in the background. This process is highlighted as “RomeGame” in the name column.
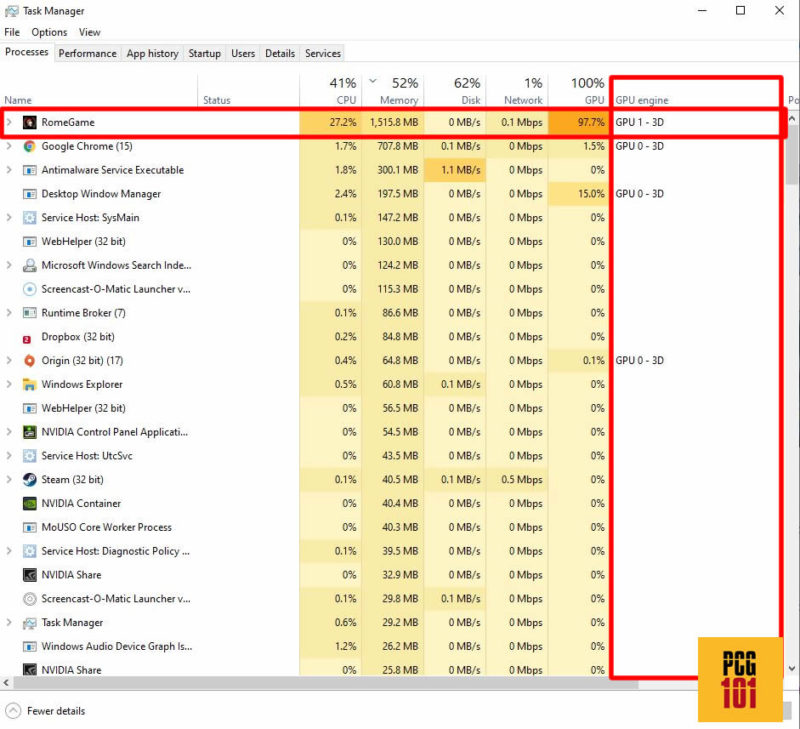
You can see above that in the GPU Engine column, the GPU used for the “RomeGame” process is GPU 1; GPU 1 refers to the NVIDIA GTX 1050Ti.
Another essential bit of information you can notice here is that you can have both the iGPU and the dedicated GPUs working simultaneously.
You can see that for the “Google Chrome” process, while GPU 0 is being used for the “RomeGame” process, GPU 1 is being used – so both GPU 0 and GPU 1, iGPU, and dedicated GPU are working simultaneously.
2. Check Using MSI Afterburner – For In-Game GPU Usage
I am using the MSI Afterburner to check what GPU is useful for gamers.
MSI Afterburner allows you to check which GPU is used WHILE GAMING.
Step 1: Download, Install, and RUN MSI Afterburner
Download the utility from the official website, install it, and run it.
Note that MSI Afterburner can work for all systems; you do not need to have an MSI motherboard, an MSI graphics card, or an MSI laptop for this utility to work.
You should see the following main window.

Step 2: Head Over to the Setting
Click the “Gear” icon on the screen’s left side to open a new window.
Step 3: Go to Monitoring Tab and Turn on the GPU Usage Sensors
In the Settings Menu, head to the “Monitoring” tab above.
The sensors showed under the “Active Hardware Monitor Graphs” turn on all the sensors corresponding to GPU Usage.
In my case, the sensors in question are as follows:
- GPU 1 Usage – GPU 1 refers to the dedicated graphics card
- GPU 2 Usage – GPU 2 refers to the integrated graphics card
To check which sensors refer to what GPU, go to the “General” tab in the Settings Window, and under the “Master Graphics Processor Selection” drop-down menu, check what GPU1 and GPU2 refer to.
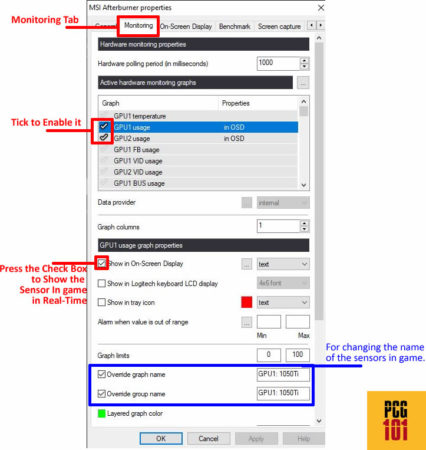
I must press the Check Mark next to GPU 1 Usage and GPU 2 Usage sensors to activate these sensors.
Then I need to individually select GPU 1 Usage and GPU 2 Usage sensors and press the “Show in On-Screen Display” check box in the “CPU Temperature Graph Properties.”
What Does the Check Mark Do?
The Check Mark enables the sensors and allows the particular sensor to record its data on the monitoring graph.
You can access the monitoring graph from Main Screen by heading to the “Hardware Monitor” section. Press the little “Monitor” icon on the Main Screen of the utility.
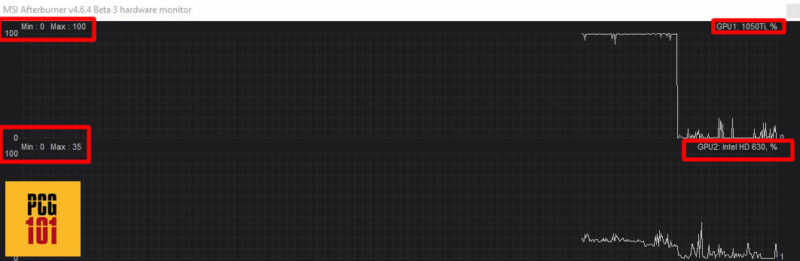
This chart shows the historical data regarding GPU Usage. Of particular importance is the max usage recorded.
Step 4: Fire Up Your Game
You can just run your game. On the top left side of the game, you can now see the GPU Usage for GPU 1 and GPU 2.
If you cannot see the value, press ALT+O; this is the default toggle for turning the value ON and OFF.

You can see here that my dedicated graphics card is being used quite heavily in this game, indicating that the primary graphics card being used for this game is the GTX 1050Ti.
Had this game been running on GPU 2 or the Intel HD 630, the dedicated graphics card usage would have been close to 0%.
You may also notice that GPU 2 or the iGPU is also being used, but as mentioned earlier, it is being used by different applications and processes, which you can check in the task manager.
3. Using GPU-Z
GPU-Z is another excellent free and light utility that enables comprehend details of the specs of all the GPUs installed in your PC and lets you monitor their usage.
Here is how you can use GPU-Z by TechPowerUp to know which graphics card is used at a particular time.
Download the Utility from the official website. Install and Run it.
You can see much information regarding the graphics card in the utility’s main window. You can select which graphics card you want to check using the drop-down menu on the bottom left.
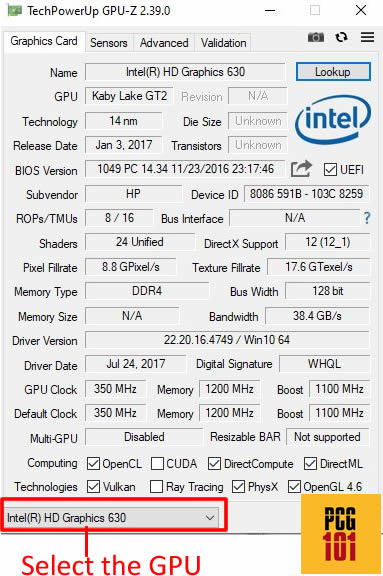
To monitor the usage of the selected graphics card, you can head over to the Sensors Tab. Here you will find a list of all the sensors you can monitor, including “GPU Load.”

You can notice the GPU Load for the dedicated graphics card ramps up to very high values when running a game.
The GPU Load will be low if a particular process does NOT use the dedicated graphics cards.
4. Physical Inspection
You can also use the good ol’ physical inspection to understand what GPU is used.
Specifically, you want to focus on hearing loud fan noise, particularly when running heavier applications like games.
You see, the dedicated graphics cards in laptops and desktops have powerful and loud fans or blowers that ramp up their speeds when running a game or a demanding task.
As such, if you hear loud fan noise from your laptop or desktop when playing a game or doing something demanding, like rendering a video, there is a high chance that your particular application will use a dedicated graphics card.
This method needs to be more conclusive but gives you a rough idea.
Why Should You Check Which GPU is Being Used?
Occasionally, you will notice a game or software performing below its optimal level despite having a reasonably powerful PC with a powerful dedicated graphics card.
This happens if the default graphics card for a particular game or software is set to the integrated graphics card.
Running a game or professional editing/designing software on an integrated graphics card can reduce performance.
Running a game on an iGPU can result in lags and stutters, while on software, this can present various issues such as higher render times on video editing software, slow timelines scrubbing, etc.
In such situations, checking what integrated GPU the game or the software uses is worthwhile.
If the application uses the integrated GPU instead of the dedicated graphics card, then one way to remedy this issue is to force the application to use the dedicated graphics card through the dedicated graphics card’s control panel.
If you have an NVIDIA graphics card, you can set an application to use a dedicated or integrated graphics card by following these steps:
- Open the NVIDIA Control Panel
- Go to “Manage 3D Settings” on the left-hand menu
- Select “Program Settings”
- In step 1, select the program you want to set the graphics card for
- In step 2, in the drop-down menu, choose a dedicated or integrated graphics processor for the selected program
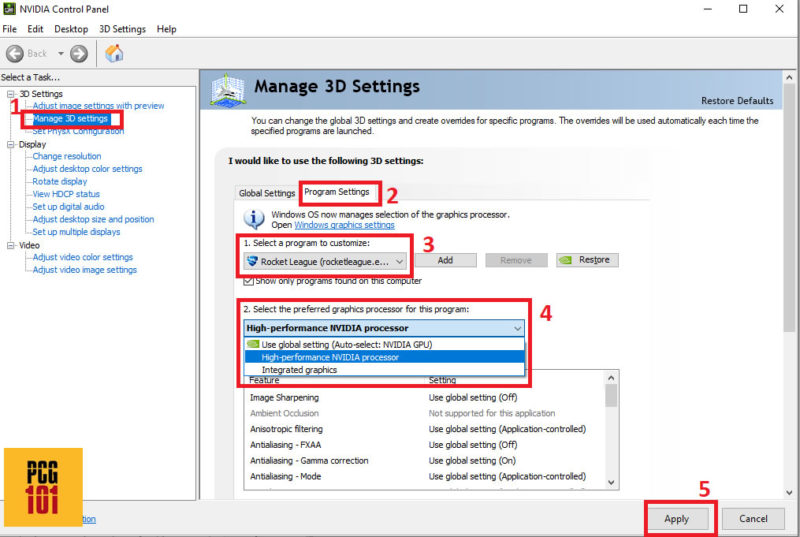
For the Rocket League program, I have set this to use a “High-Performance NVIDIA Processor,” which is the dedicated GTX 1050Ti in my case.
Note that the default setting for NVIDIA Control Panel is Auto which means that the PC decides which GPU to use for the particular applications. In most cases, you DO NOT need to set the GPU manually.
Also Read: How to Check SSD Compatibility with Your PC?
Final Words
Here I talked comprehensively about how to check which graphics card is being used using various easy-to-use methods.
It should be noted that you DO NOT want to use the dedicated graphics card for ALL applications all the time, even though it is far more powerful and better performing than the iGPU.
This is because a dedicated graphics card consumes a lot of power. Setting everything to a dedicated graphics card would raise bills and heat your PC quickly.
Frequently Asked Questions
Can I use software tools to check which graphics card is being used?
Yes, there are several software tools you can use to check which graphics card is being used on your computer. Some popular options include GPU-Z, Speccy, and HWMonitor.
How can I check which graphics card is being used on Windows operating systems?
To check which graphics card is being used on a Windows operating system, you can follow these steps:
1. Right-click on the Windows desktop and select “Display Settings”
2. Scroll down to the bottom of the Display Settings window and click on “Advanced Display Settings”
3. Under the “Display information” section, you will see the name of your graphics card listed.
Are there any hardware components that can help me check which graphics card is being used?
While there are no specific hardware components that can help you check which graphics card is being used, you can physically open up your computer and check the graphics card yourself. However, this may not be recommended unless you are experienced with computer hardware and know what you are doing. It is usually easier and safer to use software tools to check the graphics card information.
Is it possible to check which graphics card is being used on a Mac computer?
Yes, it is possible to check which graphics card is being used on a Mac computer. To do this, you can follow these steps:
1. Click on the Apple icon in the top-left corner of your screen and select “About This Mac”
2. In the Overview tab, click on “System Report”
3. In the left sidebar, click on “Graphics/Displays”
4. You will then see information about your graphics card, including the model and manufacturer.
Also Read: How to Monitor GPU and CPU Temperature While Gaming?