If you suspect that an overheating GPU or a CPU is causing the lags or stutters in your gameplay, or perhaps if you want to check the integrity of your PC’s cooling system, particularly after overclocking, then you will want to know how to monitor CPU and GPU temp while gaming.
Fortunately, monitoring the CPU and the GPU temperature while gaming is pretty simple. It is only a matter of installing a few trusted and free third-party software, namely ‘MSI Afterburner,’ ‘GPU-Z” and the ‘CPU Temp’ and configuring them with the correct settings.
MSI Afterburner is a top-rated software not just for checking the temperature but also for real-time monitoring of various elements of your CPU and GPU, including CPU and GPU usage, FPS, RAM usage, etc.
‘CPU Temp’ by ALCPU, on the other hand, is another essential tool that tells you the minimum and the maximum temperature your CPU recorded in a given time. At the same time, it shares necessary details regarding the temperature specification of your CPU, including its TJmax temperature.
And finally, GPU-Z by TechPowerUp is a tool for everything related to your graphics card, including temperature monitoring.
In the following text, I will discuss monitoring CPU and GPU temp while gaming in real-time with minimum effort.
TABLE OF CONTENTS
How to Monitor CPU and GPU Temp While Gaming?
Again, to monitor the CPU and GPU temperatures, I would recommend installing three free utilities:
- MSI Afterburner – for Both CPU and GPU
- CPU Temp – For CPU
- GPU-Z by TechPowerUp – for GPU
Video Tutorial
Watch a comprehensive tutorial on how to monitor CPU and GPU temp while gaming on PCGuide101’s official channel:
Read the tutorial in detail below:
What is MSI Afterburner?
MSI Afterburner is a utility for overclockers. However, it is also an extensive monitoring software.
The best part about this utility is that it can show the temperature of your CPU and your GPU ON-SCREEN WHILE gaming.
In addition to temperature, it can monitor a plethora of other sensors. You can check out the different detectors it can watch by visiting its settings menu. More on this is below.
Do You Need an MSI Graphics Card or a Motherboard for MSI Afterburner to Work?
Fortunately, NO. You do not need an MSI GPU or a motherboard for this free software to work.
You can use it on any PC if it has the relevant sensors (which most do).
Let us talk about how to monitor CPU and GPU temperature separately.
Also Read: What is the Difference Between System Fan and CPU Fan?
How to Monitor CPU Temp While Gaming?
Let’s first talk about how to monitor CPU temp while gaming.
You can use the MSI Afterburner to monitor the real-time or live temperature of the CPU and its cores.
Let us dive into the detail.
Step 1: Install and RUN MSI After Burner
Head over to the official site and download the software. It’s free software.
Install it and then RUN it, which should open a window similar to the one shown below:
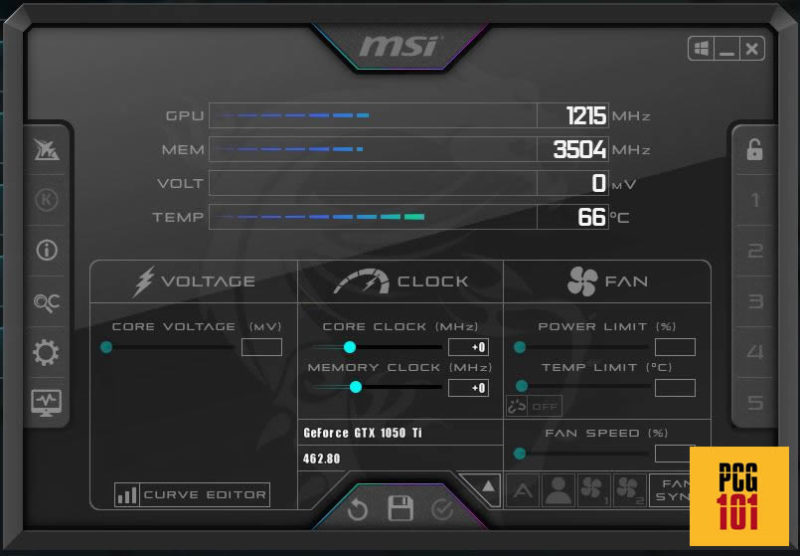
The utility on its main screen shows the details regarding your GPU (NOT the CPU). We are not interested in what the utility shows on the main screen.
Step 2: Head Over to the Setting
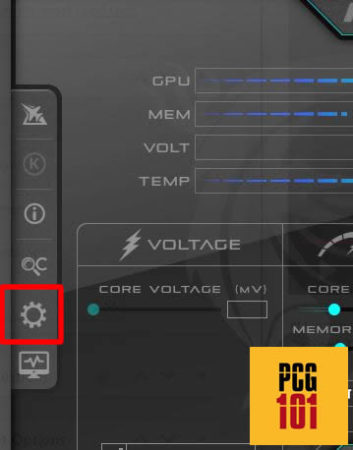
Click the “Gear” icon on the left-hand side of the screen, which should open a new window.
Step 3: Press the Monitoring Tab and Select the Right Sensors to Display On Screen
This is the most crucial step.
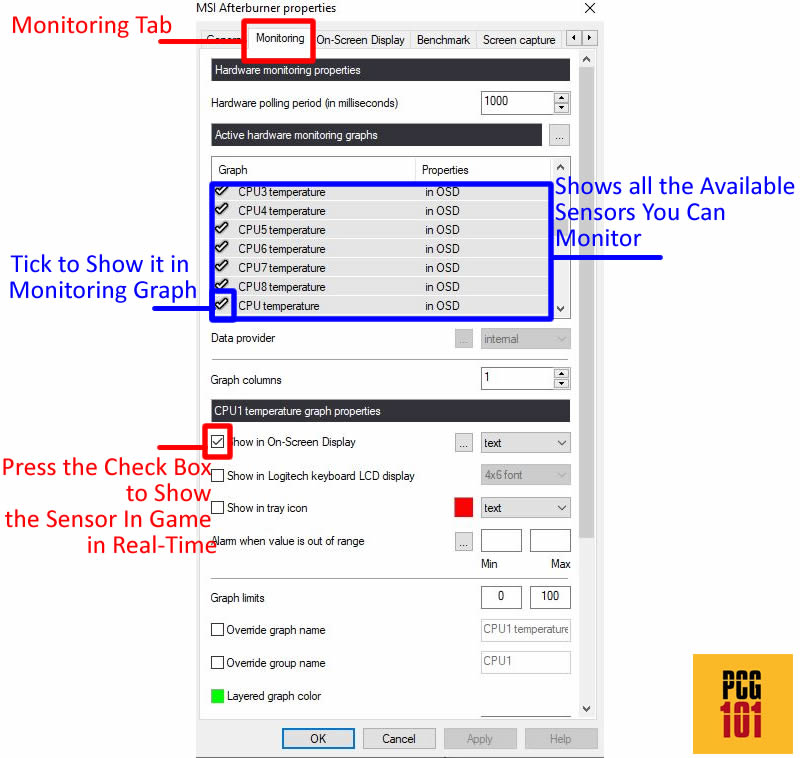
Select the “Monitoring” Tab in the open window, then pay attention to the following details.
The field that reads “Active Hardware Monitoring Graphs” shows all the sensors you can monitor on your PC.
From here, find and select all the sensors related to the “CPU Temperature,” i.e., CPU Temperature, CPU1 Temperature, CPU2 Temperature, etc.
- The CPU Temperature sensor monitors the overall temperature of your CPU
- CPU1 Temperature, CPU2 Temperature, etc., show the temperature of each THREAD your CPU has.
i. Place the Check Mark to Enable the Sensor
Once you have located all the sensors about the CPU temperature, place a Check Mark next to them on the left by pressing the Check Mark icon to enable it.
ii. Enable the Particular Sensor for On-Screen Display
This critical step will allow the sensor to show its value on-screen while gaming.
Select each of the sensors INDIVIDUALLY and press the “Show in On-Screen Display” check box in the “CPU Temperature Graph Properties.”
This will enable the sensor to display its value while you play the game.
Also Read: How to Check What Graphics Card is Being Used?
What Does the Check Mark Do?
The Check Mark on the left of each sensor serves two functions. First, it allows for that particular sensor to be enabled. Without enabling it, the sensor will not show any value.
Secondly, it allows that particular sensor to record its value in the hardware monitor graph.
You can access the graphs of the check-marked sensors by accessing the “Hardware Monitor” from the Main Screen.
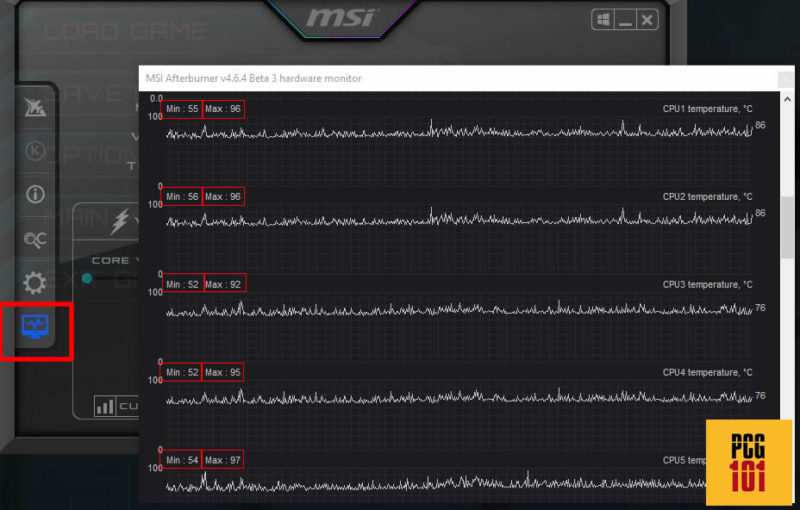
You can see the historical data of the “ticked” sensors in graph form from the Hardware Monitoring window.
The most important thing this window shows is the minimum and maximum temperature the particular CPU sensor recorded quickly.
For gamers, this is very important.
Step 4: Fire Up Your Game
Run any game.
By default, on the top left side of the screen, you should now be able to view and monitor the value of all the sensors you have selected in real-time.
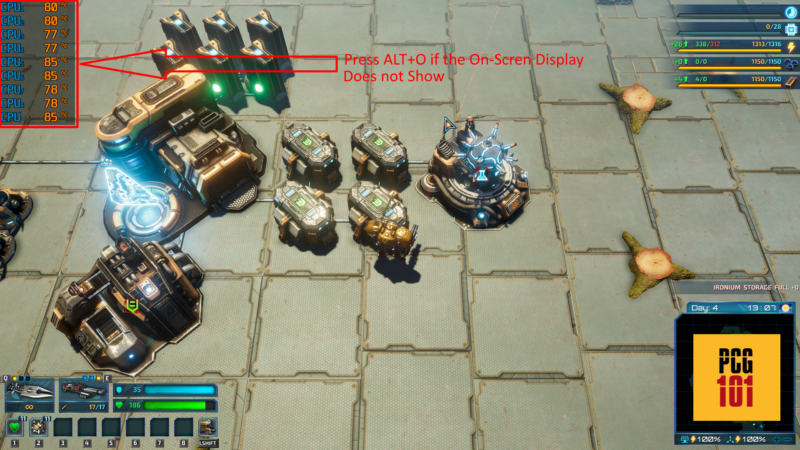
If you can’t see the On-Screen Display, press “ALT+O.”
The default toggle function for turning the On-Screen display On or Off is AlT+O”.
You can change this toggle button by going to Settings ->On-Screen Display TAB -> Toggle On-Screen Display.
Customizations: There is a plethora of Settings You Can Play Within Afterburner
There are a plethora of other sensors that you can enable, including but not limited to:
- Frame Per the Second Monitor
- CPU Usage: Overall and Per Thread
- CPU Clock: Overall and Per Thread
- RAM Usage
You can also play around with the looks of the On Screen Display. You can modify the following:
- Text Size
- Text Color
- Columns
- Name of the Sensors
and much more.
Optional Step 5: Install CPU Temp
CPU Temp is another industry standard for monitoring the temperature of your CPU.
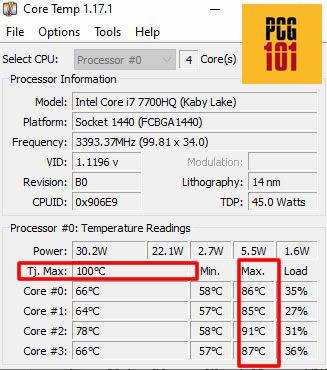
This can run in the background while you play your game.
The essential parameters it shows are the minimum and the maxim temperature your PC has recorded since the utility was run.
My old HP Omen gaming laptop’s maximum temperature is 91° C, which is considered less than optimal. So obviously, either my old laptop needs a deep cleaning, or the cooling design of HP Omen is intrinsically bad.
Another essential parameter this utility shows is your CPU’s TJMax or Thermal Junction Temperature Max.
TJMax and CPU Throttling
TJMax is the maximum temperature that a CPU can sustain before it starts to throttle or even shut down.
The CPU automatically performs thermal throttling as a fail-safe mechanism in high temperatures to save itself from burning out.
During thermal throttling, the CPU reduces its voltage and clock speed to reduce the overall power it consumes. This, in turn, results in lower heat.
The biggest issue with thermal throttling is that it can significantly lower performance, resulting in lags, stutters, and severe drops in frame rates.
Also Read in Detail: What is CPU Throttling?
How to Monitor GPU Temp While Gaming?
Let us now talk about how to monitor GPU temp while gaming.
You can use the MSI Afterburner utility to monitor the GPU Temperature as quickly as you monitor the CPU temperature.
The steps involved are identical to that with the CPU temperature above, except that you choose the relevant GPU sensors in Step 3 for On-Screen Display.
Select the GPU Temperature Sensor from Monitoring Tab
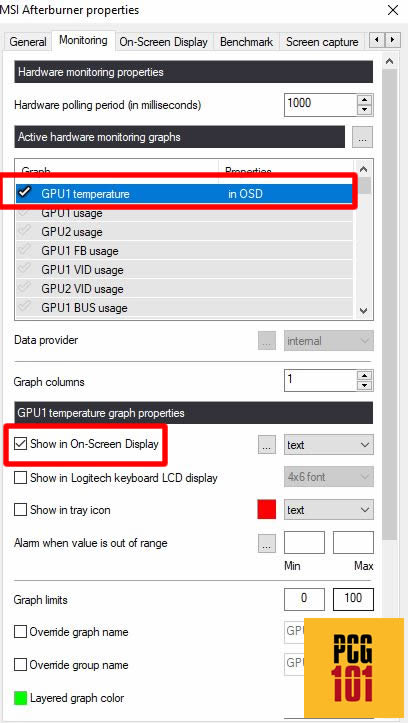
This should enable the On-Screen Display for the selected GPU
Clearing the Confusion: How to Know if GPU1 is Dedicated or Integrated – GPU1 vs. GPU2?
If you have two GPUs, i.e., an integrated and a dedicated GPU in your PC, then MSI Afterburner will show the relevant sensors simply with the prefix GPU1 and GPU2 WITHOUT telling you which is which.
For instance, the “GPU1 Temperature” sensor does not tell you whether GPU1 relates to the dedicated or the integrated graphics.
So to find this out, head over to the “General” tab of the settings window and read the drop-down menu under the “Master Graphics Processor Selection.”
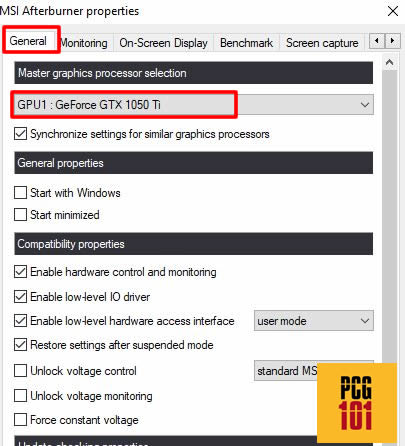
Here it should clarify what GPU1, GPU2, and so on relate to. In my PC, GPU1 relates to the dedicated NVIDIA GTX 1050Ti.
On my PC, MSI AfterBurner does not show the temperature sensor for the iGPU.
Optional Using GPU-Z – Sometimes MSI Afterburner Does not Show Sensor for iGPU
Another top-rated software for all things GPU is GPU-Z by TechPowerUp.
This can help in covering up the shortcomings of MSI Afterburner.
As mentioned. Sometimes, MSI Afterburner does not show the Temperature sensor of the iGPU. Therefore, to monitor the temperature of your iGPU, you can use GPU-Z.
Unfortunately, GPU-Z only works in the background and does not show value On-Screen while gaming.
Also Read: How to Check What Integrated Graphics Do I Have?
Step 1: Install and Run GPU-Z
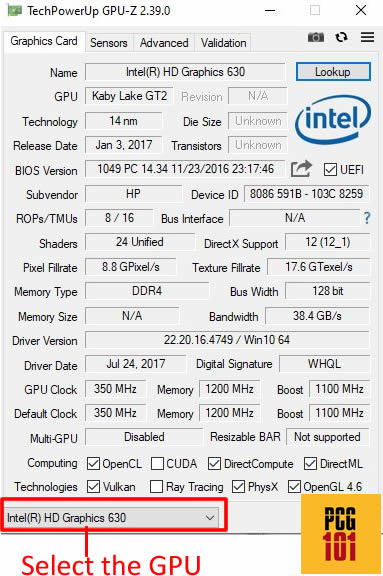
Install and RUN GPU-Z.
From the window that opens, select the proper GPU from the drop-down menu on the bottom left of the window IF you have two graphics cards.
I have selected my iGPU, i.e., Intel HD Graphics 630, from the Drop Down Menu.
Step 2: Go to Sensors Tab
Next, Go to the Sensors Tab.
There you will find a multitude of sensors that you can monitor for the selected GPU, including its temperature.
Pay attention to the GPU Temperature drop-down menu. There you can select the value you want to monitor, i.e., the current temperature reading, lower, highest, and average temperature reading.
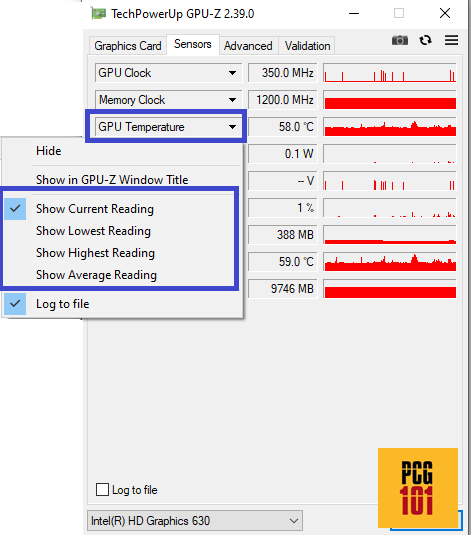
Again, the drawback of GPU-Z is that it will not show the temperatures ON SCREEN while gaming. It only runs in the background.
However, if MSI Afterburner fails to show the temperature sensor for your GPU (particularly for your iGPU), you can use the GPU-Z as a last resort to get an insight.
Final Words
Here I talked in detail about monitoring CPU and GPU temp while gaming. I talked about how you can use MSI Afterburner for this purpose.
MSI Afterburner is the industry standard for monitoring your PC systems and the gaming frame rate.
But if you have recently overclocked your CPU or your GPU, I recommend installing the CPU Temp and the GPU-Z to get a greater insight into your CPU or your GPU.
frequently asked questions
1. Can I monitor CPU and GPU temperature using in-game overlays?
Yes, many popular gaming overlays such as MSI Afterburner and NZXT CAM provide the ability to monitor CPU and GPU temperature in real-time while gaming. These overlays can display the temperature readings as an overlay on your game screen or as a separate window. You can also monitor CPU and GPU temperature on MacBooks using overlay aplications.
2. What are the ideal temperature ranges for CPUs and GPUs during gaming?
The ideal temperature ranges for CPUs and GPUs during gaming can vary depending on the specific hardware, but generally, temperatures should be below 80-85°C for both. It’s best to consult your hardware manufacturer’s specifications to determine the safe temperature ranges for your specific CPU and GPU.
3. Can I use third-party hardware to monitor CPU and GPU temperature while gaming?
Yes, there are many third-party hardware solutions available for monitoring CPU and GPU temperature while gaming. These can include standalone temperature monitors or integrated monitoring software on gaming peripherals such as keyboards and mice.
4. Can I adjust fan speeds or other settings to lower CPU and GPU temperatures while gaming?
Yes, many hardware manufacturers provide software tools to adjust fan speeds and other settings to help lower CPU and GPU temperatures while gaming.
These tools can allow you to adjust fan speeds manually or set up custom fan profiles to automatically adjust fan speeds based on temperature readings.
Additionally, lowering in-game graphics settings or reducing the overclock on your hardware can also help to lower temperatures while gaming.
